作者:JianLee 链接:https://www.jianshu.com/p/868c8536a9b2 Flutter_FFmpeg是什么? ffmpeg是一个音视频处理库,通过命令行的形式,
作者:JianLee 链接:https://www.jianshu.com/p/868c8536a9b2
ffmpeg是一个音视频处理库,通过命令行的形式,对音视频进行处理,而MobileFFmpeg
则是ffmpeg在移动端的实现,flutter_ffmpeg是对MobileFFmpeg的封装,是的在flutter下能够轻松的使用ffmpeg对音视频进行处理。flutter_ffmpeg包括两部分FFmpeg和FFprobe,其中FFmpeg负责音视频处理,而FFprobe主要负责查询音视频的媒体信息。
// 在pubspec.yaml的dependencies下添加: flutter_ffmpeg: ^0.3.1Android工程下的配置
// 在工程目录下的 /android/build.gradle下添加ext { flutterFFmpegPackage = "full-lts" }注意:上面配置中的”full-lts” 是flutter__ffmpeg各个发布版本的报名,可以查看官方文档的说明。有一个值得说明的地方是,flutter_ffmpeg有中发行包,一种是 Main Release,一种是LTS Release 发行包,而他们两者支持的 Android api Level/iOS SDK和硬件架构是不一样的,总的来说,LTS版本支持的更广泛,LTS支持度大于MAIN,所以我们最好使用LTS版本。
这里我遇到一个问题,使用full-lts编码格式,会出现上传到服务器无法播放视频的情况。
所以我这里是用的:
ext { flutterFFmpegPackage = "full-gpl-lts"}另外在使用flutter_ffmpeg的时候出现类似问题:
Caused by: java.lang.UnsatisfiedLinkError: dalvik.system.PathClassLoader[DexPathList[[zip file "/data/app/app.domain.name-Lq_GxP1CfMArHTpLoII-YA==/base.apk"],nativeLibraryDirectories=[/data/app/app.domain.name-Lq_GxP1CfMArHTpLoII-YA==/lib/arm64, /data/app/app.domain.name-Lq_GxP1CfMArHTpLoII-YA==/base.apk!/lib/arm64-v8a, /system/lib64, /system/vendor/lib64]]] couldn't find "libmobileffmpeg_abidetect.so" at java.lang.Runtime.loadLibrary0(Runtime.java:1011) at java.lang.System.loadLibrary(System.java:1657) at com.arthenica.mobileffmpeg.AbiDetect.<clinit>(Unknown Source:13) at com.arthenica.mobileffmpeg.AbiDetect.getNativeAbi(Native Method) at com.arthenica.mobileffmpeg.Config.<clinit>(Unknown Source:96) at com.arthenica.mobileffmpeg.Config.nativeFFmpegExecute(Native Method) at com.arthenica.mobileffmpeg.b.a(Unknown Source:0) at d.b.a.a.a.a(Unknown Source:31) at d.b.a.a.a.doInBackground(Unknown Source:2) at android.os.AsyncTask$2.call(AsyncTask.java:333) at java.util.concurrent.FutureTask.run(FutureTask.java:266) at android.os.AsyncTask$SerialExecutor$1.run(AsyncTask.java:245) at java.util.concurrent.ThreadPoolExecutor.runWorker(ThreadPoolExecutor.java:1162) at java.util.concurrent.ThreadPoolExecutor$Worker.run(ThreadPoolExecutor.java:636) at java.lang.Thread.run(Thread.java:764) 通过clean可以解决
flutter cleanflutter build [artificat]使用gpl保证裁剪视频默认使用x264(不然会出现上传视频无法播放的问题),具体可以查看flutter_ffmpeg封装编码
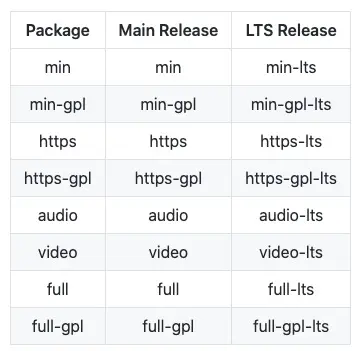
image.png
flutter_ffmpge是ffmpeg在flutter上的一个实现,ffmpeg是通过命令行还进行音视频编辑的工具,因此我们使用fluter_ffmpeg自然也是运行一些命令来实现我们的功能。具体使用方法可以直接看ffluter_ffmpeg官方文档和ffmpeg官方文档,或者看一下更加通俗易懂的阮一峰文档。接下来我们主要看看flutter_ffmpeg能干什么?
做音视频处理,首先我们肯定想知道我们的处理是否成功,或者效果好不好,那么我们只能通过处理的视频前后的参数进行对比,因此第一步我们要求这个视频处理库详细的给我们提供音视频的信息,flutter_ffmpeg的FFProde能够很好的实现这一点,而且使用很方便:
final FlutterFFprobe _flutterFFprobe = new FlutterFFprobe();_flutterFFprobe.getMediaInfORMation("" ).then((info) { print("Media Information"); print("Path: ${info.getMediaProperties()['filename']}"); print("Format: ${info.getMediaProperties()['format_name']}"); print("Duration: ${info.getMediaProperties()['duration']}"); print("Start time: ${info.getMediaProperties()['start_time']}"); print("Bitrate: ${info.getMediaProperties()['bit_rate']}"); Map<dynamic, dynamic> tags = info.getMediaProperties()['tags']; if (tags != null) { tags.forEach((key, value) { print("Tag: " + key + ":" + value + "\n"); }); } if (info.getStreams() != null) { List<StreamInformation> streams = info.getStreams(); if (streams.length > 0) { for (var stream in streams) { print("Stream id: ${stream.getAllProperties()['index']}"); print("Stream type: ${stream.getAllProperties()['codec_type']}"); print("Stream codec: ${stream.getAllProperties()['codec_name']}"); print("Stream full codec: ${stream.getAllProperties()['codec_long_name']}"); print("Stream format: ${stream.getAllProperties()['pix_fmt']}"); print("Stream width: ${stream.getAllProperties()['width']}"); print("Stream height: ${stream.getAllProperties()['height']}"); print("Stream bitrate: ${stream.getAllProperties()['bit_rate']}"); print("Stream sample rate: ${stream.getAllProperties()['sample_rate']}"); print("Stream sample format: ${stream.getAllProperties()['sample_fmt']}"); print("Stream channel layout: ${stream.getAllProperties()['channel_layout']}"); print("Stream sar: ${stream.getAllProperties()['sample_aspect_ratio']}"); print("Stream dar: ${stream.getAllProperties()['display_aspect_ratio']}"); print("Stream average frame rate: ${stream.getAllProperties()['avg_frame_rate']}"); print("Stream real frame rate: ${stream.getAllProperties()['r_frame_rate']}"); print("Stream time base: ${stream.getAllProperties()['time_base']}"); print("Stream codec time base: ${stream.getAllProperties()['codec_time_base']}"); Map<dynamic, dynamic> tags = stream.getAllProperties()['tags']; if (tags != null) { tags.forEach((key, value) { print("Stream tag: " + key + ":" + value + "\n"); }); } } } }});ffmpeg -i Desktop/吉他.mp4 -r 20 Desktop/output1.mp4-r 20:表示帧率设置为 20fps
ffmpeg -i Desktop/吉他.mp4 -fs 15MB Desktop/output1.mp4fs 20 : 表示文件大小最大值为15MB
把视频截了一部分 — 这种方法不推荐
ffmpeg -i Desktop/1.mov -s vga Desktop/1.mp4-s vga : 指定分辨率, vga 代表 600*480,也可以换成其他的值
ffmpeg -i Desktop/1.mov -b:v 1.5M Desktop/1.mp4-b:v 1.5M : 指定码率
-b:v :指定视频的码率
-b:a : 指定音频的码率
1.5M:码率的值 1.5M 表示 1.5Mb/s
比如我在项目里用到上传到服务器的视频时长需要控制在60s以内的功能,我们就可以这样:
String inputFilePath = inputFile.path; String outputFilePath = await FileUtils.outputFileNameStr(inputFile); var ffmpeg = new FlutterFFmpeg(); ffmpeg .execute("-i $inputFilePath -ss 0 -to 60 -c:v libx264 $outputFilePath")//这里是ffmpeg指令 裁剪60s视频 .then((rc) async { if (rc == 0) { //rc=0表示成功 //裁剪60s 转换 libx264 } else { showToast('视频裁剪出现异常,请重试', context); Navigator.pop(context); } });var ffmpeg = new FlutterFFmpeg(); Directory tempDir = await getTemporaryDirectory();; var tmpVideo = tempDir.path + '/1.WEBm'; var cmd = '-i ${widget.tmpPath} $tmpVideo'; print('命令是:'+cmd); ffmpeg.execute(cmd).then((rc) { print("处理的结果是:$rc"); if(rc == 0) { initController(tmpVideo); //使用临时地址可以播放 } else { print('处理失败'); } });从n开始,裁剪m秒长度的视频
// 从10s开始裁剪连续5s 也就是10-15s的视频ffmpeg -i input.mp4 -ss 10 -t 5 output.mp4从n秒开始,裁剪到m秒的视频
// 从10s开始,裁剪到20秒ffmpeg -i input.mp4 -ss 10 -to 20 output.mp4https://www.cnblogs.com/tocy/p/ffmpeg-filter-intro.html
ffmpeg -i 1.mp4 -i douyin.mp4 -filter_complex " blend=all_mode='overlay':all_opacity=0.2" blend.mp4ffmpeg -i douyin.mp4 -vf "crop=100:100" crop.mp4// red@0.5 50%的透明度红色// t=1 线条的粗细 默认3 fill的话 自动填充ffmpeg -i input.mp4 -vf "drawbox=10:10:30:30:red@0.5:t=1" output.mp4ffmpeg -i input.mp4 -vf "drawbox=x=10:y=10:width=30:height=30color=red@0.5:t=1" output.mp4画尺寸是20*20的网格ffmpeg -i 1.mp4 -vf "drawgrid=width=20:height=20:color=red" output.mp4画2*2的网格ffmpeg -i 1.mp4 -vf "drawgrid=width=iw/2:height=ih/2:color=red:t=1:color=blue@0.5" output.mp4ffmpeg -i 99.mp4 -vf "drawtext=fontsize=32:fontcolor=red:text='hello world':alpha=0.8" font.mp4//前五秒显示 // gte(t\,5) 大于等于5秒// between(t\,5\,10)5到10秒// lt(t\, 5)小于5秒ffmpeg -i 99.mp4 -vf "drawtext=fontsize=32:fontcolor=red:text='hello world':enable='lt(t\,5)' " font.mp4//水平居中 (w-text_w)/2//垂直居中 (h-text_h)/2ffmpeg -i 99.mp4 -vf "drawtext=fontsize=32:fontcolor=#cccccc:text='hello world':x=(w-text_w)/2" font2.mp4//向右对齐 ffmpeg -i 99.mp4 -vf "drawtext=fontsize=32:fontcolor=#cccccc:text='hello world':x=(w-text_w)" font2.mp4// 水平垂直居中ffmpeg -i 99.mp4 -vf "drawtext=fontsize=32:fontcolor=#cccccc:text='hello world':x=(w-text_w)/2:y=(h-text_h)/2" font2.mp4// 滚动文本ffmpeg -i 99.mp4 -vf "drawtext=fontsize=32:fontcolor=#cccccc:text='hello world':x=(w-50*t)" font2.mp4// contrast 对比度 -1000-1000// brightness 亮度 -1.0-1.0// saturation 饱和度 0.0-3.0ffmpeg -i 1.mp4 -vf "eq=saturation=3:brightness=0.3:contrast=1000" output.mp4// 从第0帧开始到30帧淡入ffmpeg -i 1.mp4 -vf "fade=t=in:s=0:n=30" output.mp4// 从10秒开始淡出5秒ffmpeg -i 1.mp4 -vf "fade=t=out:st=10:d=5" output.mp4ffmpeg -i 1.mp4 -vf "fps=fps=24" output.mp4ffmpeg -i 1.mp4 -vf "hflip" output.mp4ffmpeg -i input.mp4 -vf "reverse" output.mp4旋转45度ffmpeg -i input.mp4 -vf "rotate=PI/4"转圈圈ffplay -i 99.mp4 -vf "rotate=n*PI/3:c=red"调整输出尺寸 修改输出宽度等于输入宽度的对角线ffplay -i 99.mp4 -vf "rotate=n*PI/3:ow=hypot(iw, ih):oh=ow"ffplay -i 99.mp4 -vf "scale=100x100"ffplay -i 99.mp4 -vf "scale=w=0.8*iw:h=0.8*ih"// 宽度为100,iw较小的值 高度等比例缩小ffplay -i 99.mp4 -vf "scale=w=min(100\,iw):h=-1"// 视频的尺寸要一样大 如果不一样大的话 可以使用pad补边界 ffmpeg -i 1.mp4 -i douyin.mp4 -i 3.1.mp4 -filter_complex "[0:v:0][0:a:0][1:v:0][1:a:0][2:v:0][2:a:0]concat=n=3:v=1:a=1[ov][oa]" -map "[ov]" -map "[oa]" -vsync 2 output.mp4// 图片和视频合并 需要调整视频图片的尺寸和视频一样ffmpeg -loop 1 -framerate 25 -t 5 -i loGo.png -i 3.mp4 -filter_complex "[0]scale=1280x720[01];[01][1:v:0]concat=n=2:v=1[ov]" -map "[ov]" 33.mp4ffmpeg -loop 1 -framerate 25 -t 5 -i logo.png -i 3.mp4 -filter_complex "[0]pad=w=1280:h=720:w=(1280-iw)/2:y=(720-ih)/2[01];[01][1:v:0]concat=n=2:v=1[ov]" -map "[ov]" 33.mp4ffmpeg -loop 1 -framerate 29.42 -t 10 -i 1.s.jpg -i 1.mp4 -filter_complex "[0]scale=480:480, setsar=1[im];[1]scale=480:480, setsar=1[iv];[im][1:a][iv][1:a]concat=n=2:v=1:a=1[outv][outa]" -map "[outa]" -map "[outv]" output.mp4// 图片生成视频ffmpeg -f lavfi -t 10 -i anullsrc -loop 1 -framerate 10 -t 5 -i 1.jpg -vf "scale=664x478" -pix_fmt yuv420p output.mp4// 添加第三条音频 ffmpeg -i im.mp4 -i douyin.mp4 -i 1.mp3 -filter_complex "[0]scale=544x960,setsar=1[iv];[1]setsar=1[dv];[iv][0:a:0][dv][1:a:0]concat=n=2:v=1:a=1[ov][oa]" -map "[ov]" -map "[oa]" -map 2:a:0 -vsync 2 output.mp4ffmpeg -i im.mp4 -i douyin.mp4 -i 1.mp3 -filter_complex "[0]scale=544x960,setsar=1[iv];[1]setsar=1[dv];[iv][0:a:0][dv][1:a:0]concat=n=2:v=1:a=1[ov][oa];[2:a:0][oa]amix=inputs=2:duration=first:dropout_transition=3[aa]" -map "[ov]" -map "[aa]" -vsync 2 output.mp4// 三秒一张 fps=1/3 ffmpeg -i input.mp4 -vf "fps=1/3, scale=128:72" output_%d.jpg >>> 音视频开发 视频教程: https://ke.qq.com/course/3202131?flowToken=1031864 >>> 音视频开发学习资料、教学视频,免费分享有需要的可以自行添加学习交流群 739729163 领取来源地址:https://blog.csdn.net/weixin_52622200/article/details/131537307
--结束END--
本文标题: 【FFmpeg实战】Flutter音视频裁剪
本文链接: https://www.lsjlt.com/news/440199.html(转载时请注明来源链接)
有问题或投稿请发送至: 邮箱/279061341@qq.com QQ/279061341
下载Word文档到电脑,方便收藏和打印~
2024-01-21
2023-10-28
2023-10-28
2023-10-27
2023-10-27
2023-10-27
2023-10-27
回答
回答
回答
回答
回答
回答
回答
回答
回答
回答


官方手机版

微信公众号

商务合作


0