这篇文章主要介绍了Mycat中间件如何实现Mysql数据分片,具有一定借鉴价值,感兴趣的朋友可以参考下,希望大家阅读完这篇文章之后大有收获,下面让小编带着大家一起了解一下。架构图:机器规划:IP地址主机名角
这篇文章主要介绍了Mycat中间件如何实现Mysql数据分片,具有一定借鉴价值,感兴趣的朋友可以参考下,希望大家阅读完这篇文章之后大有收获,下面让小编带着大家一起了解一下。
架构图:
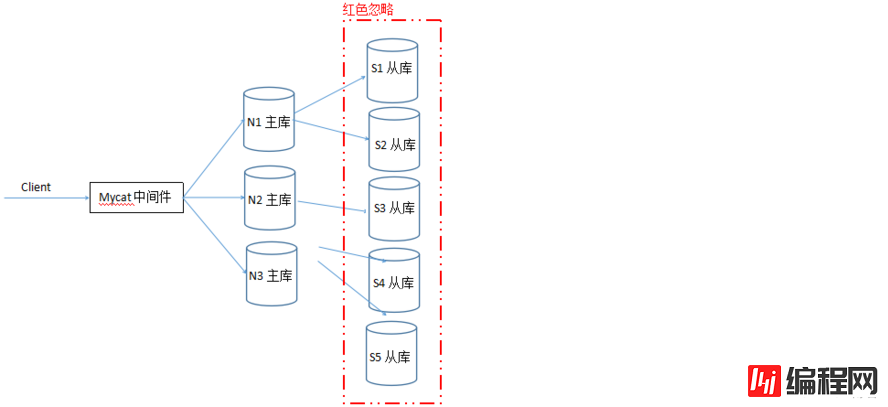
机器规划:
| IP地址 | 主机名 | 角色 | 备注 |
| 10.4.132.50 | k8s01 | mycat,master | |
| 10.4.132.42 | k8s02 | master | |
| 10.4.132.66 | k8s03 | master |
Mycat下载地址:Http://dl.mycat.io/1.6.7.3/20190828135747/Mycat-server-1.6.7.3-release-20190828135747-linux.tar.gz
mysql下载地址:
http://mirrors.163.com/mysql/Downloads/MySQL-5.7/mysql-5.7.27-linux-glibc2.12-x86_64.tar.gz
1.下载安装Mysql(三台Mysql都需要安装)
[root@k8s01 soft]# wget http://mirrors.163.com/mysql/Downloads/MySQL-5.7/mysql-5.7.27-linux-glibc2.12-x86_64.tar.gz
[root@k8s01 soft]# tar xvf mysql-5.7.27-linux-glibc2.12-x86_64.tar.gz -C /usr/local/
[root@k8s01 soft]# cd /usr/local/
[root@k8s01 local]# mv mysql-5.7.27-linux-glibc2.12-x86_64/ mysql-5.7.27
[root@k8s01 local]# chown -R root:root mysql-5.7.27/
[root@k8s01 local]# cd mysql-5.7.27/
[root@k8s01 mysql-5.7.27]# mkdir data
[root@k8s01 mysql-5.7.27]# useradd -r -M -s /bin/nologin mysql
[root@k8s01 mysql-5.7.27]# chown -R mysql:mysql data/
[root@k8s01 mysql-5.7.27]# ./bin/mysqld --initialize --user=mysql --basedir=/usr/local/mysql-5.7.27 --datadir=/usr/local/mysql-5.7.27/data
2019-11-02T04:24:41.908404Z 0 [Warning] TIMESTAMP with implicit DEFAULT value is deprecated. Please use --explicit_defaults_for_timestamp server option (see documentation for more details).
2019-11-02T04:24:46.687678Z 0 [Warning] InnoDB: New log files created, LSN=45790
2019-11-02T04:24:47.428823Z 0 [Warning] InnoDB: Creating foreign key constraint system tables.
2019-11-02T04:24:47.487404Z 0 [Warning] No existing UUID has been found, so we assume that this is the first time that this server has been started. Generating a new UUID: b42cef88-fd28-11e9-a5cc-000c29ee86d5.
2019-11-02T04:24:47.488204Z 0 [Warning] Gtid table is not ready to be used. Table 'mysql.gtid_executed' cannot be opened.
2019-11-02T04:24:47.612739Z 1 [Note] A temporary passWord is generated for root@localhost: 3m;5yQ_7T#jc --登陆密码
[root@k8s01 mysql-5.7.27]# cp -a support-files/mysql.server /etc/init.d/mysqld
[root@k8s01 mysql-5.7.27]# chkconfig --add mysqld
[root@k8s01 mysql-5.7.27]# chkconfig mysqld on
[root@k8s01 mysql-5.7.27]# vim /etc/init.d/mysqld
basedir=/usr/local/mysql-5.7.27
datadir=/usr/local/mysql-5.7.27/data
[root@k8s01 mysql-5.7.27]# vim /etc/my.cnf
[mysqld]
basedir=/usr/local/mysql-5.7.27
datadir=/usr/local/mysql-5.7.27/data
Socket=/tmp/mysql.sock
symbolic-links=0
server_id=10
binlog_fORMat=ROW
max_binlog_size=2G
sync_binlog=1
binlog_cache_size=64M
log_bin=bin-log
log_bin_index=bin-index
[mysqld_safe]
log-error=/usr/local/mysql-5.7.27/data/mariadb.log
pid-file=/usr/local/mysql-5.7.27/data/mariadb.pid
[root@k8s01 mysql-5.7.27]# /etc/init.d/mysqld restart
ERROR! MySQL Server PID file could not be found!
Starting MySQL.Logging to '/usr/local/mysql-5.7.27/data/mariadb.log'.
... SUCCESS!
[root@k8s01 mysql-5.7.27]# vim /etc/profile
export PATH=$PATH:/usr/local/mysql-5.7.27/bin
[root@k8s01 mysql-5.7.27]# mysql -u root -p
Enter password:
Welcome to the MySQL monitor. Commands end with ; or \g.
Your MySQL connection id is 3
Server version: 5.7.27
Copyright (c) 2000, 2019, oracle and/or its affiliates. All rights reserved.
Oracle is a reGIStered trademark of Oracle Corporation and/or its
affiliates. Other names may be trademarks of their respectiveowners.
Type 'help;' or '\h' for help. Type '\c' to clear the current input statement.
mysql> set password=password('System135');
Query OK, 0 rows affected, 1 warning (0.00 sec)
mysql> flush privileges;
Query OK, 0 rows affected (0.00 sec)
mysql> exit
Bye
[root@k8s01 mysql-5.7.27]# mysql -u root -pSystem135
mysql: [Warning] Using a password on the command line interface can be insecure.
Welcome to the MySQL monitor. Commands end with ; or \g.
Your MySQL connection id is 6
Server version: 5.7.27 MySQL CommUnity Server (GPL)
Copyright (c) 2000, 2019, Oracle and/or its affiliates. All rights reserved.
Oracle is a registered trademark of Oracle Corporation and/or its
affiliates. Other names may be trademarks of their respective owners.
Type 'help;' or '\h' for help. Type '\c' to clear the current input statement.
mysql> grant all privileges on *.* to repl@'%' identified by '123456';
Query OK, 0 rows affected, 1 warning (0.00 sec)
mysql> flush privileges;
Query OK, 0 rows affected (0.00 sec)
mysql>
2.下载安装Mycat
[root@k8s01 soft]# rpm -ivh jdk-8u221-linux-x64.rpm
warning: jdk-8u221-linux-x64.rpm: Header V3 RSA/SHA256 Signature, key ID ec551f03: NOKEY
Preparing... ################################# [100%]
Updating / installing...
1:jdk1.8-2000:1.8.0_221-fcs ################################# [100%]
Unpacking jar files...
tools.jar...
plugin.jar...
javaws.jar...
deploy.jar...
rt.jar...
jsse.jar...
charsets.jar...
localedata.jar...
[root@k8s01 soft]# tar xvf Mycat-server-1.6.7.3-release-20190828135747-linux.tar.gz -C /usr/local/
[root@k8s01 soft]# cd /usr/local/mycat/conf/
[root@k8s01 conf]#
3.数据按范围分片
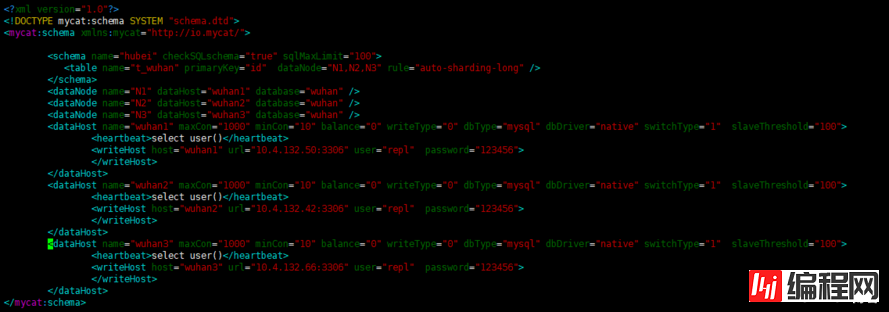
[root@k8s01 conf]# vim schema.xml
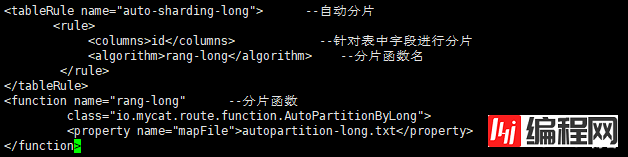
[root@k8s01 conf]# vim rule.xml --其它不要动,只修改以下内容
[root@k8s01 conf]# vim autopartition-long.txt
# range start-end ,data node index
# K=1000,M=10000. --K表示1千,M表示1万
0-5=0 --从0到5放到第一个节点
5-10=1 --从6到10放到第二个节点
10-15=2 --从11到15放到第三个节点
[root@k8s01 conf]# vim server.xml --Mycat登陆用户名和密码

[root@k8s01 conf]# ../bin/mycat restart
Stopping Mycat-server...
Stopped Mycat-server.
Starting Mycat-server...
[root@k8s01 conf]# netstat -antulp | grep 8066
tcp6 0 0 :::8066 :::* LISTEN 46762/java
[root@k8s01 conf]# netstat -antulp | grep 9066
tcp6 0 0 :::9066 :::* LISTEN 46762/java
[root@k8s01 conf]#
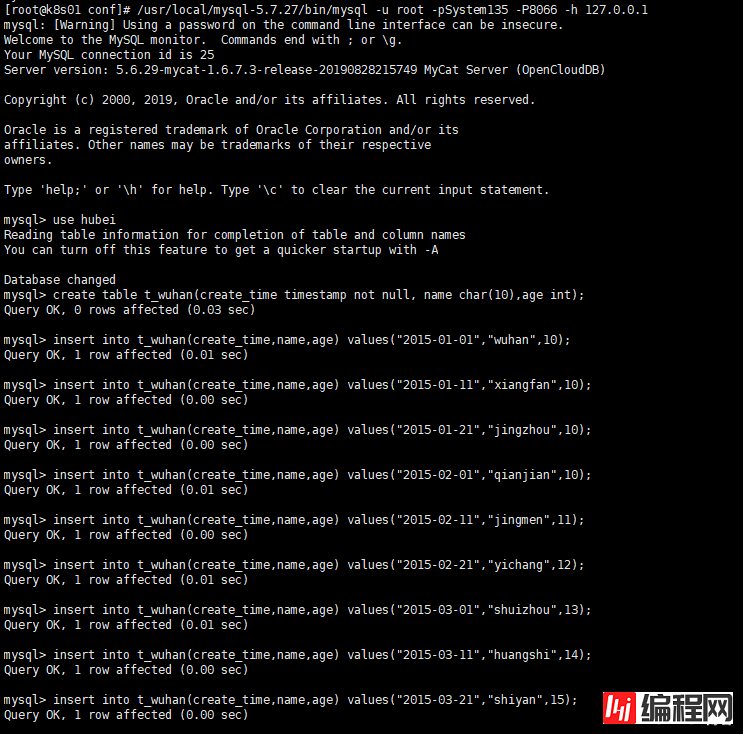
4.验证数据分片后存放
[root@k8s01 conf]# /usr/local/mysql-5.7.27/bin/mysql -u root -pSystem135 -P8066 -h 127.0.0.1 --登陆Mycat数据数据
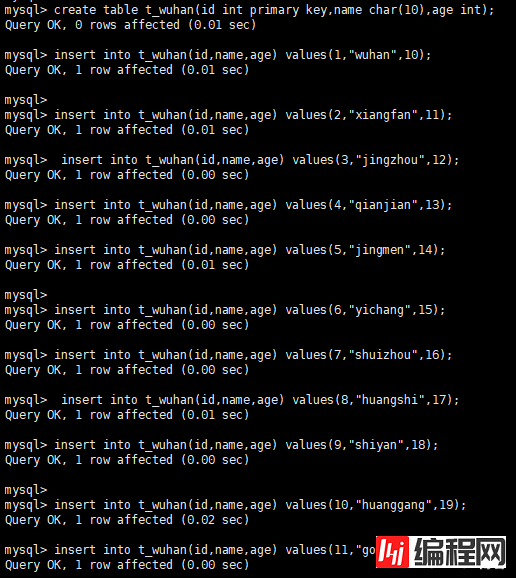
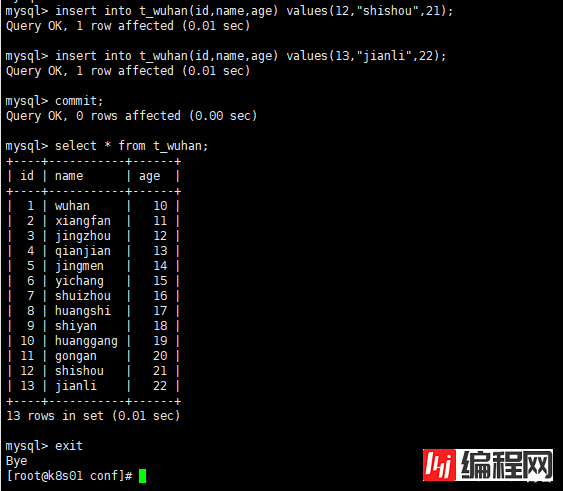
查询写入后的数据:
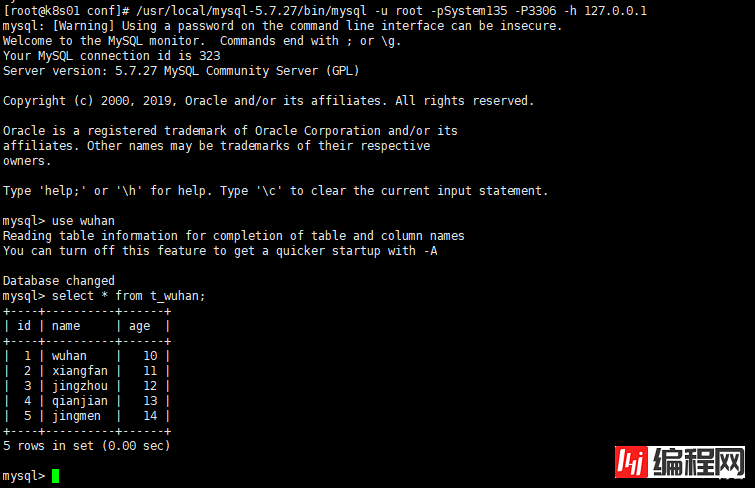
k8s01节点验证数据:
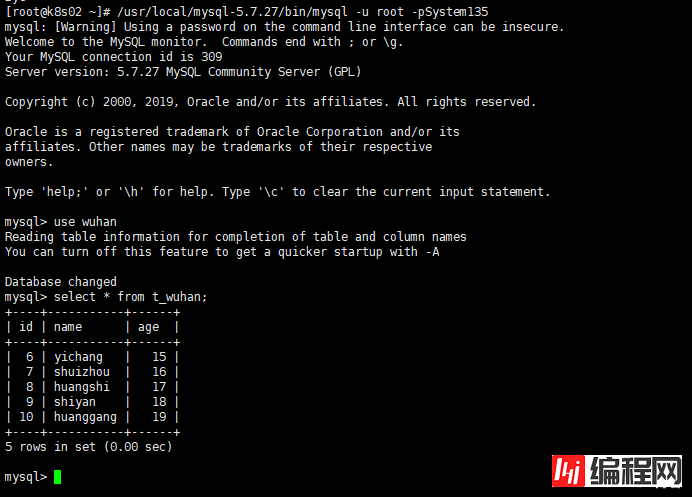
k8s02节点验证数据:
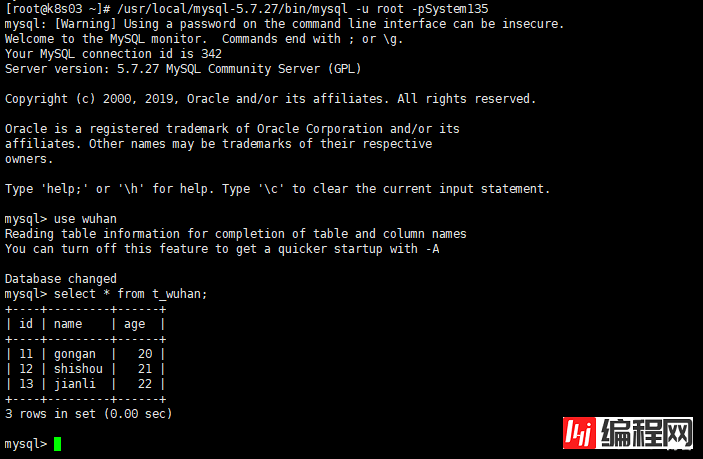
k8s03节点验证数据:
5.数据按日期(月份)分片
[root@k8s01 conf]# vim schema.xml
 [root@k8s01 conf]# vim rule.xml
[root@k8s01 conf]# ../bin/mycat restart
Stopping Mycat-server...
Stopped Mycat-server.
Starting Mycat-server...
[root@k8s01 conf]# !net
netstat -antulp | grep 9066
tcp6 0 0 :::9066 :::* LISTEN 69040/java
[root@k8s01 conf]# netstat -antulp | grep 8066
tcp6 0 0 :::8066 :::* LISTEN 69040/java
[root@k8s01 conf]#
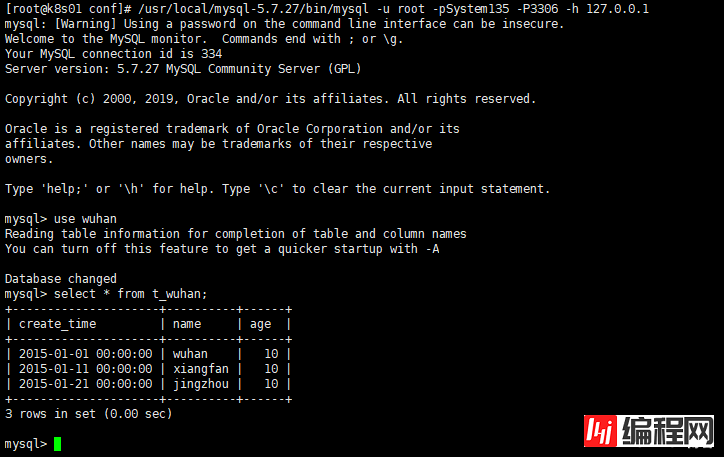
6.验证数据分片后存放
验证数据:
k8s01节点:
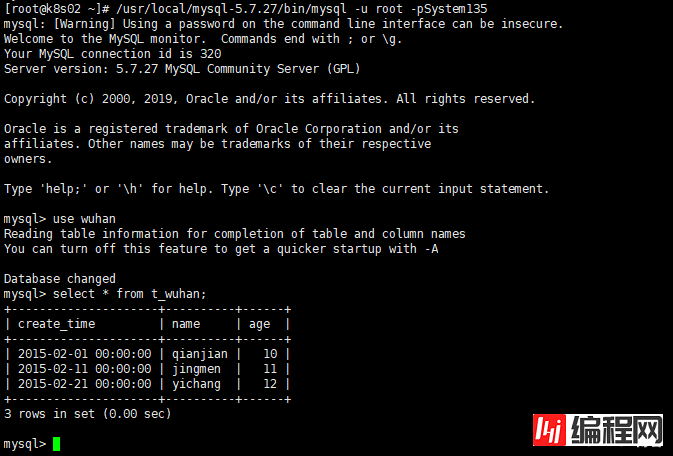
k8s02节点:
k8s03节点:

错误处理:
mysql> insert into t_wuhan(create_time,name,age) values("2015-04-01","huanggang",16);
ERROR 1064 (HY000): Can't find a valid data node for specified node index :T_WUHAN -> CREATE_TIME -> 2015-04-01 -> Index : 3
解决方法:
写入4月份数据时会提示找不到节点,是因为有几个节点就会写入几月份数据,比如我只有3个node节点,只能写入1-3月份数据。
7.数据按枚举分片
[root@k8s01 conf]# vim schema.xml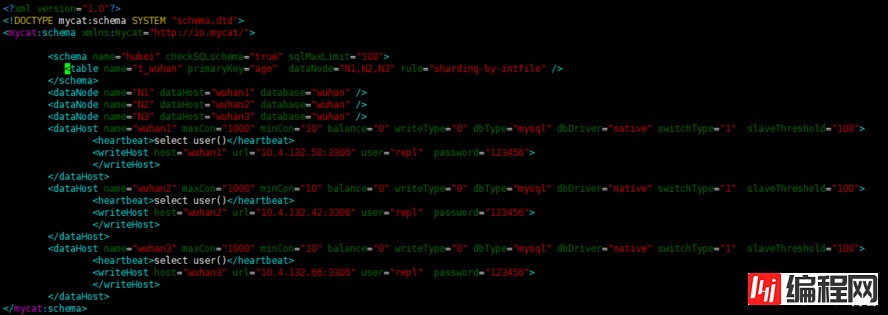 [root@k8s01 conf]# vim rule.xml
[root@k8s01 conf]# cat partition-hash-int.txt --可以写多个枚举
学生=0
老师=1
DEFAULT_NODE=2
[root@k8s01 conf]#
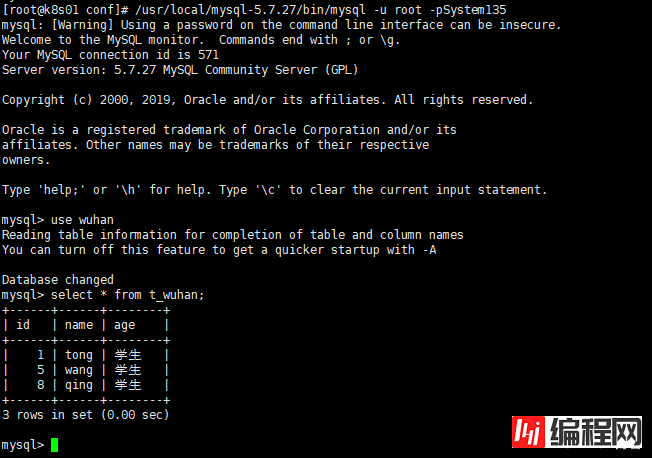
8.验证数据分片后存放
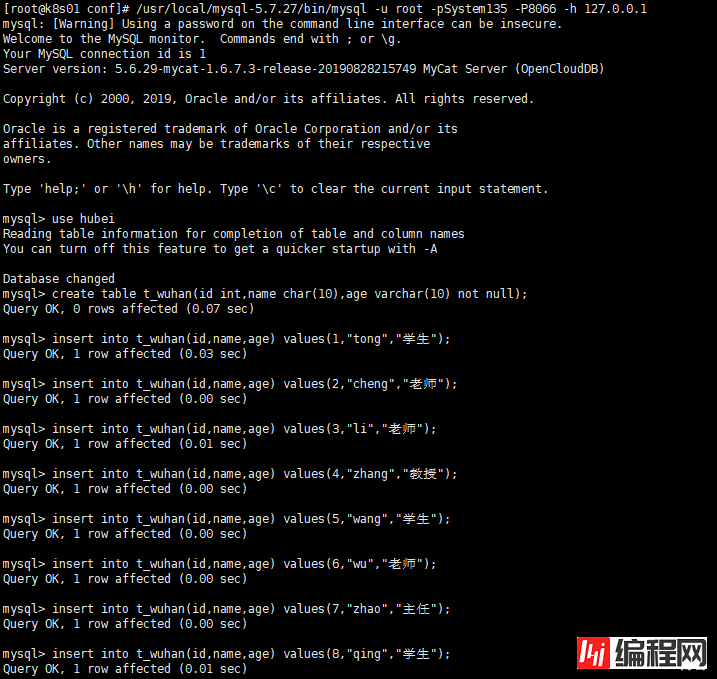
验证数据:
k8s01节点:
k8s02节点:

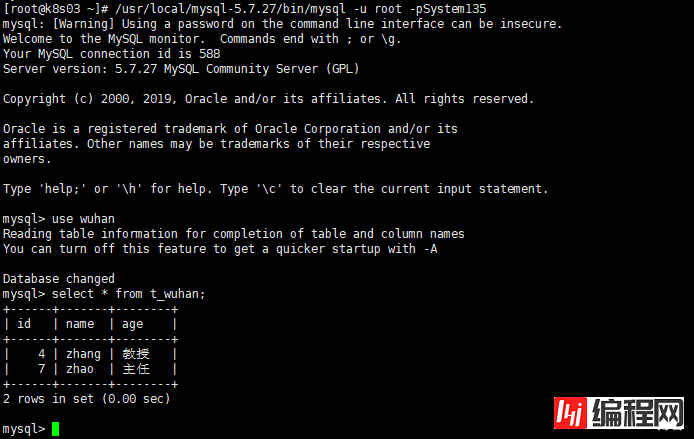
k8s03节点:
错误处理:
mysql> insert into t_wuhan(id,name,age) values(1,"tong","学生");
ERROR 1064 (HY000): columnValue:学生 Please check if the format satisfied.
mysql> insert into t_wuhan(id,name,age) values(1,"tong",'学生');
ERROR 1064 (HY000): columnValue:学生 Please check if the format satisfied.
mysql>
解决方法:

type:type值默认为0,表示数值是整型。值为1,表示是字符串。
defaultNode:值对应partition-hash-int.txt文件中的DEFAULT_NODE的值。
感谢你能够认真阅读完这篇文章,希望小编分享的“Mycat中间件如何实现Mysql数据分片”这篇文章对大家有帮助,同时也希望大家多多支持编程网,关注编程网数据库频道,更多相关知识等着你来学习!
--结束END--
本文标题: Mycat中间件如何实现Mysql数据分片
本文链接: https://www.lsjlt.com/news/62180.html(转载时请注明来源链接)
有问题或投稿请发送至: 邮箱/279061341@qq.com QQ/279061341
下载Word文档到电脑,方便收藏和打印~
2024-04-28
2024-04-28
2024-04-28
2024-04-28
2024-04-28
2024-04-28
2024-04-28
2024-04-28
2024-04-28
2024-04-28
回答
回答
回答
回答
回答
回答
回答
回答
回答
回答


官方手机版

微信公众号

商务合作


0