小编给大家分享一下Spinnaker生产环境如何安装部署监控,相信大部分人都还不怎么了解,因此分享这篇文章给大家参考一下,希望大家阅读完这篇文章后大有收获,下面让我们一起去了解一下吧!1. 架构分析Haly
小编给大家分享一下Spinnaker生产环境如何安装部署监控,相信大部分人都还不怎么了解,因此分享这篇文章给大家参考一下,希望大家阅读完这篇文章后大有收获,下面让我们一起去了解一下吧!
1. 架构分析
Halyard + kubernetes + Redis + Mysql57 + S3
redis: Gate、Orca、Clouddrive、Rosco、IGor、Fiat、Kayenta
S3:Front50 、Kayenta
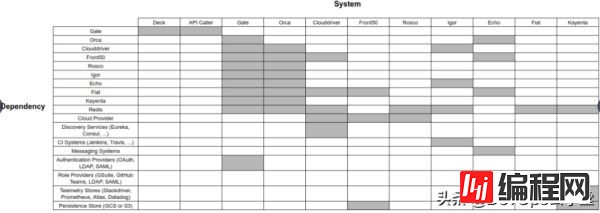
数据持久化
2.准备工作
包含6个节点的redis集群(3主+3从)。
mysql 5.7数据库。
部署MiNIO用于S3存储。
下载Halyard容器镜像。
下载Spinnaker集群所需的容器镜像(阿里云)。
下载BOM自定义安装所需的文件。
2.1 启动Halyard容器
也可以使用二进制安装。最好将halyard运行在一台配置好kubectl客户端的节点上。因为后续需要用到k8s集群账户信息。
Docker pull reGIStry.cn-beijing.aliyuncs.com/spinnaker-cd/halyard:1.32.0 mkdir /root/.hal docker run -itd --name halyard \ -v /root/.hal:/home/spinnaker/.hal \ -v /root/.kube:/home/spinnaker/.kube \ registry.cn-beijing.aliyuncs.com/spinnaker-cd/halyard:1.32.0 ## 以root身份进入容器,修改配置文件 docker exec -it -u root halyard bash ## 修改spinnaker.config.input.GCs.enabled = false 。 vi /opt/halyard/config/halyard.yml spinnaker: artifacts: debian: https://dl.bintray.com/spinnaker-releases/debians docker: gcr.io/spinnaker-marketplace config: input: gcs: enabled: false writerEnabled: false bucket: halconfig ## 需要重启容器(如果此命令未重启,则需要退出容器然后 docker restart halyard) hal shutdown ## 启动 docker start halyard2.2 下载所需要的镜像
所有的镜像已经通过GitHub Actions自动同步到阿里云镜像仓库。大家直接下载。registry.cn-beijing.aliyuncs.com/spinnaker-cd/ 为了方便可以直接运行脚本下载当前版本的所有镜像。
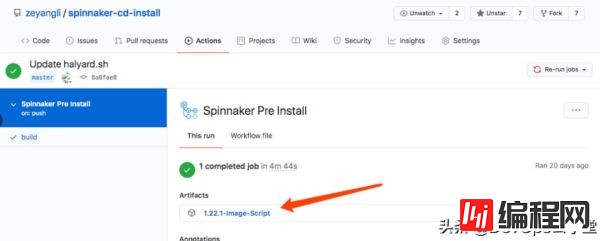
bom文件和下载镜像的脚本都在这个压缩包中,下载Https://github.com/zeyangli/spinnaker-cd-install/actions
# 上传到服务器(运行halyard容器的节点) scp 1.22.1-Image-Script.zip root@master.zy.com:/root unzip 1.22.1-Image-Script.zip cd 1.22.1 [root@master 1.22.1]# ls -a . .. .boms GetImages.sh tagfile.txt ## .boms需要放到.hal目录下 ## GetImages.sh 镜像下载脚本 ## tagfile.txt 镜像标签 sh -x GetImages.sh chmod 777 -R .hal/ ## 等待镜像下载完成(这个脚本中做了ssh免密哦)tagfile.txt
## tagfile [root@master 1.22.1]# cat tagfile.txt echo:2.14.0-20200817170018 clouddriver:6.11.0-20200818115831 deck:3.3.0-20200818132306 fiat:1.13.0-20200817170018 front50:0.25.1-20200831095512 gate:1.18.1-20200825122721 igor:1.12.0-20200817200018 kayenta:0.17.0-20200817170018 orca:2.16.0-20200817170018 rosco:0.21.1-20200827112228GetImages.sh
## script #!/bin/bash S_REGISTRY="gcr.io/spinnaker-marketplace" T_REGISTRY="registry.cn-beijing.aliyuncs.com/spinnaker-cd" nodeS="node01.zy.com node02.zy.com" ## 下载镜像 function GetImages(){ echo -e "\033[43;34m =====GetImg===== \033[0m" IMAGES=$( cat tagfile.txt) for image in ${IMAGES} do for node in ${NODES} do echo -e "\033[32m ${node} ---> pull ---> ${image} \033[0m" ssh ${node} "docker pull ${T_REGISTRY}/${image}" echo -e "\033[32m ${node} ---> tag ---> ${image} \033[0m" ssh ${node} "docker tag ${T_REGISTRY}/${image} ${S_REGISTRY}/${image}" done done for node in ${NODES} do echo -e "\033[43;34m =====${node}===镜像信息===== \033[0m" ssh ${node} "docker images | grep 'spinnaker-marketplace' " done } GetImages2.3 准备bom文件
[root@master 1.22.1]# mv .boms/ ~/.hal/ [root@master 1.22.1]# cd ~/.hal/ [root@master .hal]# cd .boms/ [root@master .boms]# ls bom clouddriver deck echo fiat front50 gate igor kayenta orca rosco [root@master .boms]# tree . ├── bom │ ├── 1.19.4.yml │ └── 1.22.1.yml ├── clouddriver │ ├── 6.11.0-20200818115831 │ │ └── clouddriver.yml │ ├── 6.7.3-20200401190525 │ │ └── clouddriver.yml │ └── clouddriver.yml ├── deck │ ├── 3.0.2-20200324040016 │ │ └── settings.js │ ├── 3.3.0-20200818132306 │ │ └── settings.js │ └── settings.js ├── echo │ ├── 2.11.2-20200401121252 │ │ └── echo.yml │ ├── 2.14.0-20200817170018 │ │ └── echo.yml │ └── echo.yml ├── fiat │ ├── 1.10.1-20200401121252 │ │ └── fiat.yml │ ├── 1.13.0-20200817170018 │ │ └── fiat.yml │ └── fiat.yml ├── front50 │ ├── 0.22.1-20200401121252 │ │ └── front50.yml │ ├── 0.25.1-20200831095512 │ │ └── front50.yml │ └── front50.yml ├── gate │ ├── 1.15.1-20200403040016 │ │ └── gate.yml │ ├── 1.18.1-20200825122721 │ │ └── gate.yml │ └── gate.yml ├── igor │ ├── 1.12.0-20200817200018 │ │ └── igor.yml │ ├── 1.9.2-20200401121252 │ │ └── igor.yml │ └── igor.yml ├── kayenta │ ├── 0.14.0-20200304112817 │ │ └── kayenta.yml │ ├── 0.17.0-20200817170018 │ │ └── kayenta.yml │ └── kayenta.yml ├── orca │ ├── 2.13.2-20200401144746 │ │ └── orca.yml │ ├── 2.16.0-20200817170018 │ │ └── orca.yml │ └── orca.yml └── rosco ├── 0.18.1-20200401121252 │ ├── images.yml │ ├── packer │ │ ├── alicloud.JSON │ │ ├── alicloud-multi.json │ │ ├── aws-chroot.json │ │ ├── aws-ebs.json │ │ ├── aws-multi-chroot.json │ │ ├── aws-multi-ebs.json │ │ ├── aws-windows-2012-r2.json │ │ ├── Azure-linux.json │ │ ├── azure-windows-2012-r2.json │ │ ├── docker.json │ │ ├── gce.json │ │ ├── huaweicloud.json │ │ ├── install_packages.sh │ │ ├── oci.json │ │ └── scripts │ │ ├── aws-windows-2012-configure-ec2service.ps1 │ │ ├── aws-windows.userdata │ │ ├── windows-configure-chocolatey.ps1 │ │ └── windows-install-packages.ps1 │ └── rosco.yml ├── 0.21.1-20200827112228 │ ├── images.yml │ ├── packer │ │ ├── alicloud.json │ │ ├── alicloud-multi.json │ │ ├── aws-chroot.json │ │ ├── aws-ebs.json │ │ ├── aws-multi-chroot.json │ │ ├── aws-multi-ebs.json │ │ ├── aws-windows-2012-r2.json │ │ ├── azure-linux.json │ │ ├── azure-windows-2012-r2.json │ │ ├── docker.json │ │ ├── gce.json │ │ ├── huaweicloud.json │ │ ├── install_packages.sh │ │ ├── oci.json │ │ └── scripts │ │ ├── aws-windows-2012-configure-ec2service.ps1 │ │ ├── aws-windows.userdata │ │ ├── windows-configure-chocolatey.ps1 │ │ └── windows-install-packages.ps1 │ ├── README.md │ └── rosco.yml ├── images.yml ├── packer │ ├── alicloud.json │ ├── alicloud-multi.json │ ├── aws-chroot.json │ ├── aws-ebs.json │ ├── aws-multi-chroot.json │ ├── aws-multi-ebs.json │ ├── aws-windows-2012-r2.json │ ├── azure-linux.json │ ├── azure-windows-2012-r2.json │ ├── docker.json │ ├── gce.json │ ├── huaweicloud.json │ ├── install_packages.sh │ ├── oci.json │ └── scripts │ ├── aws-windows-2012-configure-ec2service.ps1 │ ├── aws-windows.userdata │ ├── windows-configure-chocolatey.ps1 │ └── windows-install-packages.ps1 ├── README.md └── rosco.yml 37 directories, 91 files3.Halyard配置管理
docker exec -it halyard bash
Halyard初始化配置
添加镜像仓库(Harbor)和K8s集群账户
开启特性功能(pipeline-templates、artifacts、managed-pipeline-templates-v2-ui)
配置jenkinsCI集成
配置GitHub/GitLab集成
3.1.Halyard初始化配置
# 设置Spinnaker版本,--version 指定版本 hal config version edit --version local:1.22.1 # 设置时区 hal config edit --timezone Asia/Shanghai # 设置存储为s3(后面不用,但是必须配置bug) hal config storage edit --type s3 --no-validate # 访问方式:设置deck与gate的域名 hal config security ui edit --override-base-url http://spinnaker.idevops.site hal config security api edit --override-base-url http://spin-gate.idevops.site3.2 添加镜像仓库(harbor)和k8s集群账户
hal config provider docker-registry enable --no-validate hal config provider docker-registry account add my-harbor-registry \ --address http://192.168.1.200:8088 \ --username admin \ --passWord Harbor12345 hal config provider kubernetes enable hal config provider kubernetes account add default \ --docker-registries my-harbor-registry \ --context $(kubectl config current-context) \ --service-account true \ --omit-namespaces=kube-system,kube-public \ --provider-version v2 \ --no-validate # 部署方式,分布式部署,名称空间。 hal config deploy edit \ --account-name default \ --type distributed \ --location spinnaker3.3 开启特性功能
## 开启一些主要的功能(后期可以再追加) hal config features edit --pipeline-templates true hal config features edit --artifacts true hal config features edit --managed-pipeline-templates-v2-ui true3.4 配置JenkinsCI集成
# 配置Jenkins hal config ci jenkins enable ### JenkinsServer 需要用到账号和密码 hal config ci jenkins master add my-jenkins-master-01 \ --address http://jenkins.idevops.site \ --username admin \ --password admin ### 启用csrf hal config ci jenkins master edit my-jenkins-master-01 --csrf true3.5 配置GitHub/GitLab集成
# GitHub ## 参考:https://spinnaker.io/setup/artifacts/github/ ## 创建token https://github.com/settings/tokens hal config artifact github enable hal config artifact github account add my-github-account \ --token 02eb8aa1c2cd67af305d1f606 \ --username zey # GitLab ## https://spinnaker.io/setup/artifacts/gitlab/ ## 创建一个个人的token(admin) hal config artifact gitlab enable hal config artifact gitlab account add my-gitlab-account \ --token qqHX8T4VTpozbnX4. 使用外部Redis集群
## service-settings mkdir .hal/default/service-settings/ vi .hal/default/service-settings/redis.yml overrideBaseUrl: redis://192.168.1.200:6379 skipLifeCycleManagement: true ## profiles ## /root/.hal/default/profiles [root@master profiles]# ls [root@master profiles]# vi gate-local.yml redis: configuration: secure: true5. 使用SQL数据库
5.1 Clouddriver服务
创建数据库
CREATE DATABASE `clouddriver` DEFAULT CHARACTER SET utf8mb4 COLLATE utf8mb4_unicode_ci; GRANT SELECT, INSERT, UPDATE, DELETE, CREATE, EXECUTE, SHOW VIEW ON `clouddriver`.* TO 'clouddriver_service'@'%' IDENTIFIED BY 'clouddriver@spinnaker.com'; GRANT SELECT, INSERT, UPDATE, DELETE, CREATE, DROP, REFERENCES, INDEX, ALTER, LOCK TABLES, EXECUTE, SHOW VIEW ON `clouddriver`.* TO 'clouddriver_migrate'@'%' IDENTIFIED BY 'clouddriver@spinnaker.com';修改配置文件
## /root/.hal/default/profiles bash-5.0$ cat clouddriver-local.yml sql: enabled: true # read-only boolean toggles `SELECT` or `DELETE` health checks for all pools. # Especially relevant for clouddriver-ro and clouddriver-ro-deck which can # target a SQL read replica in their default pools. read-only: false taskRepository: enabled: true cache: enabled: true # These parameters were determined to be optimal via benchmark comparisons # in the Netflix production environment with Aurora. Setting these too low # or high may negatively impact perfORMance. These values may be sub-optimal # in some environments. readBatchSize: 500 writeBatchSize: 300 scheduler: enabled: true # Enable clouddriver-caching's clean up agent to periodically purge old # clusters and accounts. Set to true when using the Kubernetes provider. unknown-agent-cleanup-agent: enabled: false connectionPools: default: # additional connection pool parameters are available here, # for more detail and to view defaults, see: # https://github.com/spinnaker/kork/blob/master/kork-sql/src/main/Kotlin/com/netflix/spinnaker/kork/sql/config/ConnectionPoolProperties.kt default: true jdbcUrl: jdbc:mysql://192.168.1.200:3306/clouddriver user: clouddriver_service password: clouddriver@spinnaker.com # The following tasks connection pool is optional. At Netflix, clouddriver # instances pointed to Aurora read replicas have a tasks pool pointed at the # master. Instances where the default pool is pointed to the master omit a # separate tasks pool. tasks: user: clouddriver_service jdbcUrl: jdbc:mysql://192.168.1.200:3306/clouddriver password: clouddriver@spinnaker.com migration: user: clouddriver_migrate jdbcUrl: jdbc:mysql://192.168.1.200:3306/clouddriver password: clouddriver@spinnaker.com redis: enabled: false cache: enabled: false scheduler: enabled: false taskRepository: enabled: false5.2 Front50服务
创建数据库
CREATE DATABASE `front50` DEFAULT CHARACTER SET utf8mb4 COLLATE utf8mb4_unicode_ci; GRANT SELECT, INSERT, UPDATE, DELETE, CREATE, EXECUTE, SHOW VIEW ON `front50`.* TO 'front50_service'@'%' IDENTIFIED BY "front50@spinnaker.com"; GRANT SELECT, INSERT, UPDATE, DELETE, CREATE, DROP, REFERENCES, INDEX, ALTER, LOCK TABLES, EXECUTE, SHOW VIEW ON `front50`.* TO 'front50_migrate'@'%' IDENTIFIED BY "front50@spinnaker.com";修改配置文件
## /root/.hal/default/profiles bash-5.0$ cat front50-local.yml spinnaker: s3: enabled: false sql: enabled: true connectionPools: default: # additional connection pool parameters are available here, # for more detail and to view defaults, see: # https://github.com/spinnaker/kork/blob/master/kork-sql/src/main/kotlin/com/netflix/spinnaker/kork/sql/config/ConnectionPoolProperties.kt default: true jdbcUrl: jdbc:mysql://192.168.1.200:3306/front50 user: front50_service password: front50@spinnaker.com migration: user: front50_migrate jdbcUrl: jdbc:mysql://192.168.1.200:3306/front50 password: front50@spinnaker.com5.3 Orca服务
创建数据库
set tx_isolation = 'REPEATABLE-READ'; CREATE SCHEMA `orca` DEFAULT CHARACTER SET utf8mb4 COLLATE utf8mb4_unicode_ci; GRANT SELECT, INSERT, UPDATE, DELETE, CREATE, EXECUTE, SHOW VIEW ON `orca`.* TO 'orca_service'@'%' IDENTIFIED BY "orca@spinnaker.com" ; GRANT SELECT, INSERT, UPDATE, DELETE, CREATE, DROP, REFERENCES, INDEX, ALTER, LOCK TABLES, EXECUTE, SHOW VIEW ON `orca`.* TO 'orca_migrate'@'%' IDENTIFIED BY "orca@spinnaker.com" ;修改配置文件
## /root/.hal/default/profiles bash-5.0$ cat orca-local.yml sql: enabled: true connectionPool: jdbcUrl: jdbc:mysql://192.168.1.200:3306/orca user: orca_service password: orca@spinnaker.com connectionTimeout: 5000 maxLifetime: 30000 # MariaDB-specific: maxPoolSize: 50 migration: jdbcUrl: jdbc:mysql://192.168.1.200:3306/orca user: orca_migrate password: orca@spinnaker.com # Ensure we're only using SQL for accessing execution state executionRepository: sql: enabled: true redis: enabled: false # Reporting on active execution metrics will be handled by SQL monitor: activeExecutions: redis: false # Use SQL for Orca's work queue # Settings from Netflix and may require adjustment for your environment # Only validated with AWS Aurora MySQL 5.7 # Please PR if you have success with other databases keiko: queue: sql: enabled: true redis: enabled: false queue: zombieCheck: enabled: true pendingExecutionService: sql: enabled: true redis: enabled: false6.部署
hal deploy apply --no-validate创建Ingress访问
apiVersion: extensions/v1beta1
kind: Ingress
metadata:
name: spinnaker-service
annotations:
kubernetes.io/ingress.class: Nginx
spec:
rules:
- host: spinnaker.idevops.site
http:
paths:
- path: /
backend:
serviceName: spin-deck
servicePort: 9000
- host: spin-gate.idevops.site
http:
paths:
- path: /
backend:
serviceName: spin-gate
servicePort: 8084
- host: spin-front50.idevops.site
http:
paths:
- path: /
backend:
serviceName: spin-front50
servicePort: 8080
- host: spin-fiat.idevops.site
http:
paths:
- path: /
backend:
serviceName: spin-fiat
servicePort: 7003
kubectl create -f ingress.yml7. 其他设置
7.1 认证与授权
认证:LDAP、Oauth3
授权:LDAP、File
开启认证LDAP/OAuth3(两者二选一即可,推荐LDAP)
# 开启LDAP认证 hal config security authn ldap edit \ --user-search-base 'ou=devops,dc=zy,dc=com' \ --url 'ldap://192.168.1.200:389' \ --user-search-filter 'cn={0}' \ --manager-dn 'cn=admin,dc=zy,dc=com' \ --manager-password '12345678' hal config security authn ldap enable ## --user-search-base 用户搜索的部分 ## --url LDAP服务器 ## --user-search-filter 搜索用户DN时使用的过滤器 ## --manager-dn LDAP管理器用户 ## --manager-password LDAP管理器用户的密码 # GitHub ## 首先需要登录GitHub然后创建一个OAuth APP。 ## 参考官方:https://spinnaker.io/setup/security/authentication/oauth/github/ hal config security authn oauth3 edit --provider github \ --client-id 66826xxxxxxxxe0ecdbd7 \ --client-secret d834851134e80a9xxxxxxe371613f05bc26 hal config security authn oauth3 enable授权管理
角色可以通过LDAP自定义也可以使用文件自定义。两者二选一。
通过LDAP组定义角色:例如我在LDAP中存在类型为groupOfUniqueName的组yunweizu。则关联这个组的所有用户的角色为yunweizu。后续添加权限则根据yunweizu授权。
通过文件自定义:编写一个静态的yaml文件,里面定义每个用户和其对应的角色。
# 使用Yaml文件 ##如下配置设置user1为yunweizu、user2为demo。 users: - username: devops roles: - yunweizu - username: user2 roles: - demo hal config security authz enable hal config security authz file edit --file-path=$HOME/.hal/userrole.yaml hal config security authz edit --type file ## 授权(根据LDAP组进行授权) hal config security authz ldap edit \ --url 'ldap://192.168.1.200:389/dc=zy,dc=com' \ --manager-dn 'cn=admin,dc=zy,dc=com' \ --manager-password '12345678' \ --user-dn-pattern 'cn={0}' \ --group-search-base 'ou=devops' \ --group-search-filter 'uniqueMember={0}' \ --group-role-attributes 'cn' \ --user-search-filter 'cn={0}’ hal config security authz edit --type ldap hal config security authz enable开启授权后可以设置哪些用户可以访问集群账户、镜像仓库、应用程序。
## 配置yunweizu和group02角色的用户可以使用default这个集群账户 hal config provider kubernetes account edit default \ --add-read-permission yunweizu,group02 \ --add-write-permission yunweizu ## 配置yunweizu角色的用户可以使用my-harbor-registry账户 hal config provider docker-registry account edit my-harbor-registry \ --read-permissions yunweizu \ --write-permissions yunweizu开启管道权限
~/.hal/default/profiles/orca-local.yml tasks: useManagedServiceAccounts: true ~/.hal/default/profiles/settings-local.js window.spinnakerSettings.feature.managedServiceAccounts = true;定义超级管理员
vi ~/.hal/default/profiles/fiat-local.yml bash-5.0$ cat fiat-local.yml fiat: admin: roles: - devops-admin ## 指定的组7.2 邮件通知
.hal/default/profiles/echo-local.yml
[root@master profiles]# cat echo-local.yml mail: enabled: true from: 250642@qq.com spring: mail: host: smtp.qq.com username: 25642@qq.com password: ubxijwaah protocol: smtp default-encoding: utf-8 properties: mail: display: sendname: SpinnakerAdmin smtp: port: 465 auth: true starttls: enable: true required: true ssl: enable: true transport: protocol: smtp debug: true.hal/default/profiles/settings-local.js
window.spinnakerSettings.notifications.email.enabled = true;更新配置
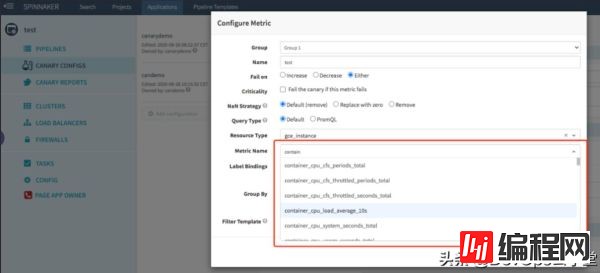
hal deploy apply --no-validate7.3 金丝雀分析
配置存储
hal config canary enable ##aws s3 minio 创建一个bucket spinnaker-canary,赋予读写权限。 hal config canary aws enable hal config canary aws account add my-canary \ --bucket spinnaker-canary \ --endpoint http://minio.idevops.site \ --access-key-id AKIAiOSFODNN7EXAMPLE \ --secret-access-key wJalrXUtnFEMI/K7MDENG/bPxRfiCYEXAMPLEKEY hal config canary edit --default-storage-account my-canary hal config canary aws edit --s3-enabled true## prometheus
hal config canary prometheus enable
## 这里做了basic认证,无认证忽略username和password选项。
hal config canary prometheus account add my-prometheus \
--base-url http://prometheus.idevops.site \
--username admin \
--password admin
hal config canary edit --default-metrics-account my-prometheus
hal config canary edit --default-metrics-store prometheus
hal deploy apply --no-validate效果

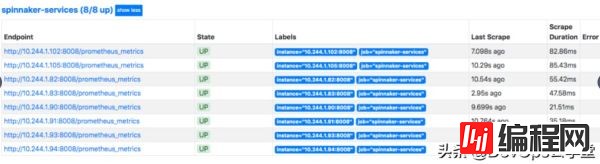
7.4 监控Spinnaker
hal config metric-stores prometheus enable hal deploy apply --no-validate [root@master monitor]# kubectl get pod -n spinnaker NAME READY STATUS RESTARTS AGE spin-clouddriver-7cd94f5b9-cn22r 2/2 Running 2 4h5m spin-deck-684854fbd7-cb7wh 1/1 Running 1 4h5m spin-echo-746b45ff98-kcz5m 2/2 Running 2 4h5m spin-front50-66b4f9966-l6r4h 2/2 Running 2 4h5m spin-gate-6788588dfc-q8cpt 2/2 Running 2 4h5m spin-igor-6f6fbbbb75-4b4jd 2/2 Running 2 4h5m spin-kayenta-64fddf7db9-j4pqg 2/2 Running 2 4h5m spin-orca-d5c488b48-5q8sp 2/2 Running 2 4h5m spin-rosco-5f4bcb754c-9kgl9 2/2 Running 2 4h5m # 通过describe可以看到POD中存在一个sidecar容器monitoring-daemon kubectl describe pod spin-gate-6788588dfc-q8cpt -n spinnaker正常运行后通过 podID:8008/prometheus_metrics获取度量数据,需要添加以下服务发现配置。
# prometheus需要添加配置 - job_name: 'spinnaker-services' kubernetes_sd_configs: - role: pod metrics_path: "/prometheus_metrics" relabel_configs: - source_labels: [__meta_kubernetes_pod_label_app] action: keep regex: 'spin' - source_labels: [__meta_kubernetes_pod_container_name] action: keep regex: 'monitoring-daemon' ## prometheus-operator 按照以下配置,其他方式忽略以下配置。 apiVersion: monitoring.coreos.com/v1 kind: ServiceMonitor metadata: name: spinnaker-all-metrics labels: app: spin # this label is here to match the prometheus operator serviceMonitorSelector attribute # prometheus.prometheusSpec.serviceMonitorSelector # https://github.com/helm/charts/tree/master/stable/prometheus-operator release: prometheus-operator spec: selector: matchLabels: app: spin namespaceSelector: any: true endpoints: # "port" is string only. "targetPort" is integer or string. - targetPort: 8008 interval: 10s path: "/prometheus_metrics"打开prometheus页面,能够看到以下信息。
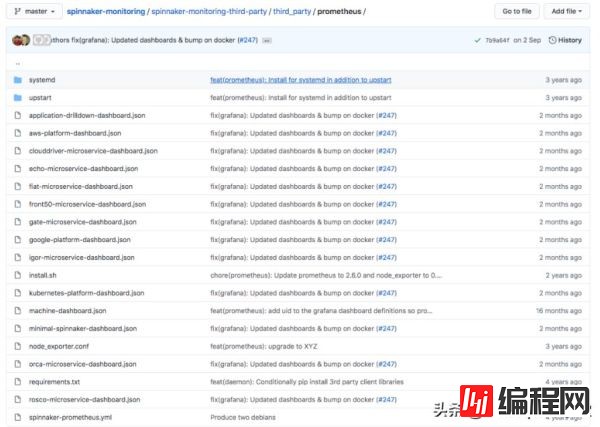
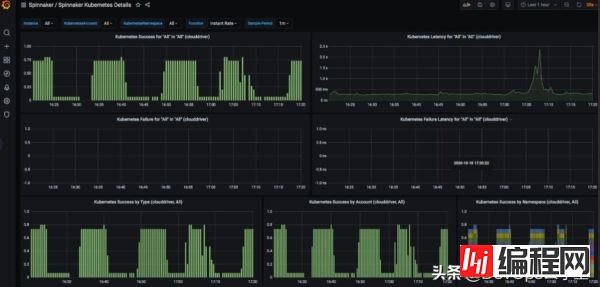
对接Grafana展示数据,Spinnaker官方提供了控制台模板。https://github.com/spinnaker/spinnaker-monitoring/tree/master/spinnaker-monitoring-third-party/third_party/prometheus
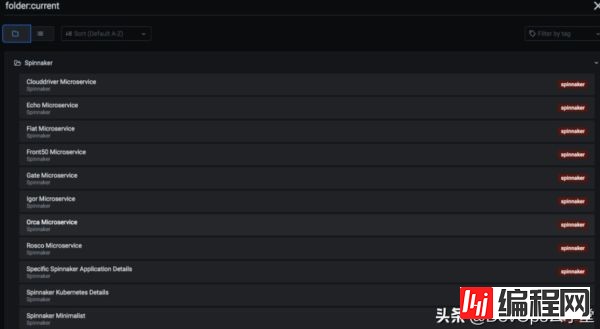
打开Grafana控制台,开始导入json模板。模板较多,创建一个文件夹管理。
以上是“Spinnaker生产环境如何安装部署监控”这篇文章的所有内容,感谢各位的阅读!相信大家都有了一定的了解,希望分享的内容对大家有所帮助,如果还想学习更多知识,欢迎关注编程网JavaScript频道!
--结束END--
本文标题: Spinnaker生产环境如何安装部署监控
本文链接: https://www.lsjlt.com/news/80357.html(转载时请注明来源链接)
有问题或投稿请发送至: 邮箱/279061341@qq.com QQ/279061341
下载Word文档到电脑,方便收藏和打印~
2024-01-12
2023-05-20
2023-05-20
2023-05-20
2023-05-20
2023-05-20
2023-05-20
2023-05-20
2023-05-20
2023-05-20
回答
回答
回答
回答
回答
回答
回答
回答
回答
回答


官方手机版

微信公众号

商务合作


0