Python 官方文档:入门教程 => 点击学习
前言:日常开发中我们常用ThreadPoolExecutor提供的线程池服务帮我们管理线程,在SpringBoot中更是提供了@Async注解来简化业务逻辑提交到线程池中执行的过程。
前言:日常开发中我们常用ThreadPoolExecutor提供的线程池服务帮我们管理线程,在SpringBoot中更是提供了@Async注解来简化业务逻辑提交到线程池中执行的过程。由于springboot中默认设置的corePoolSize=1和queyeCapacity=Integer.MAX_VALUE,相当于采用单线程处理所有任务,这就与多线程的目的背道而驰,所以这就要求我们在使用@Async注解时要配置线程池。本文就讲述下Springboot应用下的线程池配置。
背景知识:Springboot中通过使用ThreadPoolTaskExecutor这个JavaBean对象的corePoolSize(核心线程数)、maxPoolSize(最大线程数)、keepAliveSeconds(线程空闲时长)和queueCapacity(任务队列容量)属性来配置ThreadPoolExecutor,以上四个属性的作用大致如下:
新提交一个任务时的处理流程很明显:
好了,回到正文。目前配置Springboot线程池主要有两种方式:配置默认线程池和提供自定义线程池;毫无疑问,两种配置方式并无优劣。从使用角度来讲,由于自定义线程池是自定义即没有被Springboot默认使用的线程池,那么就需要通过@Async("自定义线程池bean对象名")的方式去使用,其它地方同默认线程池使用方式一致;下面通过一个简单的Springboot应用结合实际来展示:
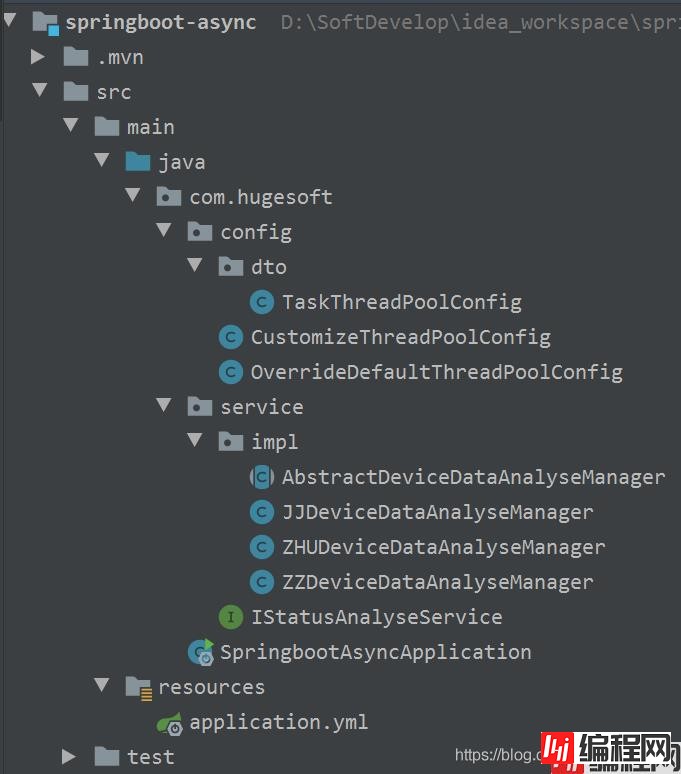
1、新建一个Springboot项目,项目结构和pom.xml内容如下:
<?xml version="1.0" encoding="UTF-8"?>
<project xmlns="Http://Maven.apache.org/POM/4.0.0" xmlns:xsi="http://www.w3.org/2001/XMLSchema-instance"
     xsi:schemaLocation="http://maven.apache.org/POM/4.0.0 https://maven.apache.org/xsd/maven-4.0.0.xsd">
  <modelVersion>4.0.0</modelVersion>
  <parent>
    <groupId>org.springframework.boot</groupId>
    <artifactId>spring-boot-starter-parent</artifactId>
    <version>2.1.17.RELEASE</version>
    <relativePath/> <!-- lookup parent from repository -->
  </parent>
  <groupId>com.hugesoft</groupId>
  <artifactId>springboot-async</artifactId>
  <version>0.0.1</version>
  <name>springboot-async</name>
  <description>Demo project for Spring Boot</description>
  <properties>
    <java.version>1.8</java.version>
  </properties>
  <dependencies>
    <dependency>
      <groupId>org.springframework.boot</groupId>
      <artifactId>spring-boot-starter-WEB</artifactId>
    </dependency>
    <dependency>
      <groupId>org.projectlombok</groupId>
      <artifactId>lombok</artifactId>
    </dependency>
    <dependency>
      <groupId>org.springframework.boot</groupId>
      <artifactId>spring-boot-starter-test</artifactId>
      <scope>test</scope>
    </dependency>
  </dependencies>

  <build>
    <plugins>
      <plugin>
        <groupId>org.springframework.boot</groupId>
        <artifactId>spring-boot-maven-plugin</artifactId>
      </plugin>
    </plugins>
  </build>

</project>
二、application.yml中,自定义了线程池需要配置的四个属性,内容如下:
task:
 pool:
  corePoolSize: 10
  maxPoolSize: 20
  keepAliveSeconds: 300
  queueCapacity: 50
三、在com.hugesoft.config包中有三个类:TaskThreadPoolConfig类用来简化封装application.yml配置的属性,OverrideDefaultThreadPoolConfig类提供了配置默认线程池的方式,CustomizeThreadPoolConfig类则实现了自定义线程池,具体实现如下:
package com.hugesoft.config.dto;

import lombok.Data;
import org.springframework.boot.context.properties.ConfigurationProperties;
import org.springframework.stereotype.Component;


@Data
@Component
@ConfigurationProperties(prefix = "task.pool")
public class TaskThreadPoolConfig {


  private int corePoolSize;


  private int maxPoolSize;


  private int keepAliveSeconds;


  private int queueCapacity;
}
package com.hugesoft.config;

import com.hugesoft.config.dto.TaskThreadPoolConfig;
import lombok.extern.slf4j.Slf4j;
import org.springframework.aop.interceptor.AsyncUncaughtExceptionHandler;
import org.springframework.beans.factory.annotation.Autowired;
import org.springframework.context.annotation.Configuration;
import org.springframework.scheduling.annotation.AsyncConfigurer;
import org.springframework.scheduling.annotation.EnableAsync;
import org.springframework.scheduling.concurrent.ThreadPoolTaskExecutor;

import java.util.concurrent.Executor;
import java.util.concurrent.ThreadPoolExecutor;


@Slf4j
@Configuration
@EnableAsync
public class OverrideDefaultThreadPoolConfig implements AsyncConfigurer {

  @Autowired
  private TaskThreadPoolConfig config;

  @Override
  public Executor getAsyncExecutor() {
    ThreadPoolTaskExecutor executor = new ThreadPoolTaskExecutor();
    //核心线程池大小
    executor.setCorePoolSize(config.getCorePoolSize());
    //最大线程数
    executor.setMaxPoolSize(config.getMaxPoolSize());
    //队列容量
    executor.setQueueCapacity(config.getQueueCapacity());
    //活跃时间
    executor.seTKEepAliveSeconds(config.getKeepAliveSeconds());
    //线程名字前缀
    executor.setThreadNamePrefix("default-thread-");

    executor.setRejectedExecutionHandler(new ThreadPoolExecutor.CallerRunsPolicy());
    executor.initialize();
    return executor;
  }


  @Override
  public AsyncUncaughtExceptionHandler getAsyncUncaughtExceptionHandler() {
    return (ex, method, params) -> {
      log.error("==========================" + ex.getMessage() + "=======================", ex);
      log.error("exception method:" + method.getName());
    };
  }
}
package com.hugesoft.config;

import com.hugesoft.config.dto.TaskThreadPoolConfig;
import org.springframework.beans.factory.annotation.Autowired;
import org.springframework.context.annotation.Bean;
import org.springframework.context.annotation.Configuration;
import org.springframework.scheduling.annotation.EnableAsync;
import org.springframework.scheduling.concurrent.ThreadPoolTaskExecutor;

import java.util.concurrent.Executor;
import java.util.concurrent.ThreadPoolExecutor;


@Configuration
@EnableAsync
public class CustomizeThreadPoolConfig {

  @Autowired
  private TaskThreadPoolConfig config;

  @Bean("customizeThreadPool")
  public Executor doConfiGCustomizeThreadPool() {
    ThreadPoolTaskExecutor executor = new ThreadPoolTaskExecutor();
    //核心线程池大小
    executor.setCorePoolSize(config.getCorePoolSize());
    //最大线程数
    executor.setMaxPoolSize(config.getMaxPoolSize());
    //队列容量
    executor.setQueueCapacity(config.getQueueCapacity());
    //活跃时间
    executor.setKeepAliveSeconds(config.getKeepAliveSeconds());
    //线程名字前缀
    executor.setThreadNamePrefix("customize-thread-");

    executor.setRejectedExecutionHandler(new ThreadPoolExecutor.CallerRunsPolicy());
    executor.initialize();
    return executor;
  }

}四、com.hugesoft.service包下的内容是从真实项目环境中提取出来的,IStatusAnalyseService定义了设备状态分析基础Service,JJDeviceDataAnalyseManager,ZHUDeviceDataAnalyseManager,ZZDeviceDataAnalyseManager三个子类分别提供了默认实现,AbstractDeviceDataAnalyseManager提取了三个子类用到的公共方法,代码没难度,理解即可;需要尤其注意AbstractDeviceDataAnalyseManager的两个重载方法,分别采用默认线程池和自定义线程池的方式,注意使用的异同点,这点也就是默认线程池和自定义线程池适用上的唯一不同点。具体试下如下:
package com.hugesoft.service;


public interface IStatusAnalyseService {


  void doStatusAnalyseHandle(String start, String end);


  void doStatusAnalyseHandle(String end);


  String getDataType();

}
package com.hugesoft.service.impl;


import com.hugesoft.service.IStatusAnalyseService;
import org.springframework.scheduling.annotation.Async;

import java.util.Random;


public abstract class AbstractDeviceDataAnalyseManager implements IStatusAnalyseService {

  @Async("customizeThreadPool")
  @Override
  public void doStatusAnalyseHandle(String start, String end) {
    int sleepSeconds = new Random().nextInt(3) + 1;
    try {
      Thread.sleep(sleepSeconds * 1000);
    } catch (InterruptedException e) {
      e.printStackTrace();
    }
    System.out.println(getDataType() + "在自定义线程" + Thread.currentThread().getName() + "执行了" + sleepSeconds + "秒");
  }

  @Async
  @Override
  public void doStatusAnalyseHandle(String end) {
    int sleepSeconds = new Random().nextInt(3) + 1;
    try {
      Thread.sleep(sleepSeconds * 1000);
    } catch (InterruptedException e) {
      e.printStackTrace();
    }
    System.out.println(getDataType() + "在默认线程" + Thread.currentThread().getName() + "执行了" + sleepSeconds + "秒");
  }
}
package com.hugesoft.service.impl;

import org.springframework.stereotype.Service;


@Service("JJ")
public class JJDeviceDataAnalyseManager extends AbstractDeviceDataAnalyseManager {

  @Override
  public String getDataType() {
    return "机加";
  }

}
package com.hugesoft.service.impl;

import org.springframework.stereotype.Service;


@Service("ZHU")
public class ZHUDeviceDataAnalyseManager extends AbstractDeviceDataAnalyseManager {

  @Override
  public String getDataType() {
    return "铸造";
  }

}
package com.hugesoft.service.impl;

import org.springframework.stereotype.Service;


@Service("ZZ")
public class ZZDeviceDataAnalyseManager extends AbstractDeviceDataAnalyseManager {

  @Override
  public String getDataType() {
    return "总装";
  }

}
五、最后看一下Springboot启动类实现;该类既是启动类也是Controller类,没什么特别要说明的。
package com.hugesoft;

import com.hugesoft.service.IStatusAnalyseService;
import org.springframework.beans.factory.annotation.Autowired;
import org.springframework.boot.SpringApplication;
import org.springframework.boot.autoconfigure.SpringBootApplication;
import org.springframework.scheduling.annotation.EnableAsync;
import org.springframework.web.bind.annotation.GetMapping;
import org.springframework.web.bind.annotation.RestController;

import java.util.List;

@RestController
@EnableAsync
@SpringBootApplication
public class SpringbootAsyncApplication {

  @Autowired
  private List<IStatusAnalyseService> statusAnalyseServiceList;

  public static void main(String[] args) {
    SpringApplication.run(SpringbootAsyncApplication.class, args);
  }

  @GetMapping("/sayHelloAsync")
  public String sayHelloAsync() {
    for (IStatusAnalyseService statusAnalyseService : statusAnalyseServiceList) {
      // 采用自定义线程池
      statusAnalyseService.doStatusAnalyseHandle(null, null);
      // 采用默认线程池
      statusAnalyseService.doStatusAnalyseHandle(null);
    }
    return "Hello, Async!";
  }

}
六、最后启动main方法,通过浏览器地址栏访问 http://localhost:8080/sayHelloAsync,发现秒出现如下页面,且控制台会出现如下内容,说明我们配置的默认线程池和自定义线程池都起作用了,到此,配置成功


到此这篇关于Springboot应用中线程池配置教程(2021版)的文章就介绍到这了,更多相关Springboot线程池配置内容请搜索编程网以前的文章或继续浏览下面的相关文章希望大家以后多多支持编程网!
--结束END--
本文标题: Springboot应用中线程池配置详细教程(最新2021版)
本文链接: https://www.lsjlt.com/news/122333.html(转载时请注明来源链接)
有问题或投稿请发送至: 邮箱/279061341@qq.com QQ/279061341
下载Word文档到电脑,方便收藏和打印~
2024-03-01
2024-03-01
2024-03-01
2024-02-29
2024-02-29
2024-02-29
2024-02-29
2024-02-29
2024-02-29
2024-02-29
回答
回答
回答
回答
回答
回答
回答
回答
回答
回答


官方手机版

微信公众号

商务合作


0