Python 官方文档:入门教程 => 点击学习
本文实例为大家分享了SpringBoot实现后台上传图片的具体代码,供大家参考,具体内容如下 1.先配置启动类 继承WEBmvcConfigurer 重写方法 @springBo
本文实例为大家分享了SpringBoot实现后台上传图片的具体代码,供大家参考,具体内容如下
重写方法
@springBootApplication
//@MapperScan("com.example.demo.Mapper")
public class DemoApplication implements WebMvcConfigurer {

    public static void main(String[] args) {
        SpringApplication.run(DemoApplication.class, args);

    }

    @Override
    public void addResourceHandlers(ResourceHandlerReGIStry registry){

        registry.addResourceHandler("/imctemp-rainy
    public boolean doUpload(MultipartFile attach, httpservletRequest request, String uploader){

        if(!attach.isEmpty()){
            originalFilename = attach.getOriginalFilename();
            System.out.println("==>上传的文件名:"+originalFilename);

            suffix = originalFilename.substring(originalFilename.lastIndexOf("."));
            System.out.println("==>上传的文件后缀名:"+suffix);

            size = attach.getSize();
            System.out.println("==>上传文件的大小:"+size);

            String currentFilename = System.currentTimeMillis()+ UUID.randomUUID().toString() + suffix;
            System.out.println("==>存储的上传文件名:"+currentFilename);

            realPath = "D:/image/"+uploader ;
            System.out.println("==>上传文件保存的真实路径:"+realPath);

            File targetFile = new File(realPath, currentFilename);
            if(!targetFile.exists()){
                targetFile.mkdirs();
            }

            try{
                attach.transferTo(targetFile);
            }catch (Exception e){
                e.printStackTrace();
                return false;
            }
            realPath = realPath + "/" + currentFilename;
//            dbPath =  request.getContextPath() + "/" + uploader + "/" + new SimpleDateFORMat("yyyy-MM-dd").format(new Date()) + "/" + currentFilename;
            dbPath = "/" + uploader + "/" + currentFilename;
            return true;
        }else{
            return false;
        }
    }
    public String getUploadFile(){
        return dbPath;
    }
}
其中关于路径都需要改成自己存放图片的路径

@RestController
public class UserPhotoController {

    @RequestMapping(value = "/upload",method = RequestMethod.POST)
    @ResponseBody
    public String testUpload(@RequestParam("file") MultipartFile file, HttpServletRequest request) {

        UploadUtil uploadUtil = new UploadUtil();
        String fileName = "";
        if (uploadUtil.doUpload(file, request, "uploadImg")) {
            fileName = uploadUtil.getUploadFile();
        } else {
            fileName = "file";
        }

        return fileName;
    }
}
完成。
附上Runapi接口测试工具测试过程(测试工具大同小异都是差不多步骤(如postman))
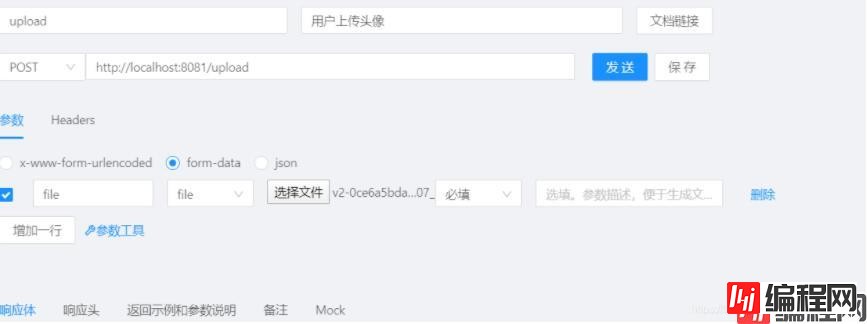
Headers:
注意这里的Headers部分不要写任何东西。
如果之前是有Content-Type头信息, 那么就会上传失败.
参数选择form-data
key:后台规定的接收文件的名称参数(切记不是你传的图片名称)
(比如我是file)
key的格式选择为File
value:自动变成 选择文件
点击发送
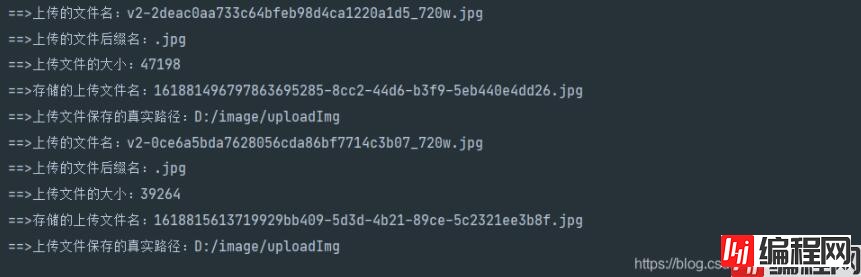
可以发现-上传图片成功(存到了你设置的路径中自动创建upload文件夹)
控制台也输出了你上传的图片信息
ok
大功告成
--结束END--
本文标题: springboot实现后台上传图片(工具类)
本文链接: https://www.lsjlt.com/news/124068.html(转载时请注明来源链接)
有问题或投稿请发送至: 邮箱/279061341@qq.com QQ/279061341
下载Word文档到电脑,方便收藏和打印~
2024-03-01
2024-03-01
2024-03-01
2024-02-29
2024-02-29
2024-02-29
2024-02-29
2024-02-29
2024-02-29
2024-02-29
回答
回答
回答
回答
回答
回答
回答
回答
回答
回答


官方手机版

微信公众号

商务合作


0