Python 官方文档:入门教程 => 点击学习
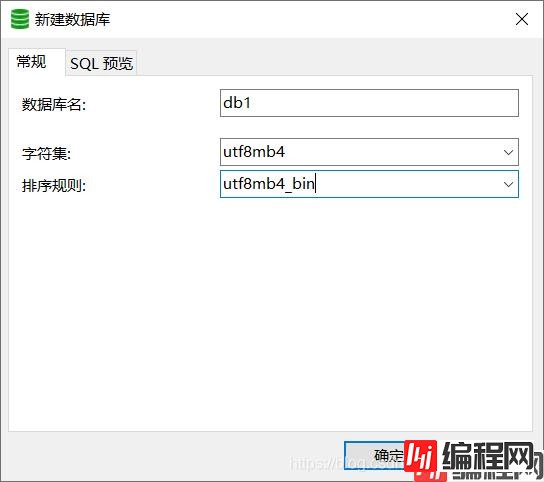
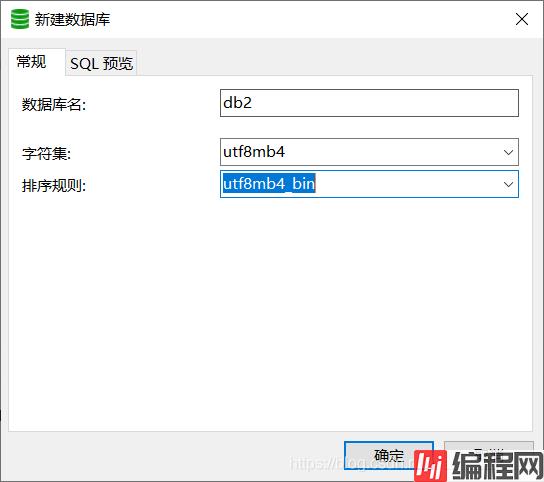
目录一、建库建表1.1 创建数据库db1和数据库db21.2 在数据库db1中创建表db11.3 在数据库db2中创建表db2二、创建SpringBoot项目2.1 pom.xml导
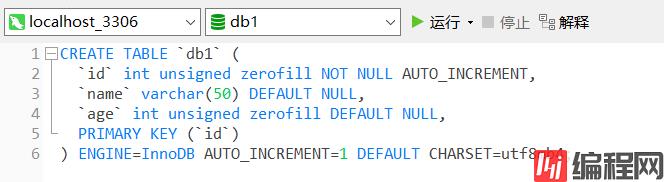
CREATE TABLE `db1` (
  `id` int unsigned zerofill NOT NULL AUTO_INCREMENT,
  `name` varchar(50) DEFAULT NULL,
  `age` int unsigned zerofill DEFAULT NULL,
  PRIMARY KEY (`id`)
) ENGINE=InnoDB AUTO_INCREMENT=1 DEFAULT CHARSET=utf8mb4;
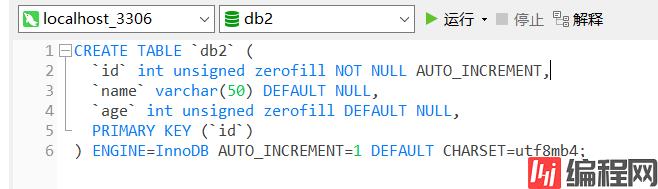
CREATE TABLE `db2` (
  `id` int unsigned zerofill NOT NULL AUTO_INCREMENT,
  `name` varchar(50) DEFAULT NULL,
  `age` int unsigned zerofill DEFAULT NULL,
  PRIMARY KEY (`id`)
) ENGINE=InnoDB AUTO_INCREMENT=1 DEFAULT CHARSET=utf8mb4;
<dependency>
            <groupId>org.springframework.boot</groupId>
            <artifactId>spring-boot-starter-WEB</artifactId>
        </dependency>
        <dependency>
            <groupId>org.mybatis.spring.boot</groupId>
            <artifactId>mybatis-spring-boot-starter</artifactId>
            <version>2.1.4</version>
        </dependency>

        <dependency>
            <groupId>Mysql</groupId>
            <artifactId>mysql-connector-java</artifactId>
            <scope>runtime</scope>
        </dependency>
        <dependency>
            <groupId>org.springframework.boot</groupId>
            <artifactId>spring-boot-starter-test</artifactId>
            <scope>test</scope>
            <exclusions>
                <exclusion>
                    <groupId>org.junit.vintage</groupId>
                    <artifactId>junit-vintage-engine</artifactId>
                </exclusion>
            </exclusions>
        </dependency>
        <dependency>
            <groupId>junit</groupId>
            <artifactId>junit</artifactId>
            <scope>test</scope>
        </dependency>
server:
  port: 8080 # 启动端口
spring:
  datasource:
    db1: # 数据源1
      jdbc-url: jdbc:mysql://localhost:3306/db1?serverTimezone=Asia/Shanghai&useUnicode=true&characterEncoding=utf8
      username: root
      passWord: root
      driver-class-name: com.mysql.cj.jdbc.Driver
    db2: # 数据源2
      jdbc-url: jdbc:mysql://localhost:3306/db2?serverTimezone=Asia/Shanghai&useUnicode=true&characterEncoding=utf8
      username: root
      password: root
      driver-class-name: com.mysql.cj.jdbc.Driver
server.port=8080

      spring.datasource.db1.url=jdbc:mysql://localhost:3306/db1?serverTimezone=Asia/Shanghai&useUnicode=true&characterEncoding=utf8
      spring.datasource.db1.username=root
      spring.datasource.db1.password=root
      spring.datasource.db1.driver-class-name=com.mysql.jdbc.Driver

      spring.datasource.db2.url=jdbc:mysql://localhost:3306/db2?serverTimezone=Asia/Shanghai&useUnicode=true&characterEncoding=utf8
      spring.datasource.db2.username=root
      spring.datasource.db2.password=root
      spring.datasource.db2.driver-class-name=com.mysql.jdbc.Driver
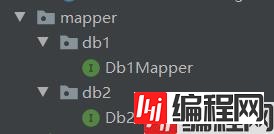
我个人是放在mapper包下,文件随便命名的
代码随便写的,测试而已
import org.apache.ibatis.annotations.Insert;
import org.apache.ibatis.annotations.Mapper;
@Mapper
public interface Db1Mapper {
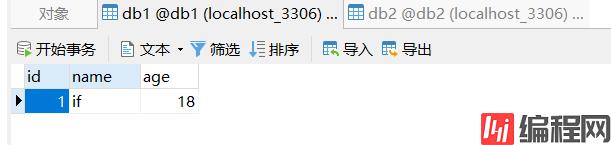
@Insert("insert into db1(name,age) values('if',18)")
int add();
}
import org.apache.ibatis.annotations.Insert;
import org.apache.ibatis.annotations.Mapper;
@Mapper
public interface Db2Mapper {
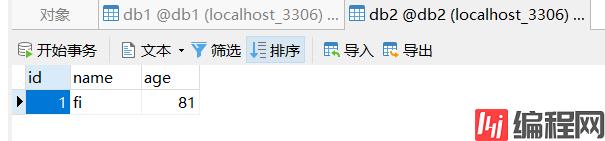
@Insert("insert into db2(name,age) values('fi',81)")
int add();
}
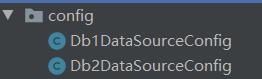
我个人是放在config包下,文件随便命名的
import org.apache.ibatis.session.SqlSessionFactory;
import org.mybatis.spring.SqlSessionFactoryBean;
import org.mybatis.spring.SqlSessionTemplate;
import org.mybatis.spring.annotation.MapperScan;
import org.springframework.beans.factory.annotation.Qualifier;
import org.springframework.boot.context.properties.ConfigurationProperties;
import org.springframework.boot.jdbc.DataSourceBuilder;
import org.springframework.context.annotation.Bean;
import org.springframework.context.annotation.Configuration;
import org.springframework.core.io.support.PathMatchingResourcePatternResolver;
import javax.sql.DataSource;


@Configuration
@MapperScan(basePackages = "com.ifyyf.study.mapper.db1", sqlSessionFactoryRef = "db1SqlSessionFactory")
public class Db1DataSourceConfig {
    @Bean("db1DataSource")
    @ConfigurationProperties(prefix = "spring.datasource.db1") //读取application.yml中的配置参数映射成为一个对象
    public DataSource getDb1DataSource(){
        return DataSourceBuilder.create().build();
    }

    @Bean("db1SqlSessionFactory")
    public SqlSessionFactory db1SqlSessionFactory(@Qualifier("db1DataSource") DataSource dataSource) throws Exception {
        SqlSessionFactoryBean bean = new SqlSessionFactoryBean();
        bean.setDataSource(dataSource);
        // mapper的xml形式文件位置必须要配置,不然将报错:no statement (这种错误也可能是mapper的xml中,namespace与项目的路径不一致导致)
        bean.setMapperLocations(new PathMatchingResourcePatternResolver().getResources("classpath*:mapping/db1
@Configuration
@MapperScan(basePackages = "com.ifyyf.study.mapper.db2", sqlSessionFactoryRef = "db2SqlSessionFactory")
public class Db2DataSourceConfig {
    @Bean("db2DataSource")
    @ConfigurationProperties(prefix = "spring.datasource.db2") //读取application.yml中的配置参数映射成为一个对象
    public DataSource getDb2DataSource(){
        return DataSourceBuilder.create().build();
    }

    @Bean("db2SqlSessionFactory")
    public SqlSessionFactory db2SqlSessionFactory(@Qualifier("db2DataSource") DataSource dataSource) throws Exception {
        SqlSessionFactoryBean bean = new SqlSessionFactoryBean();
        bean.setDataSource(dataSource);
        // mapper的xml形式文件位置必须要配置,不然将报错:no statement (这种错误也可能是mapper的xml中,namespace与项目的路径不一致导致)
        bean.setMapperLocations(new PathMatchingResourcePatternResolver().getResources("classpath*:mapping/db2/*.xml"));
        return bean.getObject();
    }

    @Bean("db2SqlSessionTemplate")
    public SqlSessionTemplate db2SqlSessionTemplate(@Qualifier("db2SqlSessionFactory") SqlSessionFactory sqlSessionFactory){
        return new SqlSessionTemplate(sqlSessionFactory);
    }
}
springboot项目中测试类进行测试
import com.ifyyf.study.mapper.db1.Db1Mapper;
import com.ifyyf.study.mapper.db2.Db2Mapper;
import org.junit.jupiter.api.Test;
import org.springframework.boot.test.context.SpringBootTest;
import javax.annotation.Resource;

@SpringBootTest
class StudyApplicationTests {
    @Resource
    private Db1Mapper db1Mapper;
    @Resource
    private Db2Mapper db2Mapper;
    @Test
    void contextLoads() {
        System.out.println(db1Mapper.add());
        System.out.println(db2Mapper.add());
    }
}

到此这篇关于教你使用springboot配置多数据源的文章就介绍到这了,更多相关springboot配置多数据源内容请搜索编程网以前的文章或继续浏览下面的相关文章希望大家以后多多支持编程网!
--结束END--
本文标题: 教你使用springboot配置多数据源
本文链接: https://www.lsjlt.com/news/126599.html(转载时请注明来源链接)
有问题或投稿请发送至: 邮箱/279061341@qq.com QQ/279061341
下载Word文档到电脑,方便收藏和打印~
2024-03-01
2024-03-01
2024-03-01
2024-02-29
2024-02-29
2024-02-29
2024-02-29
2024-02-29
2024-02-29
2024-02-29
回答
回答
回答
回答
回答
回答
回答
回答
回答
回答


官方手机版

微信公众号

商务合作


0