基于 Vue-tree-chart,生成项目效果预览,包含鼠标右击事件; vue-tree-chart:https://GitHub.com/tower1229/Vue-Tree-
基于 Vue-tree-chart,生成项目效果预览,包含鼠标右击事件;
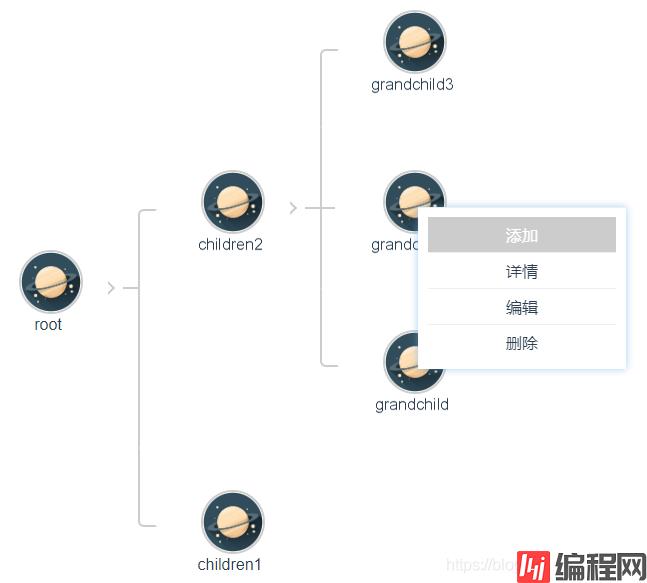
vue-tree-chart:https://GitHub.com/tower1229/Vue-Tree-Chart
大家可以直接安装使用(具体事例可以查看官网)
但是个人建议最好是下载整个项目,封装成组件调用
基于官网初始代码,封装组件:
<template>
    <table v-if="treeData.name">
      <tr>
        <td :colspan="Array.isArray(treeData.children) ? treeData.children.length * 2 : 1"
          :class="{parentLevel: Array.isArray(treeData.children) && treeData.children.length, extend: Array.isArray(treeData.children) && treeData.children.length && treeData.extend}"
        >
          <div :class="{node: true, hasMate: treeData.mate}">
            <div class="person"
              :class="Array.isArray(treeData.class) ? treeData.class : []"

            >
              <div class="avat">
                <img :src="treeData.image_url" @contextmenu="$emit('click-node', treeData)"/>
              </div>
              <!-- <div class="name">{{treeData.name}}</div> -->
            </div>
             <div class="paeson_name">{{treeData.name}}</div>
            <template v-if="Array.isArray(treeData.mate) && treeData.mate.length">
              <div class="person" v-for="(mate, mateIndex) in treeData.mate" :key="treeData.name+mateIndex"
                :class="Array.isArray(mate.class) ? mate.class : []"
                @click="$emit('click-node', mate)"
              >
                <div class="avat">
                  <img :src="mate.image_url" />
                </div>
                <!-- <div class="name">{{mate.name}}</div> -->
              </div>
              <div class="paeson_name">{{treeData.name}}</div>
            </template>
          </div>
          <div class="extend_handle" v-if="Array.isArray(treeData.children) && treeData.children.length" @click="toggleExtend(treeData)"></div>
        </td>
      </tr>
      <tr v-if="Array.isArray(treeData.children) && treeData.children.length && treeData.extend">
        <td v-for="(children, index) in treeData.children" :key="index" colspan="2" class="childLevel">
          <TreeChart :JSON="children" @click-node="$emit('click-node', $event)"/>
        </td>
      </tr>
    </table>
</template>

<script>
export default {
  name: "TreeChart",
  props: ["json"],
  data() {
    return {
      treeData: {}
    }
  },
  watch: {
    json: {
      handler: function(Props){
        let extendKey = function(jsonData){
          jsonData.extend = (jsonData.extend===void 0 ? true: !!jsonData.extend);
          if(Array.isArray(jsonData.children)){
            jsonData.children.forEach(c => {
              extendKey(c)
            })
          }
          return jsonData;
        }
        if(Props){
          this.treeData = extendKey(Props);
        }
      },
      immediate: true
    }
  },
  methods: {
    toggleExtend: function(treeData){
      treeData.extend = !treeData.extend;
      this.$forceUpdate();
    }
  }
}
</script>

<style scoped>
table{border-collapse: separate!important;border-spacing: 0!important;}
td{position: relative; vertical-align: top;padding:0 0 50px 0;text-align: center; }
.extend_handle{position: absolute;left:50%;bottom:30px; width:10px;height: 10px;padding:10px;transfORM: translate3D(-15px,0,0);cursor: pointer;}
.extend_handle:before{content:""; display: block; width:100%;height: 100%;box-sizing: border-box; border:2px solid;border-color:#ccc #ccc transparent transparent;
transform: rotateZ(135deg);transform-origin: 50% 50% 0;transition: transform ease 300ms;}
.extend_handle:hover:before{border-color:#333 #333 transparent transparent;}

.extend::after{content: "";position: absolute;left:50%;bottom:15px;height:15px;border-left:2px solid #ccc;transform: translate3d(-1px,0,0)}
.childLevel::before{content: "";position: absolute;left:50%;bottom:100%;height:15px;border-left:2px solid #ccc;transform: translate3d(-1px,0,0)}
.childLevel::after{content: "";position: absolute;left:0;right:0;top:-15px;border-top:2px solid #ccc;}
.childLevel:first-child:before, .childLevel:last-child:before{display: none;}
.childLevel:first-child:after{left:50%;height:15px; border:2px solid;border-color:#ccc transparent transparent #ccc;border-radius: 6px 0 0 0;transform: translate3d(1px,0,0)}
.childLevel:last-child:after{right:50%;height:15px; border:2px solid;border-color:#ccc #ccc transparent transparent;border-radius: 0 6px 0 0;transform: translate3d(-1px,0,0)}
.childLevel:first-child.childLevel:last-child::after{left:auto;border-radius: 0;border-color:transparent #ccc transparent transparent;transform: translate3d(1px,0,0)}
.node{position: relative; display: inline-block;margin: 0 1em;box-sizing: border-box; text-align: center;}
.node:hover{color: #2d8cf0;cursor: pointer;}
.node .person{position: relative; display: inline-block;z-index: 2;width:6em; overflow: hidden;}
.node .person .avat{display: block;width:4em;height: 4em;margin:auto;overflow:hidden; background:#fff;border:1px solid #ccc;box-sizing: border-box;}
.node .person .avat:hover{ border: 1px solid #2d8cf0;}
.node .person .avat img{width:100%;height: 100%;}
.node .person .name{height:2em;line-height: 2em;overflow: hidden;width:100%;}
.node.hasMate::after{content: "";position: absolute;left:2em;right:2em;top:2em;border-top:2px solid #ccc;z-index: 1;}
.node .paeson_name{transform: rotate(90deg);position: absolute; top: 68px;right: 39px;width: 88px;text-align: center;text-overflow: ellipsis; overflow: hidden; white-space: nowrap;}


.landscape{transform:translate(-100%,0) rotate(-90deg);transform-origin: 100% 0;}
.landscape .node{text-align: left;height: 8em;width:8em;right: 18px;}
.landscape .person{position: absolute; transform: rotate(90deg);height: 4em;top:4em;left: 2.5em;}
.landscape .person .avat{position: absolute;left: 0;border-radius: 2em;border-width:2px;}
.landscape .person .name{height: 4em; line-height: 4em;}
.landscape .hasMate{position: relative;}
.landscape .hasMate .person{position: absolute; }
.landscape .hasMate .person:first-child{left:auto; right:-4em;}
.landscape .hasMate .person:last-child{left: -4em;margin-left:0;}
</style>
新建一个组件,调用组件并增加鼠标右击事件:
<template>
  <div id="app">
    <TreeChart :json="data" :class="{landscape: 1}" @click-node="clickNode" />

    <div class="gl_prs_ctn" :style='[contextstyle]'>
          <ul class='gl_prs_li'>
              <li >添加</li>
              <li >详情</li>
              <li >编辑</li>
              <li >删除</li>
          </ul>
    </div>

  </div>
</template>

<script>
import TreeChart from "./treechar";
export default {
  name: 'app',
  components: {
    TreeChart
  },
  data() {
    return {
      data: {
        name: 'root',
        image_url: "Https://ss0.bdstatic.com/70cFvHSh_Q1YnxGkpoWK1HF6hhy/it/u=3689173839,956040439&fm=26&gp=0.jpg",
        class: ["rootNode"],
        children: [
          {
            name: 'children1',
            image_url: "https://ss0.bdstatic.com/70cFvHSh_Q1YnxGkpoWK1HF6hhy/it/u=3689173839,956040439&fm=26&gp=0.jpg"
          },
          {
            name: 'children2',
            image_url: "https://ss0.bdstatic.com/70cFvHSh_Q1YnxGkpoWK1HF6hhy/it/u=3689173839,956040439&fm=26&gp=0.jpg",
            children: [
              {
                name: 'grandchild',
                image_url: "https://ss0.bdstatic.com/70cFvHSh_Q1YnxGkpoWK1HF6hhy/it/u=3689173839,956040439&fm=26&gp=0.jpg"
              },
              {
                name: 'grandchild2',
                image_url: "https://ss0.bdstatic.com/70cFvHSh_Q1YnxGkpoWK1HF6hhy/it/u=3689173839,956040439&fm=26&gp=0.jpg"
              },
              {
                name: 'grandchild3',
                image_url: "https://ss0.bdstatic.com/70cFvHSh_Q1YnxGkpoWK1HF6hhy/it/u=3689173839,956040439&fm=26&gp=0.jpg"
              }
            ]
          }
        ]
      },
      contextstyle: {
          display: 'none',
          right: '0px',
          top: '0px',
          left: '0px',
          bottom: '0px',
      },
    }
  },
  created(){
      document.oncontextmenu = ()=>{return false}
      document.addEventListener("click", (event) => {
            if(this.contextstyle.display == 'block'){
                this.contextstyle.display = 'none'
            }
      })
  },
  methods: {
      clickNode(node){
        if(window.event.x + 188 > document.documentElement.clientWidth){
            this.contextstyle.left = 'unset';
            this.contextstyle.right = document.documentElement.clientWidth - window.event.x + 'px';
        }else{
            this.contextstyle.left = window.event.x + 'px';
        }
        if(window.event.y + 166 > document.documentElement.clientHeight){
            this.contextstyle.top = 'unset';
            this.contextstyle.bottom = document.documentElement.clientHeight - window.event.y + 'px';
        }else{
            this.contextstyle.top = window.event.y + 'px';
        }
        this.contextstyle.display = 'block';
      },
  }
}
</script>

<style>
#app {
  font-family: 'Avenir', Helvetica, Arial, sans-serif;
  -WEBkit-font-smoothing: antialiased;
  -moz-osx-font-smoothing: grayscale;
  text-align: center;
  color: #2c3e50;
  margin-top: 60px;
}
.gl_prs_ctn{
            width: 188px;
            background: rgb(255, 255, 255);
            box-shadow: rgba(0, 0, 0, 0.075) 0px 1px 1px inset, rgba(102, 175, 233, 0.6) 0px 0px 8px;
            z-index: 99999;
            position: fixed;
            padding: 10px;
            box-sizing: content-box;
            height: 142px;
}
.gl_prs_li{padding: unset;margin: unset;}
.gl_prs_li>li{
    cursor: pointer;
    list-style: none;
    border-bottom: 1px solid #efefef;
    padding: 7px 10px;
}
li:last-child { border: unset }
li:hover{
      background: #ccc;
      color: #fff;
}
</style>
到此这篇关于vue-tree-chart树形组件的实现(含鼠标右击事件)的文章就介绍到这了,更多相关vue-tree-chart 树形组件内容请搜索编程网以前的文章或继续浏览下面的相关文章希望大家以后多多支持编程网!
--结束END--
本文标题: vue-tree-chart树形组件的实现(含鼠标右击事件)
本文链接: https://www.lsjlt.com/news/140729.html(转载时请注明来源链接)
有问题或投稿请发送至: 邮箱/279061341@qq.com QQ/279061341
下载Word文档到电脑,方便收藏和打印~
2024-01-12
2023-05-20
2023-05-20
2023-05-20
2023-05-20
2023-05-20
2023-05-20
2023-05-20
2023-05-20
2023-05-20
回答
回答
回答
回答
回答
回答
回答
回答
回答
回答


官方手机版

微信公众号

商务合作


0