本文实例为大家分享了Android实现注册页面开发的具体代码,供大家参考,具体内容如下 在values文件里创建以下几个文件 colors代码: <?xml version
本文实例为大家分享了Android实现注册页面开发的具体代码,供大家参考,具体内容如下
在values文件里创建以下几个文件

colors代码:
<?xml version="1.0" encoding="utf-8"?>
<resources>
    <color name="purple_200">#FFBB86FC</color>
    <color name="purple_500">#FF6200EE</color>
    <color name="purple_700">#FF3700B3</color>
    <color name="teal_200">#FF03DAC5</color>
    <color name="teal_700">#FF018786</color>
    <color name="black">#FF000000</color>
    <color name="white">#FFFFFFFF</color>
</resources>
strings代码块
<resources>
    <string name="app_name">19260234anzidawang</string>
</resources>
修改为自己的学号
styles代码
<?xml version="1.0" encoding="utf-8"?>
<resources>
    <style name="hLine">
        <item name="android:layout_width">match_parent</item>
        <item name="android:layout_height">1dp</item>
        <item name="android:background">@android:color/white</item>
    </style>
    <style name="vLine">
        <item name="android:layout_width">1dp</item>
        <item name="android:layout_height">match_parent</item>
        <item name="android:background">@android:color/white</item>
    </style>
    <style name="tvone">
        <item name="android:layout_height">match_parent</item>
        <item name="android:layout_width">0dp</item>
        <item name="android:layout_weight">1</item>
        <item name="android:drawablePadding">8dp</item>
        <item name="android:gravity">center_horizontal</item>
        <item name="android:paddingTop">40dp</item>
        <item name="android:textColor">@android:color/white</item>
        <item name="android:textSize">15dp</item>
    </style>
    <style name="tvtwo">
        <item name="android:layout_width">wrap_content</item>
        <item name="android:layout_height">wrap_content</item>
        <item name="android:layout_marginLeft">20dp</item>
        <item name="android:textColor">@android:color/white</item>
        <item name="android:textSize">15dp</item>
    </style>
    <style name="etOne">
        <item name="android:layout_width">match_parent</item>
        <item name="android:layout_height">wrap_content</item>
        <item name="android:layout_marginLeft">30dp</item>
        <item name="android:background">@null</item>
        <item name="android:textColor">@android:color/white</item>

    </style>
</resources>布局文件(activity_main)
<?xml version="1.0" encoding="utf-8"?>
<RelativeLayout
xmlns:android="Http://schemas.android.com/apk/res/android"
android:layout_width="match_parent"
android:layout_height="match_parent"
android:background="@drawable/reGISter_bg">
<LinearLayout
android:layout_width="match_parent"
android:layout_height="match_parent"
android:orientation="vertical">
<TextView
android:id="@+id/tv_title"
android:layout_width="match_parent"
android:layout_height="50dp"
android:background="#01ceff"
android:gravity="center"
android:text="注册"
android:textColor="@color/white"
android:textSize="20sp"/>
<LinearLayout
android:layout_width="match_parent"
android:layout_height="130dp"
android:orientation="horizontal">
<TextView
style="@style/tvone"
android:drawableTop="@drawable/qq_icon"
android:text="qq register"/>
<View style="@style/vLine"/>
<TextView
style="@style/tvone"
android:drawableTop="@drawable/weixin_icon"
android:text="wechat register"/>
</LinearLayout>
<View style="@style/hLine"/>
<LinearLayout
android:layout_width="match_parent"
android:layout_height="wrap_content"
android:gravity="center"
android:orientation="horizontal"
android:padding="15dp">
<ImageView
android:layout_width="wrap_content"
android:layout_height="match_parent"
android:src="@drawable/email_icon"/>
<TextView
android:layout_width="wrap_content"
android:layout_height="match_parent"
android:layout_marginLeft="15dp"
android:text="use email register"
android:textColor="@android:color/white"
android:textSize="15sp"/>
</LinearLayout>
<View style="@style/hLine" />
<LinearLayout
android:layout_width="match_parent"
android:layout_height="wrap_content"
android:orientation="horizontal"
android:padding="15dp">
<TextView
style="@style/tvtwo"
android:text="name"/>
<EditText
android:id="@+id/et_name"
style="@style/etOne"/>
</LinearLayout>
<View style="@style/hLine"/>
<LinearLayout
android:layout_width="match_parent"
android:layout_height="wrap_content"
android:orientation="horizontal"
android:padding="15dp">
<TextView
style="@style/tvtwo"
android:text="email"/>
<EditText
android:id="@+id/et_mail"
style="@style/etOne"/>
</LinearLayout>
<View style="@style/hLine"/>
<LinearLayout
android:layout_width="match_parent"
android:layout_height="wrap_content"
android:orientation="horizontal"
android:padding="15dp">
<TextView
style="@style/tvtwo"
android:text="passWord"/>
<EditText
android:id="@+id/et_pwd"
style="@style/etOne"
android:inputType="textPassword"/>
</LinearLayout>
<View style="@style/hLine"/>
<LinearLayout
android:layout_width="match_parent"
android:layout_height="wrap_content"
android:orientation="horizontal"
android:padding="15dp">
<TextView
style="@style/tvtwo"
android:text="glender"/>
<RadioGroup
android:id="@+id/rg_sex"
android:layout_width="match_parent"
android:layout_height="match_parent"
android:layout_marginLeft="50dp"
android:orientation="horizontal">
<RadioButton
android:id="@+id/rb_boy"
android:layout_width="wrap_content"
android:layout_height="wrap_content"
android:text="man"
android:textColor="@android:color/white"
android:textSize="15sp"/>
<RadioButton
android:id="@+id/rb_girl"
style="@style/tvtwo"
android:text="woman"/>
</RadioGroup>
</LinearLayout>
<View style="@style/hLine"/>
<LinearLayout
android:layout_width="match_parent"
android:layout_height="wrap_content"
android:orientation="horizontal"
android:padding="15dp">
<TextView
android:layout_width="wrap_content"
android:layout_height="wrap_content"
android:text="chose your hobby"
android:textColor="@android:color/white"
android:textSize="15sp"/>
<CheckBox
android:id="@+id/cb_sing"
android:layout_width="wrap_content"
android:layout_height="wrap_content"
android:text="sing"
android:textColor="@android:color/white"
android:textSize="15sp"/>
<CheckBox
android:id="@+id/cb_dance"
android:layout_width="wrap_content"
android:layout_height="wrap_content"
android:text="dancing"
android:textColor="@android:color/white"
android:textSize="15sp"/>
<CheckBox
android:id="@+id/cb_read"
android:layout_width="wrap_content"
android:layout_height="wrap_content"
android:text="read"
android:textColor="@android:color/white"
android:textSize="15sp"/>
</LinearLayout>
<View style="@style/hLine"/>
<View
android:id="@+id/v_line"
android:layout_width="match_parent"
android:layout_height="1dp"
android:layout_above="@+id/btn_submit"
android:background="@android:color/darker_gray"/>
<Button
android:id="@+id/btn_submit"
android:layout_width="match_parent"
android:layout_height="50dp"
android:layout_alignParentBottom="true"
android:gravity="center"
android:text="uodate"
android:textColor="@android:color/white"
android:background="@null"
android:textSize="18sp"/>
</LinearLayout>
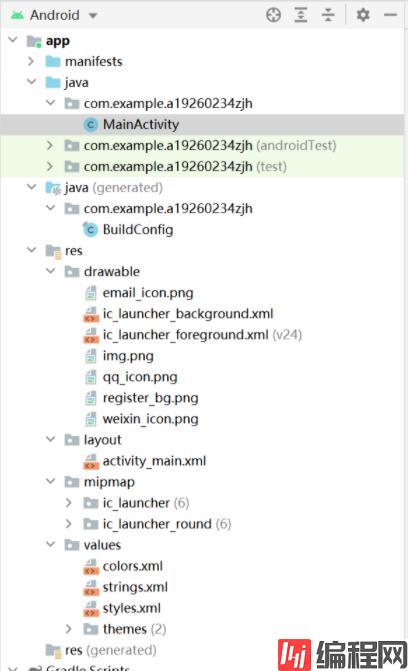
</RelativeLayout>在drawable下面创建存放图片的文件

如何创建,首先复制图片.右击drawable,ctrl +v.
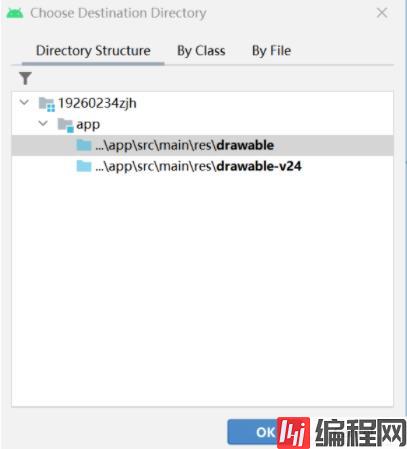
选择第一个路径就行.两个路径区别不加以赘述
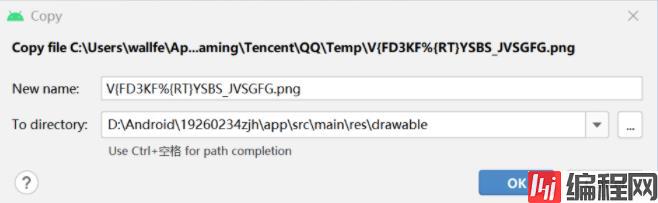
下面命名就ok.
java代码
package com.example.a19260234zjh;

import androidx.appcompat.app.AppCompatActivity;

import android.os.Bundle;
import android.text.TextUtils;
import android.util.Log;
import android.view.View;
import android.widget.Button;
import android.widget.CheckBox;
import android.widget.CompoundButton;
import android.widget.EditText;
import android.widget.RadioGroup;
import android.widget.Toast;

public class MainActivity extends AppCompatActivity implements
        View.OnClickListener, CompoundButton.OnCheckedChangeListener {
    private EditText et_name,et_email,et_pwd;
    private Button btn_submit;
    private String name,email,pwd,sex,hobbys;
    private RadioGroup rg_sex;
    private CheckBox cb_sing,cb_dance,cb_read;

    @Override
    protected void onCreate(Bundle savedInstanceState) {
        super.onCreate(savedInstanceState);
        setContentView(R.layout.activity_main);
        init();
    }
    private void init(){
        et_name=findViewById(R.id.et_name);
        et_email=findViewById(R.id.et_mail);
        et_pwd=findViewById(R.id.et_pwd);
        rg_sex=findViewById(R.id.rg_sex);
        cb_sing=findViewById(R.id.cb_sing);
        cb_read=findViewById(R.id.cb_read);
        cb_dance=findViewById(R.id.cb_dance);
        btn_submit=findViewById(R.id.btn_submit);
        btn_submit.setOnClickListener(this);
        cb_sing.setOnCheckedChangeListener(this);
        cb_dance.setOnCheckedChangeListener(this);
        cb_read.setOnCheckedChangeListener(this);
        hobbys=new String();
        rg_sex.setOnCheckedChangeListener(new RadioGroup.OnCheckedChangeListener() {
            @Override
            public void onCheckedChanged(RadioGroup radioGroup, int checkedId) {
                switch (checkedId){
                    case R.id.rb_boy:
                        sex="man";
                    case R.id.rb_girl:
                        sex="woman";
                        break;
                }

            }
        });


    }
    private void getData(){
        name=et_name.getText().toString().trim();
        email=et_email.getText().toString().trim();
        pwd=et_pwd.getText().toString().trim();
    }
    @Override
    public void onClick(View v){
        switch (v.getId()){
            case R.id.btn_submit:
                getData();
                if(TextUtils.isEmpty(name)){
                    Toast.makeText(MainActivity.this,"input name",
                            Toast.LENGTH_SHORT).show();
                }
                else if(TextUtils.isEmpty(email)){
                    Toast.makeText(MainActivity.this,"input email",
                            Toast.LENGTH_SHORT).show();
                }
                else if(TextUtils.isEmpty(pwd)){
                    Toast.makeText(MainActivity.this,"input password",
                            Toast.LENGTH_SHORT).show();
                }
                 else if(TextUtils.isEmpty(sex)){
                    Toast.makeText(MainActivity.this,"input glendar",
                            Toast.LENGTH_SHORT).show();
                }
                 else if(TextUtils.isEmpty(hobbys)){
                    Toast.makeText(MainActivity.this,"input hobbys",
                            Toast.LENGTH_SHORT).show();
                } else{
                     Toast.makeText(MainActivity.this,"success",
                             Toast.LENGTH_SHORT).show();
                    Log.i("MainActivity","infORMation"+"name:"+name+",email:"+email+
                            ",sex"+sex+",hobby"+hobbys);
                }
                 break;
        }
    }
    @Override
    public void onCheckedChanged(CompoundButton buttonViwe,boolean isChecked){
        String motion=buttonViwe.getText().toString();
        if(isChecked){
            if(!hobbys.contains(motion)){
                hobbys=hobbys+motion;
            }
        }else {
            if(hobbys.contains(motion)){
                hobbys=hobbys.replace(motion,"");
            }
        }
    }
}
以上就是实现注册页面所需要的代码.
效果如下:
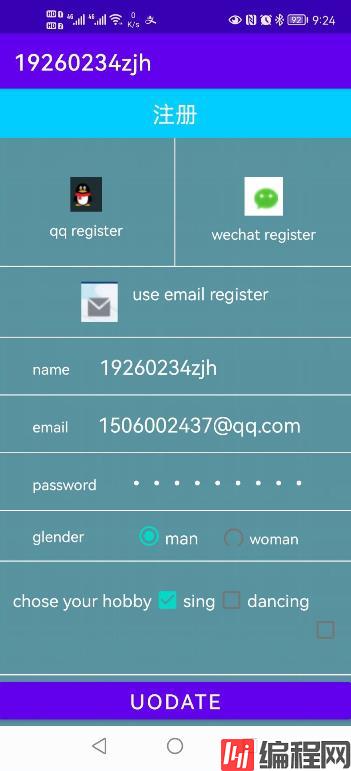
每个人的图片不一样,效果也不一样.建议图片尽量小一些。
--结束END--
本文标题: android实现注册页面开发
本文链接: https://www.lsjlt.com/news/147060.html(转载时请注明来源链接)
有问题或投稿请发送至: 邮箱/279061341@qq.com QQ/279061341
下载Word文档到电脑,方便收藏和打印~
2024-01-21
2023-10-28
2023-10-28
2023-10-27
2023-10-27
2023-10-27
2023-10-27
回答
回答
回答
回答
回答
回答
回答
回答
回答
回答


官方手机版

微信公众号

商务合作


0