简单的Android开发登录注册,这个是没有连数据库的。 首先,新建项目,新建一个登录页面LoginActivity和注册页面ReGISterActivity。 下面是登录页面的代码
首先,新建项目,新建一个登录页面LoginActivity和注册页面ReGISterActivity。
下面是登录页面的代码:activity_login.xml
<?xml version="1.0" encoding="utf-8"?>
<LinearLayout xmlns:android="Http://schemas.android.com/apk/res/android"
    xmlns:app="http://schemas.android.com/apk/res-auto"
    xmlns:tools="http://schemas.android.com/tools"
    android:layout_width="match_parent"
    android:layout_height="match_parent"
    android:orientation="vertical"
    tools:context=".LoginActivity">
    <LinearLayout
        android:layout_width="match_parent"
        android:layout_height="wrap_content"
        android:orientation="horizontal"
        android:layout_marginLeft="20dp"
        android:layout_marginRight="20dp"
        android:layout_marginTop="20dp"
        android:gravity="center_vertical">

        <TextView
            android:layout_width="wrap_content"
            android:layout_height="wrap_content"
            android:text="账号:"
            android:textSize="25sp" />

        <EditText
            android:id="@+id/et_account"
            android:layout_width="match_parent"
            android:hint="请输入用户名或手机号"
            style="@style/MyEditStyle"
            android:layout_marginLeft="10dp"
            android:inputType="text"></EditText>
    </LinearLayout>

    <LinearLayout
        android:layout_width="match_parent"
        android:layout_height="wrap_content"
        android:orientation="horizontal"
        android:layout_marginLeft="20dp"
        android:layout_marginRight="20dp"
        android:layout_marginTop="20dp"
        android:gravity="center_vertical">

        <TextView
            android:layout_width="wrap_content"
            android:layout_height="wrap_content"
            android:text="密码:"
            android:textSize="25sp" />

        <EditText
            android:id="@+id/et_passWord"
            android:layout_width="match_parent"
            android:hint="请输入密码"
            style="@style/MyEditStyle"
            android:layout_marginLeft="10dp"
            android:inputType="numberPassword"></EditText>
    </LinearLayout>
    <LinearLayout
        android:layout_width="match_parent"
        android:layout_height="wrap_content"
        android:orientation="horizontal"
        android:gravity="center"
        android:layout_marginTop="20dp"
        android:layout_marginLeft="20dp"
        android:layout_marginRight="20dp"
        >
        <CheckBox
            android:id="@+id/cb_remember"
            android:layout_width="wrap_content"
            android:layout_height="wrap_content"
            android:text="记住密码"></CheckBox>
    </LinearLayout>
    <Button
        android:id="@+id/btn_login"
        android:layout_width="match_parent"
        android:layout_height="wrap_content"
        android:text="登录"
        style="@style/MyBtnStyle"
        android:layout_marginTop="20dp"
        android:layout_marginLeft="20dp"
        android:layout_marginRight="20dp"></Button>
    <TextView
        android:layout_width="wrap_content"
        android:layout_height="wrap_content"
        android:textColor="@color/colorPrimary"
        android:text="还没有账号?"
        android:layout_gravity="right"
        android:layout_marginRight="20dp"
        android:layout_marginTop="10dp"
        android:onClick="toRegister"
        ></TextView>

</LinearLayout>
效果如图:

下面是注册页面的代码:activity_register.xml
<?xml version="1.0" encoding="utf-8"?>
<LinearLayout xmlns:android="http://schemas.android.com/apk/res/android"
xmlns:app="http://schemas.android.com/apk/res-auto"
xmlns:tools="http://schemas.android.com/tools"
android:layout_width="match_parent"
android:layout_height="match_parent"
tools:context=".RegisterActivity"
android:orientation="vertical">
<LinearLayout
android:layout_width="match_parent"
android:layout_height="wrap_content"
android:orientation="horizontal"
android:layout_marginLeft="20dp"
android:layout_marginRight="20dp"
android:layout_marginTop="20dp"
android:gravity="center_vertical">
<TextView
android:layout_width="wrap_content"
android:layout_height="wrap_content"
android:text="账  号:"
android:textSize="25sp" />
<EditText
android:id="@+id/et_account"
android:layout_width="match_parent"
android:hint="请输入用户名或手机号"
style="@style/MyEditStyle"
android:layout_marginLeft="10dp"
android:inputType="text"></EditText>
</LinearLayout>
<LinearLayout
android:layout_width="match_parent"
android:layout_height="wrap_content"
android:orientation="horizontal"
android:layout_marginLeft="20dp"
android:layout_marginRight="20dp"
android:layout_marginTop="20dp"
android:gravity="center_vertical">
<TextView
android:layout_width="wrap_content"
android:layout_height="wrap_content"
android:text="密  码:"
android:textSize="25sp" />
<EditText
android:id="@+id/et_password"
android:layout_width="match_parent"
android:hint="请输入密码"
style="@style/MyEditStyle"
android:layout_marginLeft="10dp"
android:inputType="numberPassword"></EditText>
</LinearLayout>
<LinearLayout
android:layout_width="match_parent"
android:layout_height="wrap_content"
android:orientation="horizontal"
android:layout_marginLeft="20dp"
android:layout_marginRight="20dp"
android:layout_marginTop="20dp"
android:gravity="center_vertical">
<TextView
android:layout_width="wrap_content"
android:layout_height="wrap_content"
android:text="确认密码:"
android:textSize="25sp" />
<EditText
android:id="@+id/et_password_Confirm"
android:layout_width="match_parent"
android:hint="请再次输入密码"
style="@style/MyEditStyle"
android:layout_marginLeft="10dp"
android:inputType="numberPassword"></EditText>
</LinearLayout>
<Button
android:id="@+id/btn_register"
android:layout_width="match_parent"
android:layout_height="wrap_content"
android:text="注册"
style="@style/MyBtnStyle"
android:layout_marginTop="20dp"
android:layout_marginLeft="20dp"
android:layout_marginRight="20dp"></Button>
<CheckBox
android:id="@+id/cb_agree"
android:layout_width="wrap_content"
android:layout_height="wrap_content"
android:textColor="@color/colorPrimary"
android:text="还没有账号?"
android:layout_marginRight="20dp"
android:layout_marginTop="10dp"></CheckBox>
</LinearLayout>效果如图:

最后,在LoginActivity.java中,加入一串代码:getSupportActionBar().setTitle("登录");
在RegisterActivity.java中,加入一串代码:getSupportActionBar().setTitle("注册");
public class LoginActivity extends AppCompatActivity {
public static final int REQUEST_CODE_REGISTER = 1;
private static final String TAG="tag";
private Button btnLogin;
private EditText etAccount,etPassword;
private CheckBox cbRemember;
private String userName="a";
private String pass="123";
@Override
protected void onCreate(Bundle savedInstanceState) {
super.onCreate(savedInstanceState);
setContentView(R.layout.activity_login);
getSupportActionBar().setTitle("登录");
}
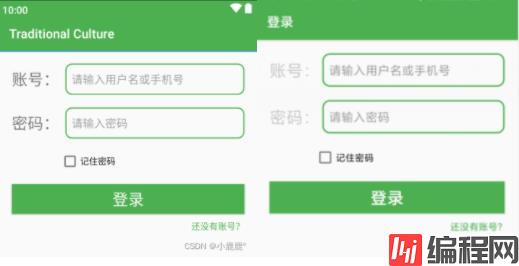
}上面的代码是LoginActivity.java中的代码,其实要添加的只有一句,其他都写出来是为了让读者能看懂,具体写在哪里。这段代码的作用是: 使标题栏那边显示的文字是登录/注册,而不是一串默认的英文
下面两张图片,左边是未添加代码的效果,右边是添加代码后的效果
写到这里,页面整体布局大致完成了,下面,你们需要添加部分细节,来使得颜色和样式跟我一致。我在上面的xml文件代码中,有下面这个代码:
style="@style/MyEditStyle"和style="@style/MyBtnStyle"你们在前面写的时候,可能会报错,很正常,因为这是引用控件样式的代码,你们需要设置一下这个样式,然后引用,就不会报错啦。
这是设置EditText和Button控件的样式,首先新建style.xml文件。在values中右键,New--Values Resource File,文件名为style。在style.xml文件中,写如下代码:
<?xml version="1.0" encoding="utf-8"?>
<resources>

    <style name="MyBtnStyle">
        <item name="android:textColor">@color/white</item>
        <item name="android:textSize">25sp</item>
        <item name="android:background">@drawable/btn_bg_selector</item>
        <item name="android:layout_marginTop">20dp</item>
        <item name="android:layout_marginRight">20dp</item>
        <item name="android:layout_marginLeft">20dp</item>
    </style>

    <style name="MyEditStyle">
        <item name="android:textSize">18sp</item>
        <item name="android:background">@drawable/edit_text_bg</item>
        <item name="android:paddingLeft">10dp</item>
        <item name="android:layout_height">50dp</item>
    </style>

</resources>
这里面又引用了样式,是设置输入框的边框和按钮的背景颜色。继续下面的步骤:drawable右键--New--Drawable Resource File,文件名为:btn_bg_selector,代码如下:
<?xml version="1.0" encoding="utf-8"?>
<selector xmlns:android="http://schemas.android.com/apk/res/android">
    <item android:state_pressed="true" android:drawable="@color/colorPrimary"></item>
    <item android:state_pressed="false" android:drawable="@color/colorPrimaryDark"></item>

</selector>
drawable右键--New--Drawable Resource File,文件名为:edit_text_bg,代码如下:
<?xml version="1.0" encoding="utf-8"?>
<shape xmlns:android="http://schemas.android.com/apk/res/android"
    android:shape="rectangle"
    >

    <stroke android:width="2dp" android:color="@color/colorPrimary"></stroke>
    <corners android:radius="10dp"></corners>

</shape>
最后,再调整一下导航栏和标题栏的颜色,就OK啦
colors.xml文件中,添加绿色这个颜色,如下代码,
<color name="colorPrimary">@color/green_500</color>
    <color name="colorPrimaryDark">@color/green_700</color>
    <color name="colorAccent">#E64A19</color>

    <color name="green_200">#A5D6A7</color>
    <color name="green_500">#4CAF50</color>
<color name="green_700">#4CAF50</color>
themes.xml文件中,只需要修改前两个item的内容,其他代码是为了你们参照一下位置,别改错了。代码如下:
<resources xmlns:tools="http://schemas.android.com/tools">
    <!-- Base application theme. -->
    <style name="Theme.TraditionalCulture" parent="Theme.MaterialComponents.DayNight.DarkActionBar.Bridge">
        <!-- Primary brand color. -->
        <item name="colorPrimary">@color/colorPrimary</item>
        <item name="colorPrimaryVariant">@color/colorPrimaryDark</item>
        <item name="colorOnPrimary">@color/white</item>
        <item name="colorAccent">@color/colorAccent</item>
        <!-- Secondary brand color. -->
        <item name="colorSecondary">@color/teal_200</item>
        <item name="colorSecondaryVariant">@color/teal_700</item>
        <item name="colorOnSecondary">@color/black</item>
        <!-- Status bar color. -->
        <item name="android:statusBarColor" tools:targetapi="l">?attr/colorPrimaryVariant</item>
        <!-- Customize your theme here. -->
    </style>
</resources>
到这里,你的登录注册页面就完成啦!
--结束END--
本文标题: Android实现登录注册页面(上)
本文链接: https://www.lsjlt.com/news/147063.html(转载时请注明来源链接)
有问题或投稿请发送至: 邮箱/279061341@qq.com QQ/279061341
下载Word文档到电脑,方便收藏和打印~
2024-01-21
2023-10-28
2023-10-28
2023-10-27
2023-10-27
2023-10-27
2023-10-27
回答
回答
回答
回答
回答
回答
回答
回答
回答
回答


官方手机版

微信公众号

商务合作


0