Python 官方文档:入门教程 => 点击学习
文章先介绍了关于俄罗斯方块游戏的几个术语。 边框——由10*20个空格组成,方块就落在这里面。 盒子——组成方块的其中小方块,是组成方块的基本单元。 方块——从边框顶掉下的东西,游戏者可以翻转
文章先介绍了关于俄罗斯方块游戏的几个术语。
边框——由10*20个空格组成,方块就落在这里面。 盒子——组成方块的其中小方块,是组成方块的基本单元。 方块——从边框顶掉下的东西,游戏者可以翻转和改变位置。每个方块由4个盒子组成。 形状——不同类型的方块。这里形状的名字被叫做T, S, Z ,J, L, I , O。如下图所示: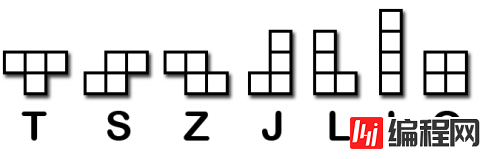
模版——用一个列表存放形状被翻转后的所有可能样式。全部存放在变量里,变量名字如S_SHAPE_TEMPLATE or J_SHAPE_TEMPLATE
着陆——当一个方块到达边框的底部或接触到在其他的盒子话,我们就说这个方块着陆了。那样的话,另一个方块就会开始下落。
下面先把代码敲一遍,试着了解作者意图,体会俄罗斯方块游戏的制作过程。
import random, time, pygame, sys
from pygame.locals import *

FPS = 25
WINDOWWIDTH = 640
WINDOWHEIGHT = 480
BOXSIZE = 20
BOARDWIDTH = 10
BOARDHEIGHT = 20
BLANK = '.'

MOVESIDEWAYSFREQ = 0.15
MOVEDOWNFREQ = 0.1

XMARGIN = int((WINDOWWIDTH - BOARDWIDTH * BOXSIZE) / 2)
TOPMARGIN = WINDOWHEIGHT - (BOARDHEIGHT * BOXSIZE) - 5
#        R  G  B
WHITE    = (255, 255, 255)
GRAY    = (185, 185, 185)
BLACK    = ( 0,  0,  0)
RED     = (155,  0,  0)
LIGHTRED  = (175, 20, 20)
GREEN    = ( 0, 155,  0)
LIGHTGREEN = ( 20, 175, 20)
BLUE    = ( 0,  0, 155)
LIGHTBLUE  = ( 20, 20, 175)
YELLOW   = (155, 155,  0)
LIGHTYELLOW = (175, 175, 20)

BORDERCOLOR = BLUE
BGCOLOR = BLACK
TEXTCOLOR = WHITE
TEXTSHADOWCOLOR = GRAY
COLORS   = (   BLUE,   GREEN,   RED,   YELLOW)
LIGHTCOLORS = (LIGHTBLUE, LIGHTGREEN, LIGHTRED, LIGHTYELLOW)
assert len(COLORS) == len(LIGHTCOLORS) # each color must have light color

TEMPLATEWIDTH = 5
TEMPLATEHEIGHT = 5

S_SHAPE_TEMPLATE = [['.....',
           '.....',
           '..OO.',
           '.OO..',
           '.....'],
          ['.....',
           '..O..',
           '..OO.',
           '...O.',
           '.....']]

Z_SHAPE_TEMPLATE = [['.....',
           '.....',
           '.OO..',
           '..OO.',
           '.....'],
          ['.....',
           '..O..',
           '.OO..',
           '.O...',
           '.....']]

I_SHAPE_TEMPLATE = [['..O..',
           '..O..',
           '..O..',
           '..O..',
           '.....'],
          ['.....',
           '.....',
           'OOOO.',
           '.....',
           '.....']]

O_SHAPE_TEMPLATE = [['.....',
           '.....',
           '.OO..',
           '.OO..',
           '.....']]

J_SHAPE_TEMPLATE = [['.....',
           '.O...',
           '.OOO.',
           '.....',
           '.....'],
          ['.....',
           '..OO.',
           '..O..',
           '..O..',
           '.....'],
          ['.....',
           '.....',
           '.OOO.',
           '...O.',
           '.....'],
          ['.....',
           '..O..',
           '..O..',
           '.OO..',
           '.....']]

L_SHAPE_TEMPLATE = [['.....',
           '...O.',
           '.OOO.',
           '.....',
           '.....'],
          ['.....',
           '..O..',
           '..O..',
           '..OO.',
           '.....'],
          ['.....',
           '.....',
           '.OOO.',
           '.O...',
           '.....'],
          ['.....',
           '.OO..',
           '..O..',
           '..O..',
           '.....']]

T_SHAPE_TEMPLATE = [['.....',
           '..O..',
           '.OOO.',
           '.....',
           '.....'],
          ['.....',
           '..O..',
           '..OO.',
           '..O..',
           '.....'],
          ['.....',
           '.....',
           '.OOO.',
           '..O..',
           '.....'],
          ['.....',
           '..O..',
           '.OO..',
           '..O..',
           '.....']]

PIECES = {'S': S_SHAPE_TEMPLATE,
     'Z': Z_SHAPE_TEMPLATE,
     'J': J_SHAPE_TEMPLATE,
     'L': L_SHAPE_TEMPLATE,
     'I': I_SHAPE_TEMPLATE,
     'O': O_SHAPE_TEMPLATE,
     'T': T_SHAPE_TEMPLATE}


def main():
  global FPSCLOCK, DISPLAYSURF, BASICFONT, BIGFONT
  pygame.init()
  FPSCLOCK = pygame.time.Clock()
  DISPLAYSURF = pygame.display.set_mode((WINDOWWIDTH, WINDOWHEIGHT))
  BASICFONT = pygame.font.Font('freesansbold.ttf', 18)
  BIGFONT = pygame.font.Font('freesansbold.ttf', 100)
  pygame.display.set_caption('Tetromino')

  showTextScreen('Tetromino')
  while True: # game loop
    if random.randint(0, 1) == 0:
      pygame.mixer.music.load('tetrisb.mid')
    else:
      pygame.mixer.music.load('tetrisc.mid')
    pygame.mixer.music.play(-1, 0.0)
    runGame()
    pygame.mixer.music.stop()
    showTextScreen('Game Over')


def runGame():
  # setup variables for the start of the game
  board = getBlankBoard()
  lastMoveDownTime = time.time()
  lastMoveSidewaysTime = time.time()
  lastFallTime = time.time()
  movingDown = False # note: there is no movingUp variable
  movingLeft = False
  movingRight = False
  score = 0
  level, fallFreq = calculateLevelAndFallFreq(score)

  fallingPiece = getNewPiece()
  nextPiece = getNewPiece()

  while True: # game loop
    if fallingPiece == None:
      # No falling piece in play, so start a new piece at the top
      fallingPiece = nextPiece
      nextPiece = getNewPiece()
      lastFallTime = time.time() # reset lastFallTime

      if not isValidPosition(board, fallingPiece):
        return # can't fit a new piece on the board, so game over

    checkForQuit()
    for event in pygame.event.get(): # event handling loop
      if event.type == KEYUP:
        if (event.key == K_p):
          # Pausing the game
          DISPLAYSURF.fill(BGCOLOR)
          pygame.mixer.music.stop()
          showTextScreen('Paused') # pause until a key press
          pygame.mixer.music.play(-1, 0.0)
          lastFallTime = time.time()
          lastMoveDownTime = time.time()
          lastMoveSidewaysTime = time.time()
        elif (event.key == K_LEFT or event.key == K_a):
          movingLeft = False
        elif (event.key == K_RIGHT or event.key == K_d):
          movingRight = False
        elif (event.key == K_DOWN or event.key == K_s):
          movingDown = False

      elif event.type == KEYDOWN:
        # moving the piece sideways
        if (event.key == K_LEFT or event.key == K_a) and isValidPosition(board, fallingPiece, adjX=-1):
          fallingPiece['x'] -= 1
          movingLeft = True
          movingRight = False
          lastMoveSidewaysTime = time.time()

        elif (event.key == K_RIGHT or event.key == K_d) and isValidPosition(board, fallingPiece, adjX=1):
          fallingPiece['x'] += 1
          movingRight = True
          movingLeft = False
          lastMoveSidewaysTime = time.time()

        # rotating the piece (if there is room to rotate)
        elif (event.key == K_UP or event.key == K_w):
          fallingPiece['rotation'] = (fallingPiece['rotation'] + 1) % len(PIECES[fallingPiece['shape']])
          if not isValidPosition(board, fallingPiece):
            fallingPiece['rotation'] = (fallingPiece['rotation'] - 1) % len(PIECES[fallingPiece['shape']])
        elif (event.key == K_q): # rotate the other direction
          fallingPiece['rotation'] = (fallingPiece['rotation'] - 1) % len(PIECES[fallingPiece['shape']])
          if not isValidPosition(board, fallingPiece):
            fallingPiece['rotation'] = (fallingPiece['rotation'] + 1) % len(PIECES[fallingPiece['shape']])

        # making the piece fall faster with the down key
        elif (event.key == K_DOWN or event.key == K_s):
          movingDown = True
          if isValidPosition(board, fallingPiece, adjY=1):
            fallingPiece['y'] += 1
          lastMoveDownTime = time.time()

        # move the current piece all the way down
        elif event.key == K_SPACE:
          movingDown = False
          movingLeft = False
          movingRight = False
          for i in range(1, BOARDHEIGHT):
            if not isValidPosition(board, fallingPiece, adjY=i):
              break
          fallingPiece['y'] += i - 1

    # handle moving the piece because of user input
    if (movingLeft or movingRight) and time.time() - lastMoveSidewaysTime > MOVESIDEWAYSFREQ:
      if movingLeft and isValidPosition(board, fallingPiece, adjX=-1):
        fallingPiece['x'] -= 1
      elif movingRight and isValidPosition(board, fallingPiece, adjX=1):
        fallingPiece['x'] += 1
      lastMoveSidewaysTime = time.time()

    if movingDown and time.time() - lastMoveDownTime > MOVEDOWNFREQ and isValidPosition(board, fallingPiece, adjY=1):
      fallingPiece['y'] += 1
      lastMoveDownTime = time.time()

    # let the piece fall if it is time to fall
    if time.time() - lastFallTime > fallFreq:
      # see if the piece has landed
      if not isValidPosition(board, fallingPiece, adjY=1):
        # falling piece has landed, set it on the board
        addToBoard(board, fallingPiece)
        score += removeCompleteLines(board)
        level, fallFreq = calculateLevelAndFallFreq(score)
        fallingPiece = None
      else:
        # piece did not land, just move the piece down
        fallingPiece['y'] += 1
        lastFallTime = time.time()

    # drawing everything on the screen
    DISPLAYSURF.fill(BGCOLOR)
    drawBoard(board)
    drawStatus(score, level)
    drawNextPiece(nextPiece)
    if fallingPiece != None:
      drawPiece(fallingPiece)

    pygame.display.update()
    FPSCLOCK.tick(FPS)


def makeTextObjs(text, font, color):
  surf = font.render(text, True, color)
  return surf, surf.get_rect()


def terminate():
  pygame.quit()
  sys.exit()


def checkForKeyPress():
  # Go through event queue looking for a KEYUP event.
  # Grab KEYDOWN events to remove them from the event queue.
  checkForQuit()

  for event in pygame.event.get([KEYDOWN, KEYUP]):
    if event.type == KEYDOWN:
      continue
    return event.key
  return None


def showTextScreen(text):
  # This function displays large text in the
  # center of the screen until a key is pressed.
  # Draw the text drop shadow
  titleSurf, titleRect = makeTextObjs(text, BIGFONT, TEXTSHADOWCOLOR)
  titleRect.center = (int(WINDOWWIDTH / 2), int(WINDOWHEIGHT / 2))
  DISPLAYSURF.blit(titleSurf, titleRect)

  # Draw the text
  titleSurf, titleRect = makeTextObjs(text, BIGFONT, TEXTCOLOR)
  titleRect.center = (int(WINDOWWIDTH / 2) - 3, int(WINDOWHEIGHT / 2) - 3)
  DISPLAYSURF.blit(titleSurf, titleRect)

  # Draw the additional "Press a key to play." text.
  pressKeySurf, pressKeyRect = makeTextObjs('Press a key to play.', BASICFONT, TEXTCOLOR)
  pressKeyRect.center = (int(WINDOWWIDTH / 2), int(WINDOWHEIGHT / 2) + 100)
  DISPLAYSURF.blit(pressKeySurf, pressKeyRect)

  while checkForKeyPress() == None:
    pygame.display.update()
    FPSCLOCK.tick()


def checkForQuit():
  for event in pygame.event.get(QUIT): # get all the QUIT events
    terminate() # terminate if any QUIT events are present
  for event in pygame.event.get(KEYUP): # get all the KEYUP events
    if event.key == K_ESCAPE:
      terminate() # terminate if the KEYUP event was for the Esc key
    pygame.event.post(event) # put the other KEYUP event objects back


def calculateLevelAndFallFreq(score):
  # Based on the score, return the level the player is on and
  # how many seconds pass until a falling piece falls one space.
  level = int(score / 10) + 1
  fallFreq = 0.27 - (level * 0.02)
  return level, fallFreq

def getNewPiece():
  # return a random new piece in a random rotation and color
  shape = random.choice(list(PIECES.keys()))
  newPiece = {'shape': shape,
        'rotation': random.randint(0, len(PIECES[shape]) - 1),
        'x': int(BOARDWIDTH / 2) - int(TEMPLATEWIDTH / 2),
        'y': -2, # start it above the board (i.e. less than 0)
        'color': random.randint(0, len(COLORS)-1)}
  return newPiece


def addToBoard(board, piece):
  # fill in the board based on piece's location, shape, and rotation
  for x in range(TEMPLATEWIDTH):
    for y in range(TEMPLATEHEIGHT):
      if PIECES[piece['shape']][piece['rotation']][y][x] != BLANK:
        board[x + piece['x']][y + piece['y']] = piece['color']


def getBlankBoard():
  # create and return a new blank board data structure
  board = []
  for i in range(BOARDWIDTH):
    board.append([BLANK] * BOARDHEIGHT)
  return board


def isOnBoard(x, y):
  return x >= 0 and x < BOARDWIDTH and y < BOARDHEIGHT


def isValidPosition(board, piece, adjX=0, adjY=0):
  # Return True if the piece is within the board and not colliding
  for x in range(TEMPLATEWIDTH):
    for y in range(TEMPLATEHEIGHT):
      isAboveBoard = y + piece['y'] + adjY < 0
      if isAboveBoard or PIECES[piece['shape']][piece['rotation']][y][x] == BLANK:
        continue
      if not isOnBoard(x + piece['x'] + adjX, y + piece['y'] + adjY):
        return False
      if board[x + piece['x'] + adjX][y + piece['y'] + adjY] != BLANK:
        return False
  return True

def isCompleteLine(board, y):
  # Return True if the line filled with boxes with no gaps.
  for x in range(BOARDWIDTH):
    if board[x][y] == BLANK:
      return False
  return True


def removeCompleteLines(board):
  # Remove any completed lines on the board, move everything above them down, and return the number of complete lines.
  numLinesRemoved = 0
  y = BOARDHEIGHT - 1 # start y at the bottom of the board
  while y >= 0:
    if isCompleteLine(board, y):
      # Remove the line and pull boxes down by one line.
      for pullDownY in range(y, 0, -1):
        for x in range(BOARDWIDTH):
          board[x][pullDownY] = board[x][pullDownY-1]
      # Set very top line to blank.
      for x in range(BOARDWIDTH):
        board[x][0] = BLANK
      numLinesRemoved += 1
      # Note on the next iteration of the loop, y is the same.
      # This is so that if the line that was pulled down is also
      # complete, it will be removed.
    else:
      y -= 1 # move on to check next row up
  return numLinesRemoved


def convertToPixelCoords(boxx, boxy):
  # Convert the given xy coordinates of the board to xy
  # coordinates of the location on the screen.
  return (XMARGIN + (boxx * BOXSIZE)), (TOPMARGIN + (boxy * BOXSIZE))


def drawBox(boxx, boxy, color, pixelx=None, pixely=None):
  # draw a single box (each tetromino piece has four boxes)
  # at xy coordinates on the board. Or, if pixelx & pixely
  # are specified, draw to the pixel coordinates stored in
  # pixelx & pixely (this is used for the "Next" piece).
  if color == BLANK:
    return
  if pixelx == None and pixely == None:
    pixelx, pixely = convertToPixelCoords(boxx, boxy)
  pygame.draw.rect(DISPLAYSURF, COLORS[color], (pixelx + 1, pixely + 1, BOXSIZE - 1, BOXSIZE - 1))
  pygame.draw.rect(DISPLAYSURF, LIGHTCOLORS[color], (pixelx + 1, pixely + 1, BOXSIZE - 4, BOXSIZE - 4))


def drawBoard(board):
  # draw the border around the board
  pygame.draw.rect(DISPLAYSURF, BORDERCOLOR, (XMARGIN - 3, TOPMARGIN - 7, (BOARDWIDTH * BOXSIZE) + 8, (BOARDHEIGHT * BOXSIZE) + 8), 5)

  # fill the background of the board
  pygame.draw.rect(DISPLAYSURF, BGCOLOR, (XMARGIN, TOPMARGIN, BOXSIZE * BOARDWIDTH, BOXSIZE * BOARDHEIGHT))
  # draw the individual boxes on the board
  for x in range(BOARDWIDTH):
    for y in range(BOARDHEIGHT):
      drawBox(x, y, board[x][y])


def drawStatus(score, level):
  # draw the score text
  scoreSurf = BASICFONT.render('Score: %s' % score, True, TEXTCOLOR)
  scoreRect = scoreSurf.get_rect()
  scoreRect.topleft = (WINDOWWIDTH - 150, 20)
  DISPLAYSURF.blit(scoreSurf, scoreRect)

  # draw the level text
  levelSurf = BASICFONT.render('Level: %s' % level, True, TEXTCOLOR)
  levelRect = levelSurf.get_rect()
  levelRect.topleft = (WINDOWWIDTH - 150, 50)
  DISPLAYSURF.blit(levelSurf, levelRect)


def drawPiece(piece, pixelx=None, pixely=None):
  shapeToDraw = PIECES[piece['shape']][piece['rotation']]
  if pixelx == None and pixely == None:
    # if pixelx & pixely hasn't been specified, use the location stored in the piece data structure
    pixelx, pixely = convertToPixelCoords(piece['x'], piece['y'])

  # draw each of the boxes that make up the piece
  for x in range(TEMPLATEWIDTH):
    for y in range(TEMPLATEHEIGHT):
      if shapeToDraw[y][x] != BLANK:
        drawBox(None, None, piece['color'], pixelx + (x * BOXSIZE), pixely + (y * BOXSIZE))


def drawNextPiece(piece):
  # draw the "next" text
  nextSurf = BASICFONT.render('Next:', True, TEXTCOLOR)
  nextRect = nextSurf.get_rect()
  nextRect.topleft = (WINDOWWIDTH - 120, 80)
  DISPLAYSURF.blit(nextSurf, nextRect)
  # draw the "next" piece
  drawPiece(piece, pixelx=WINDOWWIDTH-120, pixely=100)


if __name__ == '__main__':
  main()
代码一开始仍是一些变量的初始化,我们这里还加载了time模块,后面会用到。BOXSIZE, BOARDWIDTH, BOARDHEIGHT与前面贪吃蛇相关初始化类似,使其与屏幕像素点联系起来。
MOVESIDEWAYSFREQ = 0.15
MOVEDOWNFREQ = 0.1
这两个变量的作用是这样的,每当游戏者按下左键或右键,下降的方块相应的向左或右移一个格子。然而游戏者也可以一直按下方向左键或右键让方块保持移动。MOVESIDEWAYSFREQ这个固定值表示如果一直按下方向左键或右键那么每0.15秒方块才会继续移动。
MOVEDOWNFREQ 这个固定值与上面的是一样的除了它是告诉当游戏者一直按下方向下键时方块下落的频率。
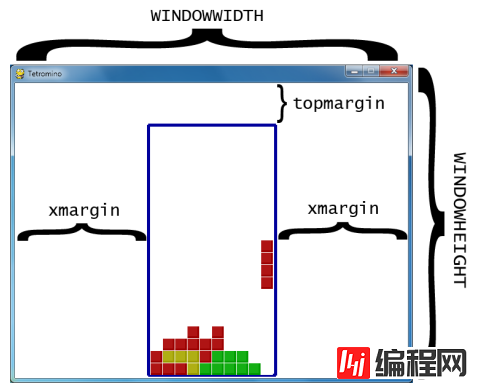
XMARGIN = int((WINDOWWIDTH - BOARDWIDTH * BOXSIZE) / 2)
TOPMARGIN = WINDOWHEIGHT - (BOARDHEIGHT * BOXSIZE) - 5
这两句的意思就看下面这个图就明白了。
然后是一些颜色值的定义。其中要注意的是COLORS和LIGHTCOLORS,COLORS是组成方块的小方块的颜色,而LIGHTCOLORS是围绕在小方块周围的颜色,为了强调出轮廓而设计的。
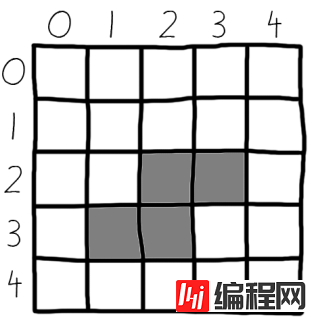
接着是定义方块了。游戏必须知道每个类型的方块有多少种形状,在这里我们用在列表中嵌入含有字符串的列表来构成这个模版,一个方块类型的模版含有了这个方块可能变换的所有形状。比如I的模版如下:
I_SHAPE_TEMPLATE = [['..O..',
           '..O..',
           '..O..',
           '..O..',
           '.....'],
          ['.....',
           '.....',
           'OOOO.',
           '.....',
           '.....']]
TEMPLATEWIDTH = 5和TEMPLATEHEIGHT = 5则表示组成形状的行和列,如下图所示:
在看这段定义。
PIECES = {'S': S_SHAPE_TEMPLATE,
     'Z': Z_SHAPE_TEMPLATE,
     'J': J_SHAPE_TEMPLATE,
     'L': L_SHAPE_TEMPLATE,
     'I': I_SHAPE_TEMPLATE,
     'O': O_SHAPE_TEMPLATE,
     'T': T_SHAPE_TEMPLATE}
PIECES这个变量是一个字典,里面储存了所有的不同模版。因为每个又有一个类型的方块的所有变换形状。那就意味着PIECES变量包含了每个类型的方块和所有的的变换形状。这就是存放我们游戏中用到的形状的数据结构。(又加强了对字典的理解)
主函数main()
主函数的前部分主要是创建一些全局变量和在游戏开始之前显示一个开始画面。
while True: # game loop
  if random.randint(0, 1) == 0:
    pygame.mixer.music.load('tetrisb.mid')
  else:
    pygame.mixer.music.load('tetrisc.mid')
  pygame.mixer.music.play(-1, 0.0)
  runGame()
  pygame.mixer.music.stop()
  showTextScreen('Game Over')
上面这段代码中runGame()是程序的核心部分。循环中首先简单的随机决定采用哪个背景音乐。然后调用runGame(),当游戏失败,runGame()就会返回到main()函数,这时会停止背景音乐和显示游戏失败的画面。
当游戏者按下一个键,showTextScreen()显示游戏失败的函数就会返回。游戏循环会再次开始然后继续下一次游戏。
runGame()
def runGame():
  # setup variables for the start of the game
  board = getBlankBoard()
  lastMoveDownTime = time.time()
  lastMoveSidewaysTime = time.time()
  lastFallTime = time.time()
  movingDown = False # note: there is no movingUp variable
  movingLeft = False
  movingRight = False
  score = 0
  level, fallFreq = calculateLevelAndFallFreq(score)

  fallingPiece = getNewPiece()
  nextPiece = getNewPiece()
在游戏开始和方块掉落之前,我们需要初始化一些跟游戏开始相关的变量。fallingPiece变量被赋值成当前掉落的变量,nextPiece变量被赋值成游戏者可以在屏幕NEXT区域看见的下一个方块。
while True: # game loop
  if fallingPiece == None:
    # No falling piece in play, so start a new piece at the top
    fallingPiece = nextPiece
    nextPiece = getNewPiece()
    lastFallTime = time.time() # reset lastFallTime

    if not isValidPosition(board, fallingPiece):
      return # can't fit a new piece on the board, so game over

  checkForQuit()
这部分包含了当方块往底部掉落时的的所有代码。fallingPiece变量在方块着陆后被设置成None。这意味着nextPiece变量中的下一个方块应该被赋值给fallingPiece变量,然后一个随机的方块又会被赋值给nextPiece变量。lastFallTime变量也被赋值成当前时间,这样我们就可以通过fallFreq变量控制方块下落的频率。
来自getNewPiece函数的方块只有一部分被放置在方框区域中。但是如果这是一个非法的位置,比如此时游戏方框已经被填满(isVaildPostion()函数返回False),那么我们就知道方框已经满了,游戏者输掉了游戏。当这些发生时,runGame()函数就会返回。
事件处理循环
事件循环主要处理当翻转方块,移动方块时或者暂停游戏时的一些事情。
暂停游戏
if (event.key == K_p):
  # Pausing the game
  DISPLAYSURF.fill(BGCOLOR)
  pygame.mixer.music.stop()
  showTextScreen('Paused') # pause until a key press
  pygame.mixer.music.play(-1, 0.0)
  lastFallTime = time.time()
  lastMoveDownTime = time.time()
  lastMoveSidewaysTime = time.time()
如果游戏者按下P键,游戏就会暂停。我们应该隐藏掉游戏界面以防止游戏者作弊(否则游戏者会看着画面思考怎么处理方块),用DISPLAYSURF.fill(BGCOLOR)就可以实现这个效果。注意的是我们还要保存一些时间变量值。
elif (event.key == K_LEFT or event.key == K_a):
  movingLeft = False
elif (event.key == K_RIGHT or event.key == K_d):
  movingRight = False
elif (event.key == K_DOWN or event.key == K_s):
  movingDown = False
停止按下方向键或ASD键会把moveLeft,moveRight,movingDown变量设置为False.,表明游戏者不再想要在此方向上移动方块。后面的代码会基于moving变量处理一些事情。注意的上方向键和W键是用来翻转方块的而不是移动方块。这就是为什么没有movingUp变量.
elif event.type == KEYDOWN:
  # moving the piece sideways
  if (event.key == K_LEFT or event.key == K_a) and isValidPosition(board, fallingPiece, adjX=-1):
    fallingPiece['x'] -= 1
    movingLeft = True
    movingRight = False
    lastMoveSidewaysTime = time.time()
当左方向键按下(而且往左移动是有效的,通过调用isVaildPosition()函数知道的),那么我们应该改变一个方块的位置使其向左移动一个通过让rallingPiece['x']减1.isVaildPosition()函数有个参数选项是adjX和adjY.平常,isVaildPostion()函数检查方块的位置通过函数的第二个参数的传递。然而,有时我们不想检查方块当前的位置,而是偏离当前方向几个格子的位置。
比如adjX=-1,则表示向左移动一个格子后方块的位置,为+1则表示向右移动一个格子后的位置。adjY同理如此。
movingLeft变量会被设置为True,确保方块不会向右移动,此时movingRight变量设置为False。同时需要更新lastMoveSidewaysTime的值。
这个lastMoveSidewaysTime变量设置的原因是这样。因为游戏者有可能一直按着方向键让其方块移动。如果moveLeft被设置为True,程序就会知道方向左键已经被按下。如果在lastMoveSidewaysTime变量储存的时间基础上,0.15秒(储存在MOVESideaYSFREQ变量中)过去后,那么此时程序就会将方块再次向左移动一个格子。
elif (event.key == K_UP or event.key == K_w):
          fallingPiece['rotation'] = (fallingPiece['rotation'] + 1) % len(PIECES[fallingPiece['shape']])
          if not isValidPosition(board, fallingPiece):
            fallingPiece['rotation'] = (fallingPiece['rotation'] - 1) % len(PIECES[fallingPiece['shape']])
如果方向键上或W键被按下,那么就会翻转方块。上面的代码做的就是将储存在fallingPiece字典中的‘rotation'键的键值加1.然而,当增加的'rotation'键值大于所有当前类型方块的形状的数目的话(此变量储存在len(SHAPES[fallingPiece['shape']])变量中),那么它翻转到最初的形状。
if not isValidPosition(board, fallingPiece):
            fallingPiece['rotation'] = (fallingPiece['rotation'] - 1) % len(PIECES[fallingPiece['shape']])
如果翻转后的形状无效因为其中的一些小方块已经超过边框的范围,那么我们就要把它变回原来的形状通过将fallingPiece['rotation')减去1.
elif (event.key == K_q): # rotate the other direction
          fallingPiece['rotation'] = (fallingPiece['rotation'] - 1) % len(PIECES[fallingPiece['shape']])
          if not isValidPosition(board, fallingPiece):
            fallingPiece['rotation'] = (fallingPiece['rotation'] + 1) % len(PIECES[fallingPiece['shape']])
这段代码与上面之前的那段代码是一个意思,不同的是这段代码是当游戏者按下Q键时翻转方块朝相反的方向。这里我们减去1而不是加1.
elif (event.key == K_DOWN or event.key == K_s):
  movingDown = True
  if isValidPosition(board, fallingPiece, adjY=1):
    fallingPiece['y'] += 1
  lastMoveDownTime = time.time()
如果下键被按下,游戏者此时希望方块下降的比平常快。fallingPiece['y'] += 1使方块下落一个格子(前提是这是一个有效的下落)moveDown被设置为True,lastMoceDownTime变量也被设置为当前时间。这个变量以后将被检查当方向下键一直按下时从而保证方块以一个比平常快的速率下降。
elif event.key == K_SPACE:
  movingDown = False
  movingLeft = False
  movingRight = False
  for i in range(1, BOARDHEIGHT):
    if not isValidPosition(board, fallingPiece, adjY=i):
      break
  fallingPiece['y'] += i - 1
当游戏者按下空格键,方块将会迅速的下落至着陆。程序首先需要找出到它着陆需要下降个多少个格子。其中有关moving的三个变量都要被设置为False(保证程序后面部分的代码知道游戏者已经停止了按下所有的方向键)。
if (movingLeft or movingRight) and time.time() - lastMoveSidewaysTime > MOVESIDEWAYSFREQ:
  if movingLeft and isValidPosition(board, fallingPiece, adjX=-1):
    fallingPiece['x'] -= 1
  elif movingRight and isValidPosition(board, fallingPiece, adjX=1):
    fallingPiece['x'] += 1
  lastMoveSidewaysTime = time.time()
这段代码是处理一直按下某个方向键时的情况。
如果用户按住键超过0.15秒。那么表达式(movingLeft or movingRight) and time.time() - lastMoveSidewaysTime > MOVESIDEWAYSFREQ:返回True。这样的话我们就可以移动方块向左或向右移动一个格子。
这个做法是很用的,因为如果用户重复的按下方向键让方块移动多个格子是很烦人的。好的做法是,用户可以按住方向键让方块保持移动直到松开键为止。最后别忘了更新lastMoveSideWaysTime变量。
if movingDown and time.time() - lastMoveDownTime > MOVEDOWNFREQ and isValidPosition(board, fallingPiece, adjY=1):
  fallingPiece['y'] += 1
  lastMoveDownTime = time.time()
这段代码的意思跟上面的代码差不多。
if time.time() - lastFallTime > fallFreq:
  # see if the piece has landed
  if not isValidPosition(board, fallingPiece, adjY=1):
    # falling piece has landed, set it on the board
    addToBoard(board, fallingPiece)
    score += removeCompleteLines(board)
    level, fallFreq = calculateLevelAndFallFreq(score)
    fallingPiece = None
  else:
    # piece did not land, just move the piece down
    fallingPiece['y'] += 1
    lastFallTime = time.time()
方块自然下落的速率由lastFallTime变量决定。如果自从上个方块掉落了一个格子后过去了足够的时间,那么上面代码就会再让方块移动一个格子。
--结束END--
本文标题: Python使用pygame模块编写俄罗斯方块游戏的代码实例
本文链接: https://www.lsjlt.com/news/15612.html(转载时请注明来源链接)
有问题或投稿请发送至: 邮箱/279061341@qq.com QQ/279061341
下载Word文档到电脑,方便收藏和打印~
2024-03-01
2024-03-01
2024-03-01
2024-02-29
2024-02-29
2024-02-29
2024-02-29
2024-02-29
2024-02-29
2024-02-29
回答
回答
回答
回答
回答
回答
回答
回答
回答
回答


官方手机版

微信公众号

商务合作


0