目录正文捕捉媒体1.创建会话2.配置视频输入3.配置音频输入5.配置输出6.开始会话\结束会话7.捕捉静态图片8.捕捉视频文件9.预览视频正文 AVFoundation 是Apple
AVFoundation 是Apple iOS和OS X系统中用于处理基于时间的媒体数据的高级框架,通过开发所需的工具提供了强大的功能集,让开发者能够基于苹果平台创建当下最先进的媒体应用程序,其针对64位处理器设计,充分利用了多核硬件优势,会自动提供硬件加速操作,确保大部分设备能以最佳性能运行,是iOS开发接触音视频开发必学的框架之一。
参与掘金日新计划,持续记录AVFoundation学习,Demo学习地址,里面封装了一些工具类,可以直接使用,这篇文章主要讲述AVFoundation中的AVCaptureSession等类实现媒体捕捉功能,其他类的相关用法可查看我的其他文章。
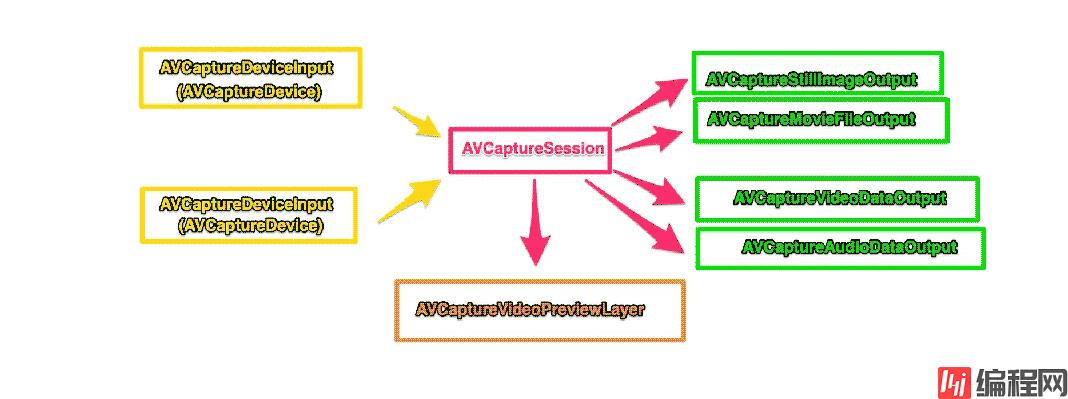
媒体捕捉是AVFoundation的核心功能之一,也是开发音视频App必不可少的功能。捕捉用到的类如图所示

具体代码可以看Demo中的CQCaptureManager类对捕捉工具的封装
创建会话并配置分辨率
self.captureSession = [[AVCaptureSession alloc] init];
- (void)configSessionPreset:(AVCaptureSessionPreset)sessionPreset {
    [self.captureSession beginConfiguration];
    if ([self.captureSession canSetSessionPreset:sessionPreset])  {
        self.captureSession.sessionPreset = sessionPreset;
    } else {
        self.captureSession.sessionPreset = AVCaptureSessionPresetHigh;
    }
    [self.captureSession commitConfiguration];
    self.isConfigSessionPreset = YES;
}
/// 配置视频输入
- (BOOL)configVideoInput:(NSError * _Nullable *)error {
    // 添加视频捕捉设备
    // 拿到默认视频捕捉设备 iOS默认后置摄像头
//    AVCaptureDevice *videoDevice = [AVCaptureDevice defaultDeviceWithMediaType:AVMediaTypeVideo];
    AVCaptureDevice *videoDevice = [self getCameraWithPosition:AVCaptureDevicePositionBack];
    // 将捕捉设备转化为AVCaptureDeviceInput
    // 注意:会话不能直接使用AVCaptureDevice,必须将AVCaptureDevice封装成AVCaptureDeviceInput对象
    AVCaptureDeviceInput *videoInput = [AVCaptureDeviceInput deviceInputWithDevice:videoDevice error:error];
    // 将捕捉设备添加给会话
    // 使用前判断videoInput是否有效以及能否添加,因为摄像头是一个公共设备,不属于任何App,有可能别的App在使用,添加前应该先进行判断是否可以添加
    if (videoInput && [self.captureSession canAddInput:videoInput]) {
        // 将videoInput 添加到 captureSession中
        [self.captureSession beginConfiguration];
        [self.captureSession addInput:videoInput];
        [self.captureSession commitConfiguration];
        self.videoDeviceInput = videoInput;
        return YES;
    }else {
        return NO;
    }
}
/// 移除视频输入设备
- (void)removeVideoDeviceInput {
    if (self.videoDeviceInput) [self.captureSession removeInput:self.videoDeviceInput];
    self.videoDeviceInput = nil;
}
/// 根据position拿到摄像头
- (AVCaptureDevice *)getCameraWithPosition:(AVCaptureDevicePosition)position {

    NSArray *deviceTypes;
    if (position == AVCaptureDevicePositionBack) {
        deviceTypes = @[AVCaptureDeviceTypeBuiltInDualCamera,
                        AVCaptureDeviceTypeBuiltInDualWideCamera,
                        AVCaptureDeviceTypeBuiltInTripleCamera, ];
    } else {
        deviceTypes = @[AVCaptureDeviceTypeBuiltInWideangleCamera];
    }
    AVCaptureDeviceDiscoverySession *deviceSession = [AVCaptureDeviceDiscoverySession discoverySessionWithDeviceTypes:deviceTypes mediaType:AVMediaTypeVideo position:position];
    if (deviceSession.devices.count) return deviceSession.devices.firstObject;
    if (position == AVCaptureDevicePositionBack) {
        // 非多摄手机
        deviceTypes = @[AVCaptureDeviceTypeBuiltInWideAngleCamera];
        AVCaptureDeviceDiscoverySession *deviceSession = [AVCaptureDeviceDiscoverySession discoverySessionWithDeviceTypes:deviceTypes mediaType:AVMediaTypeVideo position:position];
        if (deviceSession.devices.count) return deviceSession.devices.firstObject;
    }
    return nil;
}
/// 配置音频输入
- (BOOL)configAudioInput:(NSError * _Nullable *)error {
    // 添加音频捕捉设备 ,如果只是拍摄静态图片,可以不用设置
    // 选择默认音频捕捉设备 即返回一个内置麦克风
    AVCaptureDevice *audioDevice = [AVCaptureDevice defaultDeviceWithMediaType:AVMediaTypeAudio];
    self.audioDeviceInput = [AVCaptureDeviceInput deviceInputWithDevice:audioDevice error:error];
    if (self.audioDeviceInput && [self.captureSession canAddInput:self.audioDeviceInput]) {
        [self.captureSession beginConfiguration];
        [self.captureSession addInput:self.audioDeviceInput];
        [self.captureSession commitConfiguration];
        return YES;
    }else {
        return NO;
    }
}
/// 移除音频输入设备
- (void)removeAudioDeviceInput {
    if (self.audioDeviceInput) [self.captureSession removeInput:self.audioDeviceInput];
}
#pragma mark - Func 静态图片输出配置
/// 配置静态图片输出
- (void)configStillImageOutput {
    // AVCaptureStillImageOutput 从摄像头捕捉静态图片
    self.stillImageOutput = [[AVCaptureStillImageOutput alloc] init];
    // 配置字典:希望捕捉到JPEG格式的图片
    self.stillImageOutput.outputSettings = @{AVVideoCodecKey:AVVideoCodecJPEG};
    // 输出连接 判断是否可用,可用则添加到输出连接中去
    [self.captureSession beginConfiguration];
    if ([self.captureSession canAddOutput:self.stillImageOutput]) {
        [self.captureSession addOutput:self.stillImageOutput];
    }
    [self.captureSession commitConfiguration];
}
/// 移除静态图片输出
- (void)removeStillImageOutput {
    if (self.stillImageOutput) [self.captureSession removeOutput:self.stillImageOutput];
}
#pragma mark - Func 电影文件输出配置
/// 配置电影文件输出
- (void)configMovieFileOutput {
    // AVCaptureMovieFileOutput,将QuickTime视频录制到文件系统
    self.movieFileOutput = [[AVCaptureMovieFileOutput alloc] init];
    [self.captureSession beginConfiguration];
    if ([self.captureSession canAddOutput:self.movieFileOutput]) {
        [self.captureSession addOutput:self.movieFileOutput];
    }
    [self.captureSession commitConfiguration];
}
/// 移除电影文件输出
- (void)removeMovieFileOutput {
    if (self.movieFileOutput) [self.captureSession removeOutput:self.movieFileOutput];
}
// 异步开始会话
- (void)startSessionAsync {
    // 检查是否处于运行状态
    if (![self.captureSession isRunning]) {
        // 使用同步调用会损耗一定的时间,则用异步的方式处理
        dispatch_async(self.captureVideoQueue, ^{
            [self.captureSession startRunning];
        });
    }
}
// 异步停止会话
- (void)stopSessionAsync {
    // 检查是否处于运行状态
    if ([self.captureSession isRunning]) {
        dispatch_async(self.captureVideoQueue, ^{
            [self.captureSession stopRunning];
        });
    }
}
#pragma mark - 静态图片捕捉
#pragma mark Public Func 静态图片捕捉
// 捕捉静态图片
- (void)captureStillImage {
    if (!self.isConfigSessionPreset) [self configSessionPreset:AVCaptureSessionPresetMedium];
    if (!self.videoDeviceInput) {
        NSError *configError;
        BOOL configResult = [self configVideoInput:&configError];
        if (!configResult) return;
    }
    if (!self.stillImageOutput) [self configStillImageOutput];
    [self startSessionSync];
    // 获取图片输出连接
    AVCaptureConnection *connection = [self.stillImageOutput connectionWithMediaType:AVMediaTypeVideo];
    // 即使程序只支持纵向,但是如果用户横向拍照时,需要调整结果照片的方向
    // 判断是否支持设置视频方向, 支持则根据设备方向设置输出方向值
    if (connection.isVideoOrientationSupported) {
        connection.videoOrientation = [self getCurrentVideoOrientation];
    }
    [self.stillImageOutput captureStillImageAsynchronouslyFromConnection:connection completionHandler:^(CMSampleBufferRef  _Nullable imageDataSampleBuffer, NSError * _Nullable error) {        if (imageDataSampleBuffer != NULL) {            dispatch_async(dispatch_get_main_queue(), ^{                if (self.delegate && [self.delegate respondsToSelector:@selector(mediaCaptureImageFileSuccess)]) {
                    [self.delegate mediaCaptureImageFileSuccess];
                }
            });
            // CMSampleBufferRef转UIImage 并写入相册
            NSData *imageData = [AVCaptureStillImageOutput jpegStillImageNSDataRepresentation:imageDataSampleBuffer];
            UIImage *image = [[UIImage alloc] initWithData:imageData];
            [self writeImageToAssetsLibrary:image];
        } else {
            dispatch_async(dispatch_get_main_queue(), ^{
                if (self.delegate && [self.delegate respondsToSelector:@selector(mediaCaptureImageFailedWithError:)]) {
                    [self.delegate mediaCaptureImageFailedWithError:error];
                }
            });
            NSLog(@"NULL sampleBuffer:%@",[error localizedDescription]);
        }
    }];
}
#pragma mark Private Func 静态图片捕捉

/// 将UIImage写入到用户相册
- (void)writeImageToAssetsLibrary:(UIImage *)image {
    ALAssetsLibrary *library = [[ALAssetsLibrary alloc] init];
    // 参数1 图片, 参数2 方向, 参数3 回调
    [library writeImageToSavedPhotosAlbum:image.CGImage orientation:(NSUInteger)image.imageOrientation completionBlock:^(NSURL *assetURL, NSError *error) {        if (!error) {            dispatch_async(dispatch_get_main_queue(), ^{                if (self.delegate && [self.delegate respondsToSelector:@selector(assetLibraryWriteImageSuccessWithImage:)]) {
                    [self.delegate assetLibraryWriteImageSuccessWithImage:image];
                }
            });
        } else {
            dispatch_async(dispatch_get_main_queue(), ^{
                if (self.delegate && [self.delegate respondsToSelector:@selector(assetLibraryWriteImageFailedWithError:)]) {
                    [self.delegate assetLibraryWriteImageFailedWithError:error];
                }
            });
        }
    }];
}
#pragma mark - 电影文件捕捉
#pragma mark Public Func 电影文件捕捉
// 开始录制电影文件
- (void)startRecordingMovieFile {
    if (!self.isConfigSessionPreset) [self configSessionPreset:AVCaptureSessionPresetMedium];
    if (!self.videoDeviceInput) {
        NSError *configError;
        BOOL configResult = [self configVideoInput:&configError];
        if (!configResult) return;
    }
    if (!self.movieFileOutput) [self configMovieFileOutput];
    [self startSessionSync];
    if ([self isRecordingMovieFile]) return;
    AVCaptureConnection *videoConnection = [self.movieFileOutput connectionWithMediaType:AVMediaTypeVideo];
    // 设置输出方向
    // 即使程序只支持纵向,但是如果用户横向拍照时,需要调整结果照片的方向
    // 判断是否支持设置视频方向, 支持则根据设备方向设置输出方向值
    if (videoConnection.isVideoOrientationSupported) {
        videoConnection.videoOrientation = [self getCurrentVideoOrientation];
    }
    // 设置视频帧稳定
    // 判断是否支持视频稳定 可以显著提高视频的质量。只会在录制视频文件涉及
//    if (videoConnection.isVideoStabilizationSupported) {
//        videoConnection.enablesVideoStabilizationWhenAvailable = YES;
//    }
    videoConnection.preferredVideoStabilizationMode = AVCaptureVideoStabilizationModeAuto;
    // 设置对焦
    AVCaptureDevice *device = [self getActiveCamera];
    // 摄像头可以进行平滑对焦模式操作。即减慢摄像头镜头对焦速度。当用户移动拍摄时摄像头会尝试快速自动对焦。
    if (device.iSSMoothAutoFocusEnabled) {
        NSError *error;
        if ([device lockForConfiguration:&error]) {
            device.smoothAutoFocusEnabled = YES;
            [device unlockForConfiguration];
        } else {
            dispatch_async(dispatch_get_main_queue(), ^{
                if (self.delegate && [self.delegate respondsToSelector:@selector(deviceConfigurationFailedWithError:)]) {
                    [self.delegate deviceConfigurationFailedWithError:error];
                }
            });
        }
    }
    self.movieFileOutputURL = [self getVideoTempPathURL];
    // 开始录制 参数1:录制保存路径  参数2:代理
    [self.movieFileOutput startRecordingToOutputFileURL:self.movieFileOutputURL recordingDelegate:self];
}
// 停止录制电影文件
- (void)stopRecordingMovieFile {
    if ([self isRecordingMovieFile]) {
        [self.movieFileOutput stopRecording];
    }
}
// 是否在录制电影文件
- (BOOL)isRecordingMovieFile {
    return self.movieFileOutput.isRecording;
}
// 录制电影文件的时间
- (CMTime)movieFileRecordedDuration {
    return self.movieFileOutput.recordedDuration;
}
#pragma mark AVCaptureFileOutputRecordingDelegate
/// 捕捉电影文件成功的回调
- (void)captureOutput:(AVCaptureFileOutput *)output didFinishRecordingToOutputFileAtURL:(NSURL *)outputFileURL fromConnections:(NSArray<AVCaptureConnection *> *)connections error:(NSError *)error {
    if (error) {
        dispatch_async(dispatch_get_main_queue(), ^{
            if (self.delegate && [self.delegate respondsToSelector:@selector(mediaCaptureMovieFileFailedWithError:)]) {
                [self.delegate mediaCaptureMovieFileFailedWithError:error];
            }
        });
    } else {
        dispatch_async(dispatch_get_main_queue(), ^{
            if (self.delegate && [self.delegate respondsToSelector:@selector(mediaCaptureMovieFileSuccess)]) {
                [self.delegate mediaCaptureMovieFileSuccess];
            }
        });
        // copy一个副本再置为nil
        // 将文件写入相册
        [self writeVideoToAssetsLibrary:self.movieFileOutputURL.copy];
        self.movieFileOutputURL = nil;
    }
}
#pragma mark Private Func 电影文件捕捉
/// 创建视频文件临时路径URL
- (NSURL *)getVideoTempPathURL {
    NSFileManager *fileManager = [NSFileManager defaultManager];
    NSString *tempPath = [fileManager temporaryDirectoryWithTemplateString:@"video.XXXXXX"];
    if (tempPath) {
        NSString *filePath = [tempPath stringByAppendingPathComponent:@"temp_video.mov"];
        return [NSURL fileURLWithPath:filePath];
    }
    return nil;
}
/// 将视频文件写入到用户相册
- (void)writeVideoToAssetsLibrary:(NSURL *)videoURL {
    ALAssetsLibrary *library = [[ALAssetsLibrary alloc] init];
    // 和图片不同,视频的写入更耗时,所以写入之前应该判断是否能写入
    if (![library videoAtPathIsCompatibleWithSavedPhotosAlbum:videoURL]) return;
    [library writeVideoAtPathToSavedPhotosAlbum:videoURL completionBlock:^(NSURL *assetURL, NSError *error) {
        if (error) {
            dispatch_async(dispatch_get_main_queue(), ^{
                if (self.delegate && [self.delegate respondsToSelector:@selector(assetLibraryWriteMovieFileFailedWithError:)]) {
                    [self.delegate assetLibraryWriteMovieFileFailedWithError:error];
                }
            });
        } else {
            // 写入成功 回调封面图
            [self getVideoCoverImageWithVideoURL:videoURL callBlock:^(UIImage *coverImage) {
                dispatch_async(dispatch_get_main_queue(), ^{
                    if (self.delegate && [self.delegate respondsToSelector:@selector(assetLibraryWriteMovieFileSuccessWithCoverImage:)]) {
                        [self.delegate assetLibraryWriteMovieFileSuccessWithCoverImage:coverImage];
                    }
                });
            }];
        }
    }];
}
/// 获取视频文件封面图
- (void)getVideoCoverImageWithVideoURL:(NSURL *)videoURL callBlock:(void(^)(UIImage *))callBlock {
    dispatch_async(self.captureVideoQueue, ^{
        AVAsset *asset = [AVAsset assetWithURL:videoURL];
        AVAssetImageGenerator *imageGenerator = [AVAssetImageGenerator assetImageGeneratorWithAsset:asset];
        // 设置maximumSize 宽为100,高为0 根据视频的宽高比来计算图片的高度
        imageGenerator.maximumSize = CGSizeMake(100.0f, 0.0f);
        // 捕捉视频缩略图会考虑视频的变化(如视频的方向变化),如果不设置,缩略图的方向可能出错
        imageGenerator.appliesPreferredTrackTransfORM = YES;
        CGImageRef imageRef = [imageGenerator copyCGImageAtTime:kCMTimeZero actualTime:NULL error:nil];
        UIImage *image = [UIImage imageWithCGImage:imageRef];
        CGImageRelease(imageRef);
        dispatch_async(dispatch_get_main_queue(), ^{
            !callBlock ?: callBlock(image);
        });
    });
}
previewView.session = captureManager.captureSession以上就是AVFoundation AVCaptureSession媒体捕捉的详细内容,更多关于AVFoundation AVCaptureSession的资料请关注编程网其它相关文章!
--结束END--
本文标题: AVFoundationAVCaptureSession媒体捕捉
本文链接: https://www.lsjlt.com/news/170210.html(转载时请注明来源链接)
有问题或投稿请发送至: 邮箱/279061341@qq.com QQ/279061341
下载Word文档到电脑,方便收藏和打印~
2024-01-21
2023-10-28
2023-10-28
2023-10-27
2023-10-27
2023-10-27
2023-10-27
回答
回答
回答
回答
回答
回答
回答
回答
回答
回答
0