Python 官方文档:入门教程 => 点击学习
目录一、实现了Aware的接口二、为什么要使用 Aware 接口三、Aware接口执行顺序一、实现了Aware的接口 spring中有很多继承于aware中的接口,这些接口到底是做什
spring中有很多继承于aware中的接口,这些接口到底是做什么用到的,下面我们就一起来看看吧。
Aware 接口用于注入一些与容器相关信息,例如:
EnvironmentAware:实现EnvironmentAware接口重写setEnvironment方法后,可以获得配置文件属性值
BeanClassLoaderAware:注入加载当前 bean 的 ClassLoader
BeanNameAware: 注入当前 bean 对应 beanName
BeanFactoryAware: 注入 当前BeanFactory容器 的引用
ApplicationContextAware: 获取容器本身ApplicationContext对象,可以在bean中得到bean所在的应用上下文
EmbeddedValueResolverAware:获取properties文件单个属性值,一般使用@Value属性值;EmbeddedValueResolverAware是另一种基于Spring解析获取 properties 文件单个属性值的方式
ApplicationEventPublisherAware:事件发布器的接口,使用这个接口,我们自己的bean就拥有了发布事件的能力。
ResourceLoaderAware:获取ResourceLoader实例,获取资源加载器读取资源文件
Aware接口是回调,监听器和观察者设计模式的混合,一般指具备由Spring 容器通过Aware回调方法通知的特定的bean对象,简单来说就是可以通过实现该接口拿到Spring容器内部的一些资源。实际的回调方法由各个子接口确定,通常应仅包含一个接受单个参数、返回 void 的方法;但是一般情况下,Spring不建议使用该接口,因为使用这种方式会将业务代码与Spring 耦合,有所违背ioc 原则。
1、BeanNameAware
public class MyBeanName implements BeanNameAware {
    @Override
    public void setBeanName(String beanName) {
        System.out.println(beanName);
    }
}
2、BeanFactoryAware
public class MyBeanFactory implements BeanFactoryAware {
    private BeanFactory beanFactory;
    @Override
    public void setBeanFactory(BeanFactory beanFactory) throws BeansException {
        this.beanFactory = beanFactory;
    }
    public void getMyBeanName() {
        MyBeanName myBeanName = beanFactory.getBean(MyBeanName.class);
        System.out.println(beanFactory.isSingleton("myCustomBeanName"));
    }
}
3、EnvironmentAware
@Configuration
public class mybatisConfig implements EnvironmentAware {
    private static Environment environment;
    @Override
    public void setEnvironment(Environment environment) {
        this.environment = environment;
    }
    @Bean
    public DataSource druidDataSource() throws Exception {
        Properties props = new Properties();
        props.put("driverClassName", environment.getProperty("datasource.driverClassName"));
        props.put("url", environment.getProperty("datasource.url"));
        props.put("username", environment.getProperty("datasource.username"));
        props.put("passWord", environment.getProperty("datasource.password"));
        return DruidDataSourceFactory.createDataSource(props);
    }
}
4、EmbeddedValueResolverAware
@Component
public class PropertiesUtil implements EmbeddedValueResolverAware {
    private StringValueResolver resolver;
    @Override
    public void setEmbeddedValueResolver(StringValueResolver resolver) {
        this.resolver = resolver;
    }

    public String getPropertiesValue(String key) {
        StringBuilder name = new StringBuilder("${").append(key).append("}");
        return resolver.resolveStringValue(name);
    }
}
public class MyBean implements BeanNameAware, ApplicationContextAware, InitializingBean {
    private static final Logger log = LoggerFactory.getLogger(MyBean.class);
    @Override
    public void setBeanName(String name) {
        log.debug("当前bean " + this + " 名字叫:" + name);
    }
    @Override
    public void setApplicationContext(ApplicationContext applicationContext) throws BeansException {
        log.debug("当前bean " + this + " 容器是:" + applicationContext);
    }
    @Override
    public void afterPropertiesSet() throws Exception {
        log.debug("当前bean " + this + " 初始化");
    }
}
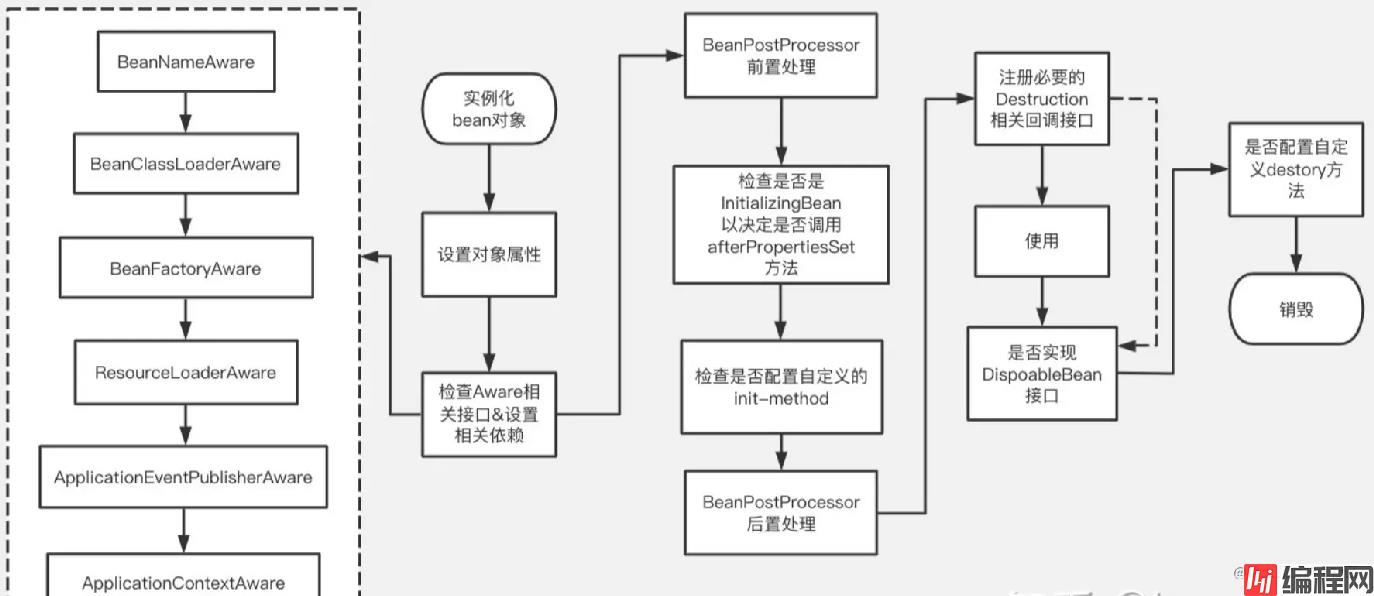
定义类SimpleAware实现了部分Aware的接口的自定义bean,经过程序运行测试其执行顺序如下:
@Component
public class SimpleAware implements
        ApplicationContextAware,
        ApplicationEventPublisherAware,
        BeanClassLoaderAware,
        BeanFactoryAware,
        BeanNameAware,
        ResourceLoaderAware {
    @Override
    public void setApplicationContext(ApplicationContext applicationContext) throws BeansException {
        System.out.println("ApplicationContextAware 回调");
    }
    @Override
    public void setApplicationEventPublisher(ApplicationEventPublisher applicationEventPublisher) {
        System.out.println("ApplicationEventPublisherAware 回调");
    }
    @Override
    public void setBeanClassLoader(ClassLoader classLoader) {
        System.out.println("BeanClassLoaderAware 回调");
    }
    @Override
    public void setBeanFactory(BeanFactory beanFactory) throws BeansException {
        System.out.println("BeanFactoryAware 回调");
    }
    @Override
    public void setBeanName(String name) {
        System.out.println("BeanNameAware 回调");
    }
    @Override
    public void setResourceLoader(ResourceLoader resourceLoader) {
        System.out.println("ResourceLoaderAware 回调");
    }
}
按照以下顺序执行:
BeanNameAware-->BeanClassLoaderAware-->BeanFactoryAware-->ResourceLoaderAware-->ApplicationEventPublisherAware-->ApplicationContextAware
以上就是Spring的Aware接口实现及执行顺序详解的详细内容,更多关于Spring Aware接口执行顺序的资料请关注编程网其它相关文章!
--结束END--
本文标题: Spring的Aware接口实现及执行顺序详解
本文链接: https://www.lsjlt.com/news/175852.html(转载时请注明来源链接)
有问题或投稿请发送至: 邮箱/279061341@qq.com QQ/279061341
下载Word文档到电脑,方便收藏和打印~
2024-03-01
2024-03-01
2024-03-01
2024-02-29
2024-02-29
2024-02-29
2024-02-29
2024-02-29
2024-02-29
2024-02-29
回答
回答
回答
回答
回答
回答
回答
回答
回答
回答


官方手机版

微信公众号

商务合作


0