目录分步指南1. 安装jest2. 初始化3. 安装jsdom环境 4. 创建test目录5. 愉快地开始单元测试6. 总结 - 踩坑记录为项目安装并配置Jest单元测试环
为项目安装并配置Jest单元测试环境
传送门:Jest - 快速入门
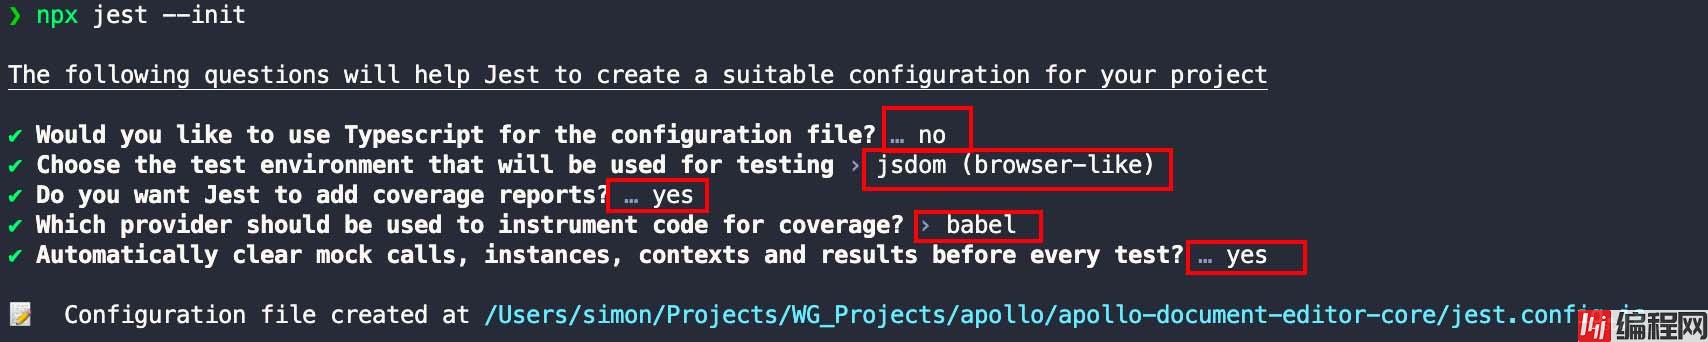
npm i jest ts-jest @types/jest -Dnpx jest --init按照图中所示选择
tip:
no;不使用ts,使用jest.config.js作为jest的配置文件;jsdom;使用jsdom作为测试环境(jsdom:一个类似浏览器的环境,项目是运行在浏览器的,需要在浏览器dom环境下测试);yes;是否添加测试报告;babel;使用babel提供的测试报告(官网说明v8仍处于试验阶段,需node14以上使用,效果未知,不稳定,因此选用babel);npm i jest-environment-jsdom eslint-plugin-jest eslint-import-resolver-typescript jest-canvas-mock -D
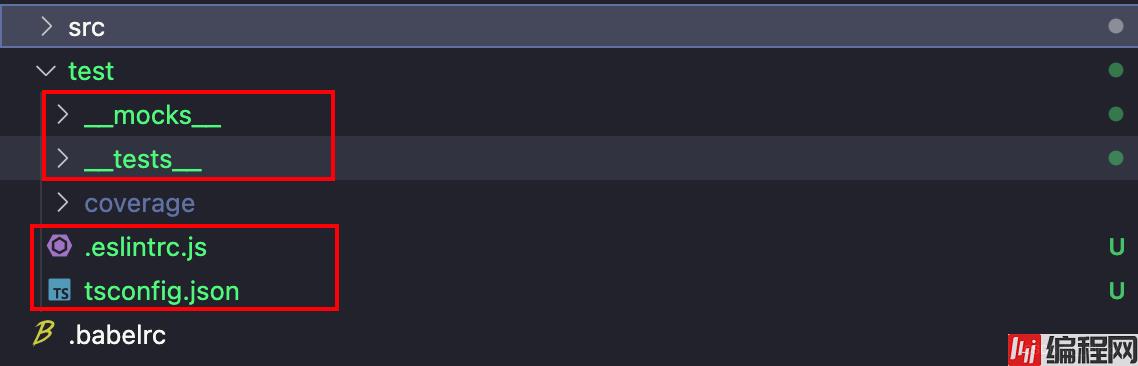
在项目根目录下创建test目录,然后在test下创建__mocks和__tests__目录,创建.eslintrc.js和tsconfig.JSON文件
附:配置示例
jest.config.js
const { pathsToModuleNameMapper } = require('ts-jest');
const { compilerOptions } = require('./tsconfig.json');

module.exports = {
  // A preset that is used as a base for Jest's configuration
  preset: 'ts-jest',
  // The test environment that will be used for testing
  testEnvironment: 'jsdom',
  // The paths to modules that run some code to configure or set up the testing environment before each test
  setupFiles: ['jest-canvas-mock'],
  // Automatically clear mock calls, instances, contexts and results before every test
  clearMocks: true,
  // Indicates whether the coverage infORMation should be collected while executing the test
  collectCoverage: true,
  // The directory where Jest should output its coverage files
  coverageDirectory: 'test/coverage',
  // The root directory that Jest should scan for tests and modules within
  // rootDir: undefined,
  // rootDir: __dirname,
  // An array of file extensions your modules use
  moduleFileExtensions: ['ts', 'js'],
  // A map from regular expressions to module names or to arrays of module names that allow to stub out resources with a single module
  moduleNameMapper: pathsToModuleNameMapper(compilerOptions.paths, {
    prefix: '<rootDir>/',
  }),
  // The glob patterns Jest uses to detect test files
  testMatch: ['<rootDir>/test/__tests__*.test.ts'],
  // A map from regular expressions to paths to transformers
  transform: {
    '^.+\\.ts$': 'ts-jest',
  },
};
配置测试用例的eslint规则
/test/.eslintrc.js
module.exports = {
  extends: ['../.eslintrc.js'],
  settings: {
    'import/resolver': {
      typescript: {
        alwaysTryTypes: true, // always try to resolve types under `<root>@types` directory even it doesn't contain any source code, like `@types/unist`

        // Choose from one of the "project" configs below or omit to use <root>/tsconfig.json by default
        // use <root>/path/to/folder/tsconfig.json
        project: 'tsconfig.json',
      },
    },
  },
  plugins: ['jest'],
  overrides: [
    // unit-tests
    {
      files: ['**/__tests__/**'],
      rules: {
        'jest/no-disabled-tests': 'warn',
        'jest/no-focused-tests': 'error',
        'jest/no-identical-title': 'error',
        'jest/prefer-to-have-length': 'warn',
        'jest/valid-expect': 'error',
      },
    },
  ],
};
代码覆盖率报告无需加入git版本管理,将test/coverage目录追加至.gitignore
...

# Unit test / coverage reports
test/coverage
tsconfig.json中配置路径别名
在 test/__test__ 目录下新增自己模块的单元测试目录及文件,开始单元测试代码编写
文件命名规范: *.test.ts
以上为个人经验,希望能给大家一个参考,也希望大家多多支持编程网。
--结束END--
本文标题: 单元测试框架Jest搭配TypeScript的安装与配置方式
本文链接: https://www.lsjlt.com/news/178282.html(转载时请注明来源链接)
有问题或投稿请发送至: 邮箱/279061341@qq.com QQ/279061341
下载Word文档到电脑,方便收藏和打印~
2024-01-12
2023-05-20
2023-05-20
2023-05-20
2023-05-20
2023-05-20
2023-05-20
2023-05-20
2023-05-20
2023-05-20
回答
回答
回答
回答
回答
回答
回答
回答
回答
回答


官方手机版

微信公众号

商务合作


0