Python 官方文档:入门教程 => 点击学习
目录1、前言2、手工方式2.1、设置域名2.2、获取code2.3、换取access_token3、使用第三方sdk3.1、引入第三方依赖3.2、将微信公众号配置写入yaml文件并引
随着技术的发展,微信的一系列服务渗透进了我们的生活,但是我们应该怎样进行微信方面的开发呢。相信很多的小伙伴们都很渴望知道吧。这篇文章就是来解决大家的一些疑惑的。首先我们要进行相关的开发的话,那么我们需要先获取微信的openid。那么我们英爱怎样获取呢?这里我会介绍两种方式。
官方文档
(1).注册对应的公众号找到下图位置

(2). 在natapp.cn上购买自己的用于微信开发的域名
注册地址

哈哈,这个网站上面的域名也不是特别的贵呀,我在这上面买的一个域名为期一个月的话也就才12元,且改类型的属于二级域名,是已经备过案的,所以也就不需要备案。
(3). 下载对应的客户端进行启动

在windows上启动的命令
natapp -authtoken 你的authtoken启动后

可见我的域名指向了127.0.0.1:8080。
(4).将我们的域名填到公众号中JS接口安全域名提交
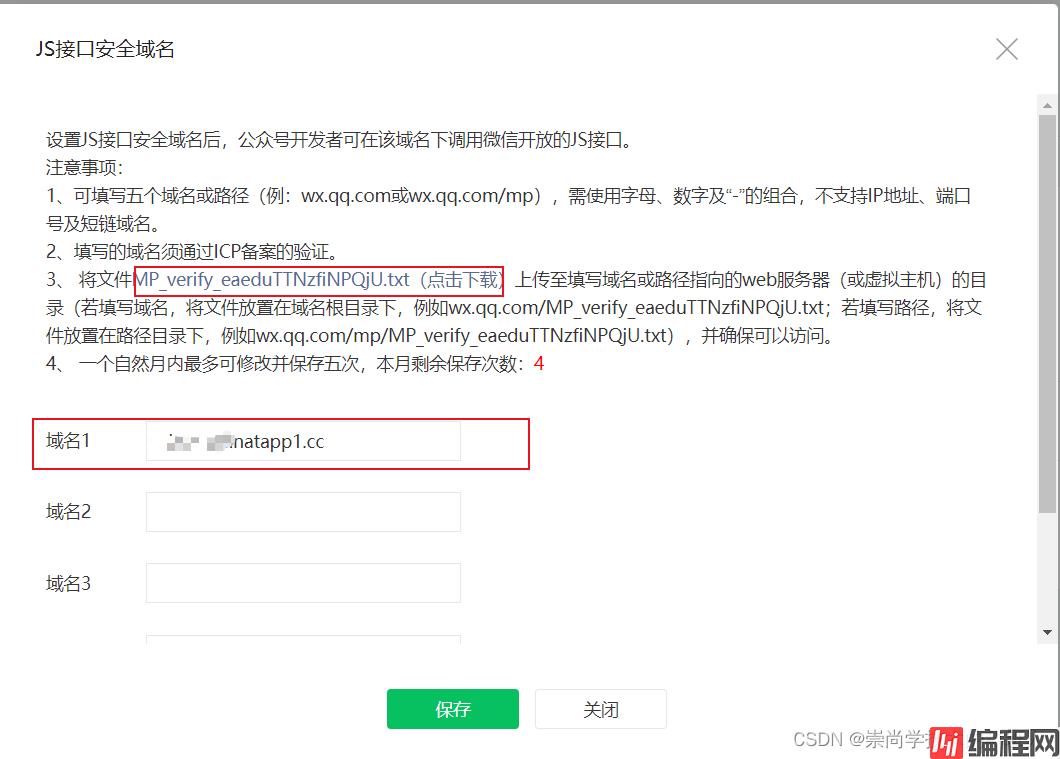
提交之前我们需要将上图中的红色框框住的部分的文件下载下来放置项目的
static目录下,测试访问通过之后,然后才能进行提交。
可谓是一波三折呀,我本来以为我这个项目就要gg了。但也是我自己太小儿科了。微信怎么可能没有想到这么一个问题呢。就是微信公众号的 网页授权获取用户基本信息 功能服务。它这个功能服务必须只有 服务号 才拥有,但是其实每个用户可以免注册获得一个测试号,该测试号就含有这个特殊功能服务。
(1).登录自己的测试号

微信测试号是免注册的,我们直接扫码登录即可。
(2).编写对应的接口
import lombok.extern.slf4j.Slf4j;
import org.springframework.WEB.bind.annotation.GetMapping;
import org.springframework.web.bind.annotation.RequestMapping;
import org.springframework.web.bind.annotation.RequestParam;
import org.springframework.web.bind.annotation.RestController;


@RestController
@RequestMapping("/weixin")
@Slf4j
public class WeixinController {

    @GetMapping("/auth")
    public void auth(@RequestParam("code") String code){
        log.info("进入了auth方法...");
        log.info("code = {}",code);
    }
}
(3).在登录测试号之后进行网页授权


授权的域名就是我们在
natapp.cn上购买的域名,如果没有进行授权的话那么就会报出10003 redirect_uri域名与后台配置不一致错误。
(4).进行访问url进行测试
https://open.weixin.qq.com/connect/oauth2/authorize?appid=测试号的appid&redirect_uri=Http://你的域名/sell/weixin/auth&response_type=code&scope=snsapi_base&state=STATE#wechat_redirect
注意点

被测试的对象必须先关注对应的测试号且必须在微信客户端进行访问。
(5).测试结果

成功获取了用户的code信息。
(1).编写的controller
import lombok.extern.slf4j.Slf4j;
import org.springframework.web.bind.annotation.GetMapping;
import org.springframework.web.bind.annotation.RequestMapping;
import org.springframework.web.bind.annotation.RequestParam;
import org.springframework.web.bind.annotation.RestController;
import org.springframework.web.client.RestTemplate;


@RestController
@RequestMapping("/weixin")
@Slf4j
public class WeixinController {

    @GetMapping("/auth")
    public void auth(@RequestParam("code") String code){
        log.info("进入了auth方法...");
        log.info("code = {}",code);
        String url = "https://api.weixin.qq.com/sns/oauth2/access_token?appid=appid&secret=appsecret&code=" + code + "&grant_type=authorization_code";
        RestTemplate restTemplate = new RestTemplate();
        String response = restTemplate.getForObject(url, String.class);
    }
}
(2).访问的url组成
https://api.weixin.qq.com/sns/oauth2/access_token?appid=APPID&secret=SECRET&code=CODE&grant_type=authorization_code
| 参数 | 是否必须 | 说明 |
|---|---|---|
| appid | 是 | 公众号的唯一标识 |
| secret | 是 | 公众号的appsecret |
| code | 是 | 填写第一步获取的code参数 |
| grant_type | 是 | 填写为authorization_code |
(3).访问的结果
{
  "access_token": "53_HK355v2MhOolNlGkaoUf4oDCkyX0WDollvsQNU5SvhsvmvF2S2VoqdPXuokfERI2oqFvQijVShq8aQzeQ9n01mGKSJn7q5rLAcYbTjm1H7k",
  "expires_in": 7200,
  "refresh_token": "53_C1us_G770mgzXjd-PuK329qB65lXiK483_qxUXjKudwWIdHkOz5ntwlByEgUQfMEy_-7tCCzcO4DoHaFbY0JurpZYD3Bys6DLs8ua8J_CjU",
  "openid": "你的openid",
  "scope": "snsapi_base"
}
        <!--微信公众号开发需要引入的依赖-->
        <dependency>
            <groupId>com.GitHub.binarywang</groupId>
            <artifactId>weixin-java-mp</artifactId>
            <version>3.1.0</version>
        </dependency>
wechat:
  mpAppId: 你的微信测试号appId
  mpAppSecret: 你的微信测试号secret
import lombok.Data;
import org.springframework.boot.context.properties.ConfigurationProperties;
import org.springframework.stereotype.Component;


@Component
@Data
@ConfigurationProperties(prefix = "wechat")
public class WechatAccountConfig {


    private String mpAppId;


    private String mpAppSecret;

}
import me.chanjar.weixin.mp.api.WxMpConfigStorage;
import me.chanjar.weixin.mp.api.WxMpInMemoryConfigStorage;
import me.chanjar.weixin.mp.api.WxMpService;
import me.chanjar.weixin.mp.api.impl.WxMpServiceImpl;
import org.springframework.beans.factory.annotation.Autowired;
import org.springframework.context.annotation.Bean;
import org.springframework.stereotype.Component;


@Component
public class WechatMpConfig {


    @Autowired
    private WechatAccountConfig wechatAccountConfig;

    @Autowired
    private WxMpInMemoryConfigStorage wxMpInMemoryConfigStorage;

    @Bean
    public WxMpService wxMpService(){
        WxMpService wxMpService = new WxMpServiceImpl();
        wxMpService.setWxMpConfigStorage(wxMpInMemoryConfigStorage);
        return wxMpService;
    }

    @Bean
    public WxMpInMemoryConfigStorage wxMpConfigStorage(){

        WxMpInMemoryConfigStorage wxMpConfigStorage = new WxMpInMemoryConfigStorage();
        wxMpConfigStorage.setAppId(wechatAccountConfig.getMpAppId());
        wxMpConfigStorage.setSecret(wechatAccountConfig.getMpAppSecret());
        return wxMpConfigStorage;
    }
}
import com.xiao.enums.ResultEnum;
import com.xiao.exception.SellException;
import lombok.extern.slf4j.Slf4j;
import me.chanjar.weixin.common.api.WxConsts;
import me.chanjar.weixin.common.error.WxErrorException;
import me.chanjar.weixin.mp.api.WxMpService;
import me.chanjar.weixin.mp.bean.result.WxMpOAuth2AccessToken;
import org.springframework.beans.factory.annotation.Autowired;
import org.springframework.stereotype.Controller;
import org.springframework.web.bind.annotation.GetMapping;
import org.springframework.web.bind.annotation.RequestMapping;
import org.springframework.web.bind.annotation.RequestParam;
import org.springframework.web.bind.annotation.RestController;


@Controller
@RequestMapping("/wechat")
@Slf4j
public class WechatController {

    @Autowired
    private WxMpService wxMpService;

    @GetMapping("/authorize")
    public String authorize(@RequestParam("returnUrl") String returnUrl){
        String url = "http://xiao-sell.natapp1.cc/sell/wechat/userInfo";
        String redirectUrl = wxMpService.oauth2buildAuthorizationUrl(url, WxConsts.OAuth2Scope.SNSAPI_USERINFO,returnUrl);
        return "redirect:" +  redirectUrl;
    }

    @GetMapping("/userInfo")
    public String userInfo(@RequestParam("code") String code,
                         @RequestParam("state") String returnUrl) {
        WxMpOAuth2AccessToken wxMpOAuth2AccessToken = new WxMpOAuth2AccessToken();
        try{
            wxMpOAuth2AccessToken = wxMpService.oauth2getAccessToken(code);
        }catch (WxErrorException e){
            log.error("【微信网页授权错误】 exception = {}",e);
            throw new SellException(ResultEnum.WECHAT_MP_ERROR.getCode(),e.getError().getErrORMsg());
        }
        String openId = wxMpOAuth2AccessToken.getOpenId();
        log.info("openid = {}",openId);
        return "redirect:" + returnUrl + "?openid=" + openId;
    }
}第一个断点

该重定向的url很明显就是我们手工方式中获取code的url。
第二个断点

成功获取了code和openid。
到此这篇关于手把手教你如何获取微信用户openid的文章就介绍到这了,更多相关获取微信用户openid内容请搜索编程网以前的文章或继续浏览下面的相关文章希望大家以后多多支持编程网!
--结束END--
本文标题: 手把手教你如何获取微信用户openid
本文链接: https://www.lsjlt.com/news/195882.html(转载时请注明来源链接)
有问题或投稿请发送至: 邮箱/279061341@qq.com QQ/279061341
下载Word文档到电脑,方便收藏和打印~
2024-03-01
2024-03-01
2024-03-01
2024-02-29
2024-02-29
2024-02-29
2024-02-29
2024-02-29
2024-02-29
2024-02-29
回答
回答
回答
回答
回答
回答
回答
回答
回答
回答


官方手机版

微信公众号

商务合作


0