目录1.Context是干嘛的2.可以倒是可以实现的做法-props逐级传递3.Context1.Context是干嘛的 一种React组件间通信方式, 常用于【祖组件】与【后代组件
一种React组件间通信方式, 常用于【祖组件】与【后代组件】间通信
import React, { Component } from "react";
import "./index.CSS";
export default class A extends Component {
state = { username: "tom", age: 18 };
render() {
const { username, age } = this.state;
return (
<div className="parent">
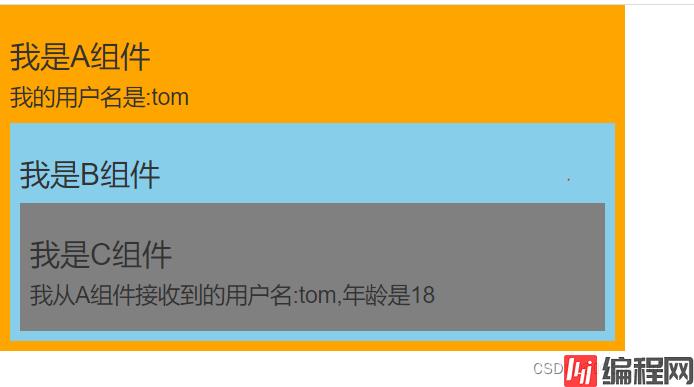
<h3>我是A组件</h3>
<h4>我的用户名是:{username}</h4>
<B username={username} age={age}></B>
</div>
);
}
}
class B extends Component {
render() {
console.log(this.props);
const { username, age } = this.props;
return (
<div className="child">
<h3>我是B组件</h3>
<C username={username} age={age} />
</div>
);
}
}
function C(props) {
const { username, age } = props;
return (
<div className="grand">
<h3>我是C组件</h3>
<h4>
我从A组件接收到的用户名:{username},年龄是{age}
</h4>
</div>
);
}
这里C组件用了下函数式组件的写法
但是这种写法有很多的不太好的地方,如果层级再深一点呢,传的值再多一点呢。肯定会有很多的重复代码出现,而且我只想要祖组件和孙组件通信,这样写的话其实是每个组件都在通信了的
Context的就可以挺好的适用于这种场景
创建Context容器对象:
const XxxContext = React.createContext()
2) 渲染子组时,外面包裹xxxContext.Provider, 通过value属性给后代组件传递数据:
<xxxContext.Provider value={数据}>
子组件
</xxxContext.Provider>
3) 后代组件读取数据:
//第一种方式:仅适用于类组件
static contextType = xxxContext // 声明接收context
this.context // 读取context中的value数据
//第二种方式: 函数组件与类组件都可以
<xxxContext.Consumer>
{
value => ( // value就是context中的value数据
要显示的内容
)
}
</xxxContext.Consumer>
上代码
import React, { Component } from "react";
import "./index.css";
//创建Context对象
const MyContext = React.createContext();
const { Provider, Consumer } = MyContext;
export default class A extends Component {
  state = { username: "tom", age: 18 };
  render() {
    const { username, age } = this.state;
    return (
      <div className="parent">
        <h3>我是A组件</h3>
        <h4>我的用户名是:{username}</h4>
        //如果传的只有一个值例如username,应该式value={username},后面就是直接获取了,不需要再属性名取值了
        <Provider value={{ username, age }}>
          <B />
        </Provider>
      </div>
    );
  }
}
class B extends Component {
  render() {
    return (
      <div className="child">
        <h3>我是B组件</h3>
        <C/>
      </div>
    );
  }
}
 class C extends Component {
	//声明接收context
	static contextType = MyContext
	render() {
		const {username,age} = this.context
		return (
			<div className="grand">
				<h3>我是C组件</h3>
				<h4>我从A组件接收到的用户名:{username},年龄是{age}</h4>
			</div>
		)
	}
}
// function C() {
//   return (
//     <div className="grand">
//       <h3>我是C组件</h3>
//       <h4>
//         我从A组件接收到的用户名:
//         {}
//       </h4>
//     </div>
//   );
// }
到此这篇关于React Context详解使用过程的文章就介绍到这了,更多相关React Context内容请搜索编程网以前的文章或继续浏览下面的相关文章希望大家以后多多支持编程网!
--结束END--
本文标题: ReactContext详解使用过程
本文链接: https://www.lsjlt.com/news/198594.html(转载时请注明来源链接)
有问题或投稿请发送至: 邮箱/279061341@qq.com QQ/279061341
下载Word文档到电脑,方便收藏和打印~
2024-01-12
2023-05-20
2023-05-20
2023-05-20
2023-05-20
2023-05-20
2023-05-20
2023-05-20
2023-05-20
2023-05-20
回答
回答
回答
回答
回答
回答
回答
回答
回答
回答


官方手机版

微信公众号

商务合作


0