本文实例讲述了Android编程自定义菜单实现方法。分享给大家供大家参考,具体如下: 在android开发的过程中系统自带的菜单往往满足不了开发中的一些需求,比如说一排最多只能
本文实例讲述了Android编程自定义菜单实现方法。分享给大家供大家参考,具体如下:
在android开发的过程中系统自带的菜单往往满足不了开发中的一些需求,比如说一排最多只能放置三个菜单,坐多只能放置6个,再多的话就会折叠起来,如果我们想再一排显示4个或5个菜单那么就要自己想办法处理。
这里我用布局的隐藏并加上动画来模拟菜单的效果。
要点:
1、隐藏和显示菜单,我使用了一个线性布局把菜单封装起来。
<?xml version="1.0" encoding="utf-8"?>
<LinearLayout xmlns:android="Http://schemas.android.com/apk/res/android"
 android:layout_alignParentBottom="true"
 android:background="@drawable/menubackground"
 android:layout_width="fill_parent"
 android:layout_height="144px"
 android:orientation="vertical"
 android:gravity="center"
 android:visibility="Gone"
   android:id="@+id/lines">
   <LinearLayout android:orientation="horizontal"
   android:gravity="center"
   android:layout_width="fill_parent"
 android:layout_height="72px"
   >
 <ImageButton
   android:layout_marginLeft="8dip"
   android:id="@+id/menu_btn_index"
   android:layout_width="wrap_content"
   android:layout_height="wrap_content"
   android:background="@drawable/menu_index_selector"
   />
  <ImageButton
   android:layout_width="wrap_content"
   android:layout_height="wrap_content"
   android:background="@drawable/menu_news_selector"
   android:id="@+id/menu_btn_news"
   />
  <ImageButton
   android:layout_width="wrap_content"
   android:layout_height="wrap_content"
   android:background="@drawable/menu_lib_selector"
   android:id="@+id/menu_btn_lib"
   />
    <ImageButton
   android:layout_width="wrap_content"
   android:layout_height="wrap_content"
   android:background="@drawable/menu_add_selector"
   android:id="@+id/menu_btn_add"
   />
 <ImageButton
   android:layout_width="wrap_content"
   android:layout_height="wrap_content"
   android:background="@drawable/menu_set_selector"
   android:id="@+id/menu_btn_set"
   />
 </LinearLayout>
 <LinearLayout android:orientation="horizontal" android:gravity="center"
   android:layout_width="fill_parent"
   android:layout_height="72px">
 <ImageButton
   android:layout_marginLeft="8dip"
   android:id="@+id/menu_btn_index"
   android:layout_width="wrap_content"
   android:layout_height="wrap_content"
   android:background="@drawable/menu_index_selector"
   />
  <ImageButton
   android:layout_width="wrap_content"
   android:layout_height="wrap_content"
   android:background="@drawable/menu_news_selector"
   android:id="@+id/menu_btn_news"
   />
  <ImageButton
   android:layout_width="wrap_content"
   android:layout_height="wrap_content"
   android:background="@drawable/menu_lib_selector"
   android:id="@+id/menu_btn_lib"
   />
  <ImageButton
   android:layout_width="wrap_content"
   android:layout_height="wrap_content"
   android:background="@drawable/menu_add_selector"
   android:id="@+id/menu_btn_add"
   />
 <ImageButton
   android:layout_width="wrap_content"
   android:layout_height="wrap_content"
   android:background="@drawable/menu_quit_selector"
   android:id="@+id/menu_btn_quit"
   />
 </LinearLayout>
</LinearLayout>
2、模拟菜单的效果,增加动画,布局显示的时候增加一个渐渐底部生气的效果,隐藏的时候增加一个缓缓下落的效果,显示菜单动画文件:
<?xml version="1.0" encoding="utf-8"?>
<set xmlns:android="http://schemas.android.com/apk/res/android">
  <translate
    android:fromXDelta="0"
    android:toXDelta="0"
    android:fromYDelta="00"
    android:toYDelta="140"
    android:duration="200" />
</set>
隐藏菜单动画文件:
<?xml version="1.0" encoding="utf-8"?>
<set xmlns:android="http://schemas.android.com/apk/res/android">
  <translate
    android:fromXDelta="0"
    android:toXDelta="0"
    android:fromYDelta="140"
    android:toYDelta="00"
    android:duration="200" />
</set>
动画调用:
 private void showAppMenu() {
   if (menuShowAnimation == null) {
     menuShowAnimation = AnimationUtils
         .loadAnimation(mContext, R.anim.menuhide);
   }
   myLayout.startAnimation(menuShowAnimation);
   myLayout.setVisibility(View.VISIBLE);
 }

 private void hideappMenu() {
   myLayout.setVisibility(View.GONE);
   if (menuHideAnimation == null)
     menuHideAnimation =AnimationUtils
         .loadAnimation(mContext, R.anim.menushow);
   myLayout.startAnimation(menuHideAnimation);
 }
3、控制菜单的隐藏和显示,需要重写三个方法public boolean onCreateOptionsMenu(Menu menu),
public boolean dispatchKeyEvent(KeyEvent event) 和public boolean dispatchTouchEvent(MotionEvent event)
@Override
  public boolean onCreateOptionsMenu(Menu menu) {
    if(mCustomMenu==null)
      mCustomMenu=new CustomMenu(CustomMenuActivity.this,CustomMenuActivity.this);
    mCustomMenu.CreateMenu();
    return false;
  }
  @Override
  public boolean dispatchKeyEvent(KeyEvent event) {
    if(mCustomMenu!=null)
      return mCustomMenu.dispatchKeyEvent(event,super.dispatchKeyEvent(event));
    return super.dispatchKeyEvent(event);
  }
  @Override
  public boolean dispatchTouchEvent(MotionEvent event) {
    if(mCustomMenu!=null)
      return mCustomMenu.dispatchTouchEvent(event,super.dispatchTouchEvent(event));
    return super.dispatchTouchEvent(event);
  }
4、实现菜单点击时候被点击菜单状态的般变化,这里我使用了selector来实现,菜单我使用ImageButton将selector赋值给ImageButton 的background即可:
一个菜单项
<ImageButton
   android:layout_marginLeft="8dip"
   android:id="@+id/menu_btn_index"
   android:layout_width="wrap_content"
   android:layout_height="wrap_content"
   android:background="@drawable/menu_index_selector"
   />
menu_index_selector 文件内容如下:
<?xml version="1.0" encoding="utf-8"?>
<!-- Copyright (C) 2009 The Android Open Source Project
  Licensed under the Apache License, Version 2.0 (the "License");
  you may not use this file except in compliance with the License.
  You may obtain a copy of the License at
   http://www.apache.org/licenses/LICENSE-2.0
  Unless required by applicable law or agreed to in writing, software
  distributed under the License is distributed on an "AS IS" BASIS,
  WITHOUT WARRANTIES OR CONDITIONS OF ANY KIND, either express or implied.
  See the License for the specific language governing permissions and
  limitations under the License.
-->
<selector xmlns:android="http://schemas.android.com/apk/res/android">
 <item android:state_window_focused="false"
  android:drawable="@drawable/menu_index" />
 <item android:state_pressed="true"
  android:drawable="@drawable/menu_index1" />
 <item android:state_focused="true"
  android:drawable="@drawable/menu_index1" />
 <item
   android:drawable="@drawable/menu_index" />
</selector>
5、页面的调用使用:<include>标签来进行引用:
<?xml version="1.0" encoding="utf-8"?>
<RelativeLayout
 xmlns:android="http://schemas.android.com/apk/res/android"
 android:orientation="vertical"
 android:layout_width="fill_parent"
 android:layout_height="fill_parent">
 <include layout="@layout/menu_layout"/>
 </RelativeLayout>
这样的话一个模拟的自定义菜单就基本完成了,菜单控制完整代码java类:
package com.demo.utils;
import android.app.Activity;
import android.content.Context;
import android.content.res.Resources;
import android.view.KeyEvent;
import android.view.MotionEvent;
import android.view.View;
import android.view.View.OnClickListener;
import android.view.animation.Animation;
import android.view.animation.AnimationUtils;
import android.widget.ImageButton;
import android.widget.LinearLayout;
import com.demo.HelloWorld.R;

public class CustomMenu {
  private LinearLayout myLayout;
  private Context mContext;
  private Activity Mactivity;
  private Animation menuShowAnimation = null;
  private Animation menuHideAnimation = null;
  private Resources res;
  public int screen_height;
  private ImageButton imgIndex,imgSet,imgNews,imgAdd,imgQuit,imgLib;
  public CustomMenu(Context context,Activity activity){
    mContext=context;
    mActivity=activity;
    res = mContext.getResources();
    screen_height = res.getDisplayMetrics().heightPixels;
    myLayout=(LinearLayout)activity.findViewById(R.id.lines);
    imgIndex=(ImageButton)activity.findViewById(R.id.menu_btn_index);
    imgSet=(ImageButton)activity.findViewById(R.id.menu_btn_set);
    imgNews=(ImageButton)activity.findViewById(R.id.menu_btn_news);
    imgAdd=(ImageButton)activity.findViewById(R.id.menu_btn_add);
    imgQuit=(ImageButton)activity.findViewById(R.id.menu_btn_quit);
    imgLib=(ImageButton)activity.findViewById(R.id.menu_btn_lib);
    //返回首页
    imgIndex.setOnClickListener(new OnClickListener(){
      public void onClick(View v) {
        //TODO do somthing
      }
    });
    //设置
    imgSet.setOnClickListener(new OnClickListener(){
      public void onClick(View v) {
        //TODO do somthing
      }
    });
    //查询
    imgNews.setOnClickListener(new OnClickListener(){
      public void onClick(View v) {
        //TODO do somthing
      }
    });
    //编辑
    imgAdd.setOnClickListener(new OnClickListener(){
      public void onClick(View v) {
        //TODO do somthing
      }
    });
    //退出系统
    imgQuit.setOnClickListener(new OnClickListener(){
      public void onClick(View v) {
        //TODO do somthing
      }
    });
    //素材库
    imgLib.setOnClickListener(new OnClickListener(){
      public void onClick(View v) {
        //TODO do somthing
      }
    });
  }
  public void CreateMenu(){
    if(myLayout.getVisibility()==View.GONE)
      showAppMenu();
      //myLayout.setVisibility(View.VISIBLE);
    else
      hideAppMenu();
      //myLayout.setVisibility(View.GONE);
  }

 private void showAppMenu() {
   if (menuShowAnimation == null) {
     menuShowAnimation = AnimationUtils
         .loadAnimation(mContext, R.anim.menuhide);
   }
   myLayout.startAnimation(menuShowAnimation);
   myLayout.setVisibility(View.VISIBLE);
 }

 private void hideAppMenu() {
   myLayout.setVisibility(View.GONE);
   if (menuHideAnimation == null)
     menuHideAnimation =AnimationUtils
         .loadAnimation(mContext, R.anim.menushow);
   myLayout.startAnimation(menuHideAnimation);
 }
 public boolean dispatchTouchEvent(MotionEvent event,boolean b) {
    if (myLayout.getVisibility() == View.VISIBLE) {
      int y = (int) event.getRawY();
      if (y < screen_height - myLayout.getHeight()) {
        hideAppMenu();
        return true;
      }
    }
    return b;
 }
 public boolean dispatchKeyEvent(KeyEvent event,boolean b) {
   int act = event.getAction();
   int code = event.geTKEyCode();
   // app menu like option menu
   if (code == KeyEvent.KEYCODE_MENU){
     if (act == KeyEvent.ACTION_DOWN){
       if (myLayout.getVisibility() == View.VISIBLE) {
         hideAppMenu();
       } else {
         showAppMenu();
       }
       return true;
     }
   }else if (code == KeyEvent.KEYCODE_BACK){
     if (myLayout.getVisibility() == View.VISIBLE) {
       hideAppMenu();
       return true;
     }
   }
   return b;
 }
}
activity调用菜单完整代码:
package com.demo.ui;
import com.demo.HelloWorld.R;
import com.demo.utils.CustomMenu;
import android.app.Activity;
import android.os.Bundle;
import android.view.KeyEvent;
import android.view.Menu;
import android.view.MotionEvent;

public class CustomMenuActivity extends Activity {
  private CustomMenu mCustomMenu=null;
  @Override
  public void onCreate(Bundle savedInstanceState) {
    super.onCreate(savedInstanceState);
    setContentView(R.layout.custom_menu);
  }
  @Override
  public boolean onCreateOptionsMenu(Menu menu) {
    if(mCustomMenu==null)
      mCustomMenu=new CustomMenu(CustomMenuActivity.this,CustomMenuActivity.this);
    mCustomMenu.CreateMenu();
    return false;
  }
  @Override
  public boolean dispatchKeyEvent(KeyEvent event) {
    if(mCustomMenu!=null)
      return mCustomMenu.dispatchKeyEvent(event,super.dispatchKeyEvent(event));
    return super.dispatchKeyEvent(event);
  }
  @Override
  public boolean dispatchTouchEvent(MotionEvent event) {
    if(mCustomMenu!=null)
      return mCustomMenu.dispatchTouchEvent(event,super.dispatchTouchEvent(event));
    return super.dispatchTouchEvent(event);
  }
}
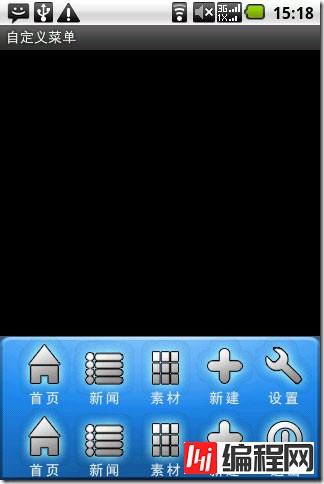
实现的效果如下:

更多关于Android相关内容感兴趣的读者可查看本站专题:《Android开发入门与进阶教程》、《Android布局layout技巧总结》、《Android视图View技巧总结》、《Android编程之activity操作技巧总结》、《Android操作JSON格式数据技巧总结》、《Android资源操作技巧汇总》及《Android控件用法总结》
希望本文所述对大家Android程序设计有所帮助。
您可能感兴趣的文章:Android开发技巧之我的菜单我做主(自定义菜单)android自定义popupwindow仿微信右上角弹出菜单效果Android实现自定义滑动式抽屉效果菜单android 自定义Android菜单背景的代码Android自定义ViewGroup实现带箭头的圆角矩形菜单Android自定义view实现圆形与半圆形菜单Android实现自定义的卫星式菜单(弧形菜单)详解Android 自定义弹出菜单和对话框功能实例代码Android自定义控件简单实现侧滑菜单效果Android自定义View展开菜单功能的实现Android使用xml文件资源定义菜单实现方法示例
--结束END--
本文标题: Android编程自定义菜单实现方法详解
本文链接: https://www.lsjlt.com/news/22217.html(转载时请注明来源链接)
有问题或投稿请发送至: 邮箱/279061341@qq.com QQ/279061341
下载Word文档到电脑,方便收藏和打印~
2024-01-21
2023-10-28
2023-10-28
2023-10-27
2023-10-27
2023-10-27
2023-10-27
回答
回答
回答
回答
回答
回答
回答
回答
回答
回答


官方手机版

微信公众号

商务合作


0