目前,各种App的社区或者用户晒照片、发说说的地方,都提供了评论功能,为了更好地学习,自己把这个功能实现了一下,做了个小的Demo。 首先推荐一款实用的插件LayoutCre
目前,各种App的社区或者用户晒照片、发说说的地方,都提供了评论功能,为了更好地学习,自己把这个功能实现了一下,做了个小的Demo。
首先推荐一款实用的插件LayoutCreater,可以帮助开发者自动生成布局代码,具体用法可以去GiHub上看看:
GitHub地址:https://github.com/boredream/BorePlugin
1、新建一个Android工程,写MainActivity的布局 activity_main.xml
<RelativeLayout
 xmlns:android="Http://schemas.android.com/apk/res/android"
 android:layout_width="match_parent"
 android:layout_height="match_parent"
 android:background="@color/grey">
 <ListView
  android:id="@+id/comment_list"
  android:layout_width="match_parent"
  android:layout_height="match_parent"
  android:layout_marginTop="10dp"
  android:layout_marginBottom="50dp" />
 <LinearLayout
  android:id="@+id/rl_enroll"
  android:layout_width="match_parent"
  android:layout_height="50dp"
  android:orientation="horizontal"
  android:layout_alignParentBottom="true"
  android:background="@color/white">
  <ImageView
   android:id="@+id/comment"
   android:layout_width="32dp"
   android:layout_height="32dp"
   android:src="@drawable/comment"
   android:layout_weight="1"
   android:layout_gravity="center" />
  <ImageView
   android:id="@+id/chat"
   android:layout_width="23Dp"
   android:layout_height="23dp"
   android:src="@drawable/chat"
   android:layout_weight="1"
   android:layout_gravity="center"/>
 </LinearLayout>
 <RelativeLayout
  android:id="@+id/rl_comment"
  android:layout_width="match_parent"
  android:layout_height="50dp"
  android:background="@color/white"
  android:visibility="Gone"
  android:layout_alignParentBottom="true">
  <View
   android:layout_width="match_parent"
   android:layout_height="1dp"
   android:background="@color/grey" />
  <TextView
   android:id="@+id/hide_down"
   android:layout_width="wrap_content"
   android:layout_height="wrap_content"
   android:text="@string/hide_down"
   android:textSize="13sp"
   android:textColor="@color/txtgrey"
   android:drawableBottom="@drawable/hide_dowm"
   android:layout_alignParentLeft="true"
   android:layout_centerVertical="true"
   android:layout_marginLeft="10dp"/>
  <View
   android:layout_width="1dp"
   android:layout_height="match_parent"
   android:background="@color/grey"
   android:layout_toRightOf="@id/hide_down"
   android:layout_marginLeft="10dp"/>
  <EditText
   android:id="@+id/comment_content"
   android:hint="@string/comment_content"
   android:textSize="15sp"
   android:singleLine="true"
   android:layout_width="240dp"
   android:layout_height="match_parent"
   android:background="@null"
   android:layout_toRightOf="@id/hide_down"
   android:layout_marginLeft="20dp"/>
  <Button
   android:id="@+id/comment_send"
   android:layout_width="50dp"
   android:layout_height="35dp"
   android:layout_margin="5dp"
   android:text="@string/send"
   android:textSize="13sp"
   android:textColor="@color/white"
   android:background="@color/mainColor"
   android:layout_alignParentRight="true"
   android:layout_marginRight="10dp"
   android:layout_marginLeft="15dp"/>
 </RelativeLayout>
</RelativeLayout>
2、创建评论内容实体类、 内容适配器、内容的Item布局
1)内容实体类 Comment
public class Comment {
 String name; //评论者
 String content; //评论内容
 public Comment(){
 }
 public Comment(String name, String content){
  this.name = name;
  this.content = content;
 }
 public String getName() {
  return name;
 }
 public void setName(String name) {
  this.name = name;
 }
 public String getContent() {
  return content;
 }
 public void setContent(String content) {
  this.content = content;
 }
}
2)内容适配器 AdapterComment
public class AdapterComment extends BaseAdapter {
 Context context;
 List<Comment> data;
 public AdapterComment(Context c, List<Comment> data){
  this.context = c;
  this.data = data;
 }
 @Override
 public int getCount() {
  return data.size();
 }
 @Override
 public Object getItem(int i) {
  return data.get(i);
 }
 @Override
 public long getItemId(int i) {
  return i;
 }
 @Override
 public View getView(int i, View convertView, ViewGroup viewGroup) {
  ViewHolder holder;
  // 重用convertView
  if(convertView == null){
   holder = new ViewHolder();
   convertView = LayoutInflater.from(context).inflate(R.layout.item_comment, null);
   holder.comment_name = (TextView) convertView.findViewById(R.id.comment_name);
   holder.comment_content = (TextView) convertView.findViewById(R.id.comment_content);
   convertView.setTag(holder);
  }else{
   holder = (ViewHolder) convertView.getTag();
  }
  // 适配数据
  holder.comment_name.setText(data.get(i).getName());
  holder.comment_content.setText(data.get(i).getContent());
  return convertView;
 }

 public void addComment(Comment comment){
  data.add(comment);
  notifyDataSetChanged();
 }

 public static class ViewHolder{
  TextView comment_name;
  TextView comment_content;
 }
}
3)内容的Item布局 item_comment.xml
<LinearLayout xmlns:android="http://schemas.android.com/apk/res/android"
 android:orientation="horizontal"
 android:layout_width="match_parent"
 android:layout_height="match_parent">
 <TextView
  android:id="@+id/comment_name"
  android:layout_width="wrap_content"
  android:layout_height="wrap_content"
  android:textColor="@color/mainColor"
  android:textSize="15sp"
  android:layout_marginLeft="15dp"
  android:layout_marginRight="3dp"/>
 <TextView
  android:id="@+id/comment_content"
  android:layout_width="wrap_content"
  android:layout_height="wrap_content"
  android:textColor="@color/colorAccent"
  android:textSize="15sp" />
</LinearLayout>
3、在MainActivity选中布局,然后菜单栏点击 Code —> LayoutCreater,确定要生成的布局代码后,点击confirm完成
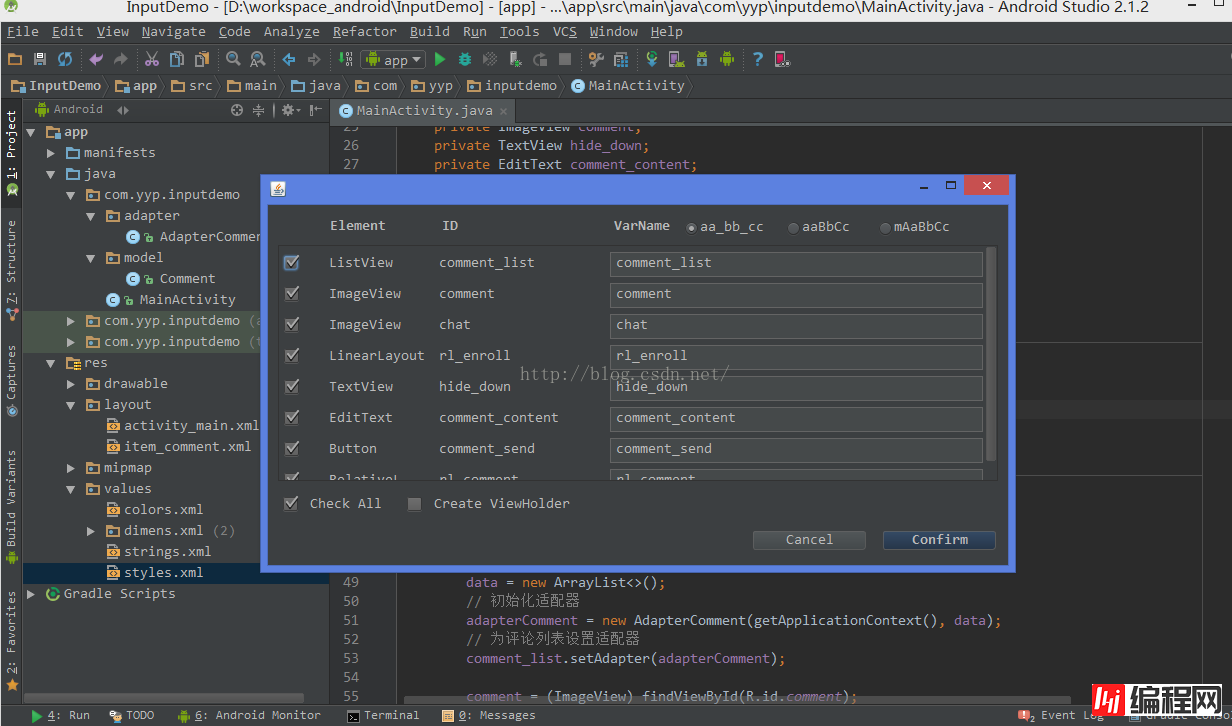
接下来再完善,具体的实现我已经在代码中做了注释,就不具体说了
public class MainActivity extends Activity implements View.OnClickListener {
 private ImageView comment;
 private TextView hide_down;
 private EditText comment_content;
 private Button comment_send;
 private LinearLayout rl_enroll;
 private RelativeLayout rl_comment;
 private ListView comment_list;
 private AdapterComment adapterComment;
 private List<Comment> data;
 @Override
 protected void onCreate(Bundle savedInstanceState) {
  super.onCreate(savedInstanceState);
  setContentView(R.layout.activity_main);
  initView();
 }
 private void initView() {
  // 初始化评论列表
  comment_list = (ListView) findViewById(R.id.comment_list);
  // 初始化数据
  data = new ArrayList<>();
  // 初始化适配器
  adapterComment = new AdapterComment(getApplicationContext(), data);
  // 为评论列表设置适配器
  comment_list.setAdapter(adapterComment);
  comment = (ImageView) findViewById(R.id.comment);
  hide_down = (TextView) findViewById(R.id.hide_down);
  comment_content = (EditText) findViewById(R.id.comment_content);
  comment_send = (Button) findViewById(R.id.comment_send);
  rl_enroll = (LinearLayout) findViewById(R.id.rl_enroll);
  rl_comment = (RelativeLayout) findViewById(R.id.rl_comment);
  setListener();
 }

 public void setListener(){
  comment.setOnClickListener(this);
  hide_down.setOnClickListener(this);
  comment_send.setOnClickListener(this);
 }
 @Override
 public void onClick(View v) {
  switch (v.getId()) {
   case R.id.comment:
    // 弹出输入法
    InputMethodManager imm = (InputMethodManager) getApplicationContext().getSystemService(Context.INPUT_METHOD_SERVICE);
    imm.toggleSoftInput(0, InputMethodManager.HIDE_NOT_ALWAYS);
    // 显示评论框
    rl_enroll.setVisibility(View.GONE);
    rl_comment.setVisibility(View.VISIBLE);
    break;
   case R.id.hide_down:
    // 隐藏评论框
    rl_enroll.setVisibility(View.VISIBLE);
    rl_comment.setVisibility(View.GONE);
    // 隐藏输入法,然后暂存当前输入框的内容,方便下次使用
    InputMethodManager im = (InputMethodManager)getApplicationContext().getSystemService(Context.INPUT_METHOD_SERVICE);
    im.hideSoftInputFromWindow(comment_content.getWindowToken(), 0);
    break;
   case R.id.comment_send:
    sendComment();
    break;
   default:
    break;
  }
 }

 public void sendComment(){
  if(comment_content.getText().toString().equals("")){
   Toast.makeText(getApplicationContext(), "评论不能为空!", Toast.LENGTH_SHORT).show();
  }else{
   // 生成评论数据
   Comment comment = new Comment();
   comment.setName("评论者"+(data.size()+1)+":");
   comment.setContent(comment_content.getText().toString());
   adapterComment.addComment(comment);
   // 发送完,清空输入框
   comment_content.setText("");
   Toast.makeText(getApplicationContext(), "评论成功!", Toast.LENGTH_SHORT).show();
  }
 }
}
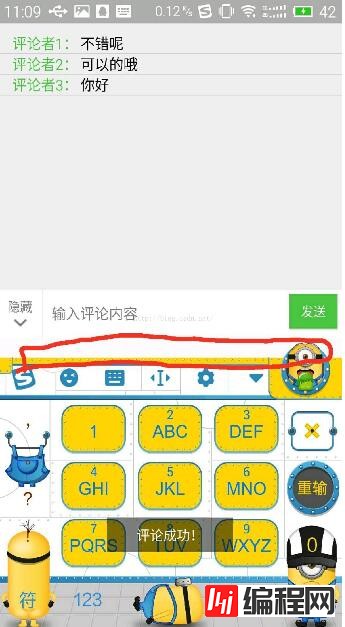
注意:
因为Android 手机类型比较杂,所以有的手机中会出现底部输入框和输入法重叠,如下图,画红圈的这部分是没有的:
当出现这个问题时,可以在Manifest.xml文件中,给对应的Activity添加一条属性
android:windowsoftInputMode="stateHidden|adjustResize"
这样,输入法就可以自动调节,显示画红圈的部分,底部输入框和输入法就不会重叠了。
4、最后的效果图如下
隐藏输入框的界面

显示输入框的界面

--结束END--
本文标题: Android评论功能的实现过程
本文链接: https://www.lsjlt.com/news/24342.html(转载时请注明来源链接)
有问题或投稿请发送至: 邮箱/279061341@qq.com QQ/279061341
下载Word文档到电脑,方便收藏和打印~
2024-01-21
2023-10-28
2023-10-28
2023-10-27
2023-10-27
2023-10-27
2023-10-27
回答
回答
回答
回答
回答
回答
回答
回答
回答
回答


官方手机版

微信公众号

商务合作


0