ListFragment继承于Fragment。因此它具有Fragment的特性,能够作为activity中的一部分,目的也是为了使页面设计更加灵活。 相比Fragment,L
ListFragment继承于Fragment。因此它具有Fragment的特性,能够作为activity中的一部分,目的也是为了使页面设计更加灵活。
相比Fragment,ListFragment的内容是以列表(list)的形式显示的。ListFragment的布局默认包含一个ListView。因此,在ListFragment对应的布局文件中,必须指定一个 Android:id 为 “@android:id/list” 的ListView控件!
ListFragment基础使用
下面介绍在Activity中显示ListFragment的步骤。
1. Activity对应的代码
public class FragmentTest extends Activity {
 @Override
 public void onCreate(Bundle savedInstanceState) {
  super.onCreate(savedInstanceState);
  setContentView(R.layout.main);
 }
}
2. Activity对应的布局
<LinearLayout xmlns:android="Http://schemas.android.com/apk/res/android"
 xmlns:tools="http://schemas.android.com/tools"
 android:layout_width="match_parent"
 android:layout_height="match_parent"
 android:orientation="horizontal" >
 <fragment
  android:name="com.skw.fragmenttest.MyListFragment"
  android:id="@+id/myfragment"
  android:layout_width="match_parent"
  android:layout_height="match_parent" />
</LinearLayout>
说明:该Activity的布局中只包行了一个Fragment。下面看看MyListFragment的内容。
3. MyListFragment的内容
public class MyListFragment extends ListFragment {
 private static final String TAG = "##MyListFragment##";
 private ListView selfList;
 String[] cities = {
   "Shenzhen",
   "Beijing",
   "Shanghai",
   "Guangzhou",
   "Wuhan",
   "Tianjing",
   "Changsha",
   "Xi'an",
   "Chongqing",
   "Guilin",
 };
 @Override
 public View onCreateView(LayoutInflater inflater, ViewGroup container,
   Bundle savedInstanceState) {
  Log.d(TAG, "onCreateView");
  return inflater.inflate(R.layout.list_fragment, container, false);
 }
 @Override
 public void onCreate(Bundle savedInstanceState) {
  Log.d(TAG, "onCreate");
  super.onCreate(savedInstanceState);
  // 设置ListFragment默认的ListView,即@id/android:list
  this.setListAdapter(new ArrayAdapter<String>(getActivity(),
    android.R.layout.simple_list_item_1, cities));
 }
 public void onListItemClick(ListView parent, View v,
   int position, long id) {
  Log.d(TAG, "onListItemClick");
  Toast.makeText(getActivity(), "You have selected " + cities[position],
    Toast.LENGTH_SHORT).show();
 }
}
说明:MyListFragment是自定义的ListFragment。它使用了list_fragment.xml作为布局,并通过android.R.layout.simple_list_item_1显示ListView中的每一项。
4. list_fragment.xml的内容
<?xml version="1.0" encoding="utf-8"?>
<LinearLayout xmlns:android="http://schemas.android.com/apk/res/android"
 android:layout_width="match_parent"
 android:layout_height="match_parent"
 android:orientation="vertical" >
 <!-- ListFragment对应的android:id值固定为"@id/android:list" -->
 <ListView
  android:id="@id/android:list"
  android:layout_width="match_parent"
  android:layout_height="match_parent"
  android:drawSelectorOnTop="false"
  />
</LinearLayout>
"Activity的布局以及代码"和前面一样,这里就不再重复说明。
5. MyListFragment的内容
public class MyListFragment extends ListFragment {
 private static final String TAG = "##MyListFragment##";
 private ListView selfList;
 @Override
 public View onCreateView(LayoutInflater inflater, ViewGroup container,
   Bundle savedInstanceState) {
  Log.d(TAG, "onCreateView");
  return inflater.inflate(R.layout.list_fragment, container, false);
 }
 @Override
 public void onCreate(Bundle savedInstanceState) {
  final String[] from = new String[] {"title", "info"};
  final int[] to = new int[] {R.id.text1, R.id.text2};
  Log.d(TAG, "onCreate");
  super.onCreate(savedInstanceState);
  // 建立SimpleAdapter,将from和to对应起来
  SimpleAdapter adapter = new SimpleAdapter(
    this.getActivity(), getSimpleData(),
    R.layout.item, from, to);
  this.setListAdapter(adapter);
 }
 public void onListItemClick(ListView parent, View v,
   int position, long id) {
  Log.d(TAG, "onListItemClick");
  Toast.makeText(getActivity(),
    "You have selected " + position,
    Toast.LENGTH_SHORT).show();
 }
 private List<Map<String, Object>> getSimpleData() {
  List<Map<String, Object>> list = new ArrayList<Map<String, Object>>();
  Map<String, Object> map = new HashMap<String, Object>();
  map.put("title", "Ferris wheel");
  map.put("info", "Suzhou Ferris wheel");
  list.add(map);
  map = new HashMap<String, Object>();
  map.put("title", "Flower");
  map.put("info", "Roser");
  list.add(map);
  map = new HashMap<String, Object>();
  map.put("title", "Disk");
  map.put("info", "Song Disk");
  list.add(map);
  return list;
 }
}
说明:MyListFragment使用了R.layout.list_fragment作为布局,并且对于ListView中的每一项都使用了R.layout.item作为布局。
6. list_fragment.xml的内容
<!-- ListFragment对应的android:id值固定为"@id/android:list" -->
<ListView
android:id="@id/android:list"
android:layout_width="match_parent"
android:layout_height="match_parent"
android:drawSelectorOnTop="false"
/>
7. item.xml的内容
<?xml version="1.0" encoding="utf-8"?>
<LinearLayout xmlns:android="http://schemas.android.com/apk/res/android"
 android:layout_width="match_parent"
 android:layout_height="match_parent"
 android:orientation="vertical" >
 <TextView android:id="@+id/text1"
  android:textSize="12sp"
  android:textStyle="bold"
  android:layout_width="match_parent"
  android:layout_height="wrap_content"/>
 <TextView android:id="@+id/text2"
  android:textSize="24sp"
  android:layout_width="match_parent"
  android:layout_height="wrap_content"/>
</LinearLayout>
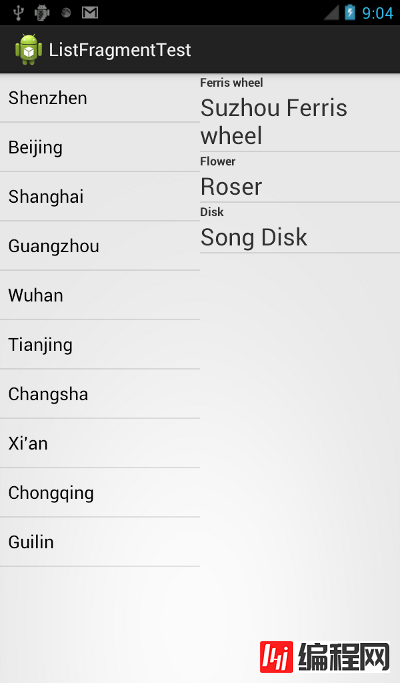
ListFragment实例
应用实例说明:建立一个activity,包括2个ListFragment。第1个ListFragment采用中ListView每一行的内容通过android自带的android.R.layout.simple_list_item_1布局来显示;第2个ListFragment每一行的内容通过自定义的layout文件来显示,每一行显示两个文本。
activity对应的layout文件代码:
<LinearLayout xmlns:android="http://schemas.android.com/apk/res/android"
 xmlns:tools="http://schemas.android.com/tools"
 android:layout_width="match_parent"
 android:layout_height="match_parent"
 android:orientation="horizontal" >
 <fragment
  android:name="com.skywang.app.ListFragmentImpl"
  android:id="@+id/fragment1"
  android:layout_weight="1"
  android:layout_width="match_parent"
  android:layout_height="match_parent" />
 <fragment
  android:name="com.skywang.app.ListFragmentSelf"
  android:id="@+id/fragment2"
  android:layout_weight="1"
  android:layout_width="match_parent"
  android:layout_height="match_parent" />
</LinearLayout>
说明:
(01) 该layout布局包含两个fragment。
activity的代码:
package com.skywang.app;
import android.os.Bundle;
import android.app.Activity;
import android.app.FragmentManager;
import android.app.FragmentTransaction;
import android.view.Menu;
public class ListFragmentTest extends Activity {
 @Override
 protected void onCreate(Bundle savedInstanceState) {
  super.onCreate(savedInstanceState);
  setContentView(R.layout.list_fragment_test);
 }
}
说明:
(01) 在 onCreateView()中,调用list_fragment_impl作为该ListFragment的布局文件。
(02) 在 onCreate()中,通过setListAdapter() 设置android.R.layout.simple_list_item_1为ListView每一行的布局文件,设置cities为其中数据的每一项内容。
ListFragmentImpl.java的代码:
package com.skywang.app;
import android.app.ListFragment;
import android.widget.ListView;
import android.os.Bundle;
import android.view.LayoutInflater;
import android.view.View;
import android.view.ViewGroup;
import android.widget.ArrayAdapter;
import android.util.Log;
import android.widget.Toast;
import android.widget.SimpleAdapter;
import java.util.Map;
import java.util.HashMap;
import java.util.List;
import java.util.ArrayList;
public class ListFragmentImpl extends ListFragment{
 private static final String TAG = "ListFragmentImpl";
 private ListView selfList;
 String[] cities = {
   "Shenzhen",
   "Beijing",
   "Shanghai",
   "Guangzhou",
   "Wuhan",
   "Tianjing",
   "Changsha",
   "Xi'an",
   "Chongqing",
   "Guilin",
 };
 @Override
 public View onCreateView(LayoutInflater inflater, ViewGroup container,
   Bundle savedInstanceState) {
  Log.d(TAG, "onCreateView");
  return inflater.inflate(R.layout.list_fragment_impl, container, false);
 }
 @Override
 public void onCreate(Bundle savedInstanceState) {
  Log.d(TAG, "onCreate");
  super.onCreate(savedInstanceState);
  // 设置ListFragment默认的ListView,即@id/android:list
  this.setListAdapter(new ArrayAdapter<String>(getActivity(),
    android.R.layout.simple_list_item_1, cities));
 }
 public void onListItemClick(ListView parent, View v,
   int position, long id) {
  Log.d(TAG, "onListItemClick");
  Toast.makeText(getActivity(),
    "You have selected " + cities[position],
    Toast.LENGTH_SHORT).show();
 }
}
list_fragment_impl.xml的内容:
<?xml version="1.0" encoding="utf-8"?>
<LinearLayout xmlns:android="http://schemas.android.com/apk/res/android"
 android:layout_width="match_parent"
 android:layout_height="match_parent"
 android:orientation="vertical" >
 <!-- ListFragment对应的android:id值固定为"@id/android:list" -->
 <ListView
  android:id="@id/android:list"
  android:layout_width="match_parent"
  android:layout_height="match_parent"
  android:drawSelectorOnTop="false"
  />
</LinearLayout>
ListFragmentSelf.java的代码:
package com.skywang.app;
import android.app.ListFragment;
import android.widget.ListView;
import android.os.Bundle;
import android.view.LayoutInflater;
import android.view.View;
import android.view.ViewGroup;
import android.widget.ArrayAdapter;
import android.util.Log;
import android.widget.Toast;
import android.widget.SimpleAdapter;
import java.util.Map;
import java.util.HashMap;
import java.util.List;
import java.util.ArrayList;
public class ListFragmentSelf extends ListFragment{
 private static final String TAG = "ListFragmentImpl";
 private ListView selfList;
 @Override
 public View onCreateView(LayoutInflater inflater, ViewGroup container,
   Bundle savedInstanceState) {
  Log.d(TAG, "onCreateView");
  return inflater.inflate(R.layout.list_fragment_self, container, false);
 }
 @Override
 public void onCreate(Bundle savedInstanceState) {
  final String[] from = new String[] {"title", "info"};
  final int[] to = new int[] {R.id.text1, R.id.text2};
  Log.d(TAG, "onCreate");
  super.onCreate(savedInstanceState);
  // 建立SimpleAdapter,将from和to对应起来
  SimpleAdapter adapter = new SimpleAdapter(
    this.getActivity(), getSimpleData(),
    R.layout.two_textview, from, to);
  this.setListAdapter(adapter);
 }
 public void onListItemClick(ListView parent, View v,
   int position, long id) {
  Log.d(TAG, "onListItemClick");
  Toast.makeText(getActivity(),
    "You have selected " + position,
    Toast.LENGTH_SHORT).show();
 }
 private List<Map<String, Object>> getSimpleData() {
  List<Map<String, Object>> list = new ArrayList<Map<String, Object>>();
  Map<String, Object> map = new HashMap<String, Object>();
  map.put("title", "Ferris wheel");
  map.put("info", "Suzhou Ferris wheel");
  list.add(map);
  map = new HashMap<String, Object>();
  map.put("title", "Flower");
  map.put("info", "Roser");
  list.add(map);
  map = new HashMap<String, Object>();
  map.put("title", "Disk");
  map.put("info", "Song Disk");
  list.add(map);
  return list;
 }
}
说明:
(01) 在 onCreateView()中,调用list_fragment_self作为该ListFragment的布局文件。
(02) 在 onCreate()中,通过setListAdapter() 设置R.layout.two_textview为ListView每一行的布局文件。
list_fragment_self.xml的内容:
<?xml version="1.0" encoding="utf-8"?>
<LinearLayout xmlns:android="http://schemas.android.com/apk/res/android"
 android:layout_width="match_parent"
 android:layout_height="match_parent"
 android:orientation="vertical" >
 <!-- ListFragment对应的android:id值固定为"@id/android:list" -->
 <ListView
  android:id="@id/android:list"
  android:layout_width="match_parent"
  android:layout_height="match_parent"
  android:drawSelectorOnTop="false"
  />
</LinearLayout>
two_textview.xml的内容:
<?xml version="1.0" encoding="utf-8"?>
<LinearLayout xmlns:android="http://schemas.android.com/apk/res/android"
 android:layout_width="match_parent"
 android:layout_height="match_parent"
 android:orientation="vertical" >
 <TextView android:id="@+id/text1"
  android:textSize="12sp"
  android:textStyle="bold"
  android:layout_width="match_parent"
  android:layout_height="wrap_content"/>
 <TextView android:id="@+id/text2"
  android:textSize="24sp"
  android:layout_width="match_parent"
  android:layout_height="wrap_content"/>
</LinearLayout>
效果图:
--结束END--
本文标题: Android App中使用ListFragment的实例教程
本文链接: https://www.lsjlt.com/news/25071.html(转载时请注明来源链接)
有问题或投稿请发送至: 邮箱/279061341@qq.com QQ/279061341
下载Word文档到电脑,方便收藏和打印~
2024-01-21
2023-10-28
2023-10-28
2023-10-27
2023-10-27
2023-10-27
2023-10-27
回答
回答
回答
回答
回答
回答
回答
回答
回答
回答


官方手机版

微信公众号

商务合作


0