小编给大家分享一下Android中OkHttp是如何做网络请求的,希望大家阅读完这篇文章之后都有所收获,下面让我们一起去探讨吧!什么是OKhttp简单来说 OkHttp 就是一个客户端用来发送 HTTP 消息并对服务器的响应做出处理的应用层
小编给大家分享一下Android中OkHttp是如何做网络请求的,希望大家阅读完这篇文章之后都有所收获,下面让我们一起去探讨吧!
简单来说 OkHttp 就是一个客户端用来发送 HTTP 消息并对服务器的响应做出处理的应用层框架。 那么它有什么优点呢?
易使用、易扩展。
支持 HTTP/2 协议,允许对同一主机的所有请求共用同一个 Socket 连接。
如果 HTTP/2 不可用, 使用连接池复用减少请求延迟。
支持 GZIP,减小了下载大小。
支持缓存处理,可以避免重复请求。
如果你的服务有多个 IP 地址,当第一次连接失败,OkHttp 会尝试备用地址。
OkHttp 还处理了代理服务器问题和SSL握手失败问题。
val request = Request.Builder() .url("") .addHeader("","") .get() .build() val okHttpClient = OkHttpClient.Builder() .connectTimeout(15, TimeUnit.SECONDS) .readTimeout(15, TimeUnit.SECONDS) .addInterceptor() .build() val newCall = okHttpClient.newCall(request) //异步请求数据 newCall.enqueue(object :Callback{ override fun onFailure(call: Call, e: ioException) {} override fun onResponse(call: Call, response: Response) {} }) //同步请求数据 val response = newCall.execute()整个使用流程很简单,主要的地方在于如何通过 Call 对象发起同/异步请求,后续的源码追踪以方法开始。
override fun newCall(request: Request): Call = RealCall(this, request, forwebsocket = false)//RealCall#enqueue(responseCallback: Callback) override fun enqueue(responseCallback: Callback) { synchronized(this) { //检查这个call是否执行过,每个 call 只能被执行一次 check(!executed) { "Already Executed" } executed = true } //此方法调用了EventListener#callStart(call: Call), 主要是用来监视应用程序的HTTP调用的数量,大小和各个阶段的耗时 callStart() //创建AsyncCall,实际是个Runnable client.dispatcher.enqueue(AsyncCall(responseCallback)) }enqueue 最后一个方法分为两步
第一步将响应的回调放入 AsyncCall 对象中 ,AsyncCall 对象是 RealCall 的一个内部类实现了 Runnable 接口。
第二步通过 Dispatcher 类的 enqueue() 将 AsyncCall 对象传入
//Dispatcher#enqueue(call: AsyncCall) private val readyAsyncCalls = ArrayDeque<AsyncCall>() internal fun enqueue(call: AsyncCall) { synchronized(this) { //将call添加到即将运行的异步队列 readyAsyncCalls.add(call) ... promoteAndExecute() }//Dispatcher#promoteAndExecute() //将[readyAsyncCalls]过渡到[runningAsyncCalls] private fun promoteAndExecute(): Boolean { ... for (i in 0 until executableCalls.size) { val asyncCall = executableCalls[i] //这里就是通过 ExecutorService 执行 run() asyncCall.executeOn(executorService) } return isRunning }//RealCall.kt中的内部类 internal inner class AsyncCall( private val responseCallback: Callback ) : Runnable { fun executeOn(executorService: ExecutorService) { ... //执行Runnable executorService.execute(this) ... } override fun run() { threadName("OkHttp ${redactedUrl()}") { ... try { //兜兜转转 终于调用这个关键方法了 val response = getResponseWithInterceptorChain() signalledCallback = true //通过之前传入的接口回调数据 responseCallback.onResponse(this@RealCall, response) } catch (e: IOException) { if (signalledCallback) { PlatfORM.get().log("Callback failure for ${toLoggableString()}", Platform.INFO, e) } else { responseCallback.onFailure(this@RealCall, e) } } catch (t: Throwable) { cancel() if (!signalledCallback) { val canceledException = IOException("canceled due to $t") canceledException.addSuppressed(t) responseCallback.onFailure(this@RealCall, canceledException) } throw t } finally { //移除队列 client.dispatcher.finished(this) } } } } override fun execute(): Response { //同样判断是否执行过 synchronized(this) { check(!executed) { "Already Executed" } executed = true } timeout.enter() //同样监听 callStart() try { //同样执行 client.dispatcher.executed(this) return getResponseWithInterceptorChain() } finally { //同样移除 client.dispatcher.finished(this) } }无论同异步请求都会调用到 getResponseWithInterceptorChain() ,这个方法主要使用责任链模式将整个请求分为几个拦截器调用 ,简化了各自的责任和逻辑,可以扩展其它拦截器,看懂了拦截器 OkHttp 就了解的差不多了。
@Throws(IOException::class) internal fun getResponseWithInterceptorChain(): Response { // 构建完整的拦截器 val interceptors = mutableListOf<Interceptor>() interceptors += client.interceptors //用户自己拦截器,数据最开始和最后 interceptors += RetryAndFollowUpInterceptor(client) //失败后的重试和重定向 interceptors += BridgeInterceptor(client.cookiejar) //桥接用户的信息和服务器的信息 interceptors += CacheInterceptor(client.cache) //处理缓存相关 interceptors += ConnectInterceptor //负责与服务器连接 if (!forWEBSocket) { interceptors += client.networkInterceptors //配置 OkHttpClient 时设置,数据未经处理 } interceptors += CallServerInterceptor(forWebSocket) //负责向服务器发送请求数据、从服务器读取响应数据 //创建拦截链 val chain = RealInterceptorChain( call = this, interceptors = interceptors, index = 0, exchange = null, request = originalRequest, connectTimeoutMillis = client.connectTimeoutMillis, readTimeoutMillis = client.readTimeoutMillis, writeTimeoutMillis = client.writeTimeoutMillis ) var calledNoMoreExchanges = false try { //拦截链的执行 val response = chain.proceed(originalRequest) ... } catch (e: IOException) { ... } finally { ... } }//1.RealInterceptorChain#proceed(request: Request)@Throws(IOException::class) override fun proceed(request: Request): Response { ... // copy出新的拦截链,链中的拦截器集合index+1 val next = copy(index = index + 1, request = request) val interceptor = interceptors[index] //调用拦截器的intercept(chain: Chain): Response 返回处理后的数据 交由下一个拦截器处理 @Suppress("USELESS_ELVIS") val response = interceptor.intercept(next) ?: throw NullPointerException( "interceptor $interceptor returned null") ... //返回最终的响应体 return response }拦截器开始操作 Request。
拦截器都继承自 Interceptor 类并实现了 fun intercept(chain: Chain): Response 方法。
在 intercept 方法里传入 chain 对象 调用它的 proceed() 然后 proceed() 方法里又 copy 下一个拦截器,然后双调用了 intercept(chain: Chain) 接着叒 chain.proceed(request) 直到最后一个拦截器 return response 然后一层一层向上反馈数据。
这个拦截器是用来处理重定向的后续请求和失败重试,也就是说一般第一次发起请求不需要重定向会调用下一个拦截器。
@Throws(IOException::class) override fun intercept(chain: Interceptor.Chain): Response { val realChain = chain as RealInterceptorChain var request = chain.request val call = realChain.call var followUpCount = 0 var priorResponse: Response? = null var newExchangeFinder = true var recoveredFailures = listOf<IOException>() while (true) { ...//在调用下一个拦截器前的操作 var response: Response try { ... try { //调用下一个拦截器 response = realChain.proceed(request) newExchangeFinder = true } catch (e: RouteException) { ... continue } catch (e: IOException) { ... continue } ... //处理上一个拦截器返回的 response val followUp = followUpRequest(response, exchange) ... //中间有一些判断是否需要重新请求 不需要则返回 response //处理之后重新请求 Request request = followUp priorResponse = response } finally { call.exitNetworkInterceptorExchange(closeActiveExchange) } } } @Throws(IOException::class) private fun followUpRequest(userResponse: Response, exchange: Exchange?): Request? { val route = exchange?.connection?.route() val responseCode = userResponse.code val method = userResponse.request.method when (responseCode) { //3xx 重定向 HTTP_PERM_REDIRECT, HTTP_TEMP_REDIRECT, HTTP_MULT_CHOICE, HTTP_MOVED_PERM, HTTP_MOVED_TEMP, HTTP_SEE_OTHER -> { //这个方法重新 构建了 Request 用于重新请求 return buildRedirectRequest(userResponse, method) } ... 省略一部分code else -> return null } }在 followUpRequest(userResponse: Response, exchange: Exchange?): Request? 方法中判断了 response 中的服务器响应码做出了不同的操作。
它负责对于 Http 的额外预处理,比如 Content-Length 的计算和添加、 gzip 的⽀持(Accept-Encoding: gzip)、 gzip 压缩数据的解包等,这个类比较简单就不贴代码了,想了解的话可以自行查看。
这个类负责 Cache 的处理,如果本地有了可⽤的 Cache,⼀个请求可以在没有发⽣实质⽹络交互的情况下就返回缓存结果,实现如下。
@Throws(IOException::class) override fun intercept(chain: Interceptor.Chain): Response { //在Cache(DiskLruCache)类中 通过request.url匹配response val cacheCandidate = cache?.get(chain.request()) //记录当前时间点 val now = System.currentTimeMillis() //缓存策略 有两种类型 //networkRequest 网络请求 //cacheResponse 缓存的响应 val strategy = CacheStrategy.Factory(now, chain.request(), cacheCandidate).compute() val networkRequest = strategy.networkRequest val cacheResponse = strategy.cacheResponse //计算请求次数和缓存次数 cache?.trackResponse(strategy) ... // 如果 禁止使用网络 并且 缓存不足,返回504和空body的Response if (networkRequest == null && cacheResponse == null) { return Response.Builder() .request(chain.request()) .protocol(Protocol.HTTP_1_1) .code(HTTP_GATEWAY_TIMEOUT) .message("Unsatisfiable Request (only-if-cached)") .body(EMPTY_RESPONSE) .sentRequestAtMillis(-1L) .receivedResponseAtMillis(System.currentTimeMillis()) .build() } // 如果策略中不能使用网络,就把缓存中的response封装返回 if (networkRequest == null) { return cacheResponse!!.newBuilder() .cacheResponse(stripBody(cacheResponse)) .build() } //调用拦截器process从网络获取数据 var networkResponse: Response? = null try { networkResponse = chain.proceed(networkRequest) } finally { // If we're crashing on I/O or otherwise, don't leak the cache body. if (networkResponse == null && cacheCandidate != null) { cacheCandidate.body?.closeQuietly() } } //如果有缓存的Response if (cacheResponse != null) { //如果网络请求返回code为304 即说明资源未修改 if (networkResponse?.code == HTTP_NOT_MODIFIED) { //直接封装封装缓存的Response返回即可 val response = cacheResponse.newBuilder() .headers(combine(cacheResponse.headers, networkResponse.headers)) .sentRequestAtMillis(networkResponse.sentRequestAtMillis) .receivedResponseAtMillis(networkResponse.receivedResponseAtMillis) .cacheResponse(stripBody(cacheResponse)) .networkResponse(stripBody(networkResponse)) .build() networkResponse.body!!.close() // Update the cache after combining headers but before stripping the // Content-Encoding header (as performed by initContentStream()). cache!!.trackConditionalCacheHit() cache.update(cacheResponse, response) return response } else { cacheResponse.body?.closeQuietly() } } val response = networkResponse!!.newBuilder() .cacheResponse(stripBody(cacheResponse)) .networkResponse(stripBody(networkResponse)) .build() if (cache != null) { //判断是否具有主体 并且 是否可以缓存供后续使用 if (response.promisesBody() && CacheStrategy.isCacheable(response, networkRequest)) { // 加入缓存中 val cacheRequest = cache.put(response) return cacheWritingResponse(cacheRequest, response) } //如果请求方法无效 就从缓存中remove掉 if (HttpMethod.invalidatesCache(networkRequest.method)) { try { cache.remove(networkRequest) } catch (_: IOException) { // The cache cannot be written. } } } return response }此类负责建⽴连接。 包含了⽹络请求所需要的 tcp 连接(HTTP),或者 TCP 之前的 TLS 连接(https),并且会创建出对应的 HttpCodec 对象(⽤于编码解码 HTTP 请求)。
@Throws(IOException::class) override fun intercept(chain: Interceptor.Chain): Response { val realChain = chain as RealInterceptorChain val exchange = realChain.call.initExchange(chain) val connectedChain = realChain.copy(exchange = exchange) return connectedChain.proceed(realChain.request) }看似短短四行实际工作还是比较多的。
internal fun initExchange(chain: RealInterceptorChain): Exchange {...//codec是对 HTTP 协议操作的抽象,有两个实现:Http1Codec和Http2Codec,对应 HTTP/1.1 和 HTTP/2。 val codec = exchangeFinder.find(client, chain) val result = Exchange(this, eventListener, exchangeFinder, codec) ... return result } #ExchangeFinder.find fun find(client: OkHttpClient,chain: RealInterceptorChain):ExchangeCodec { try { //寻找一个可用的连接 val resultConnection = findHealthyConnection( connectTimeout = chain.connectTimeoutMillis, readTimeout = chain.readTimeoutMillis, writeTimeout = chain.writeTimeoutMillis, pingIntervalMillis = client.pingIntervalMillis, connectionRetryEnabled = client.retryOnConnectionFailure, doExtensiveHealthChecks = chain.request.method != "GET" ) return resultConnection.newCodec(client, chain) } catch (e: RouteException) { trackFailure(e.lastConnectException) throw e } catch (e: IOException) { trackFailure(e) throw RouteException(e) } } @Throws(IOException::class) private fun findHealthyConnection( connectTimeout: Int, readTimeout: Int, writeTimeout: Int, pingIntervalMillis: Int, connectionRetryEnabled: Boolean, doExtensiveHealthChecks: Boolean ): RealConnection { while (true) { //寻找连接 val candidate = findConnection( connectTimeout = connectTimeout, readTimeout = readTimeout, writeTimeout = writeTimeout, pingIntervalMillis = pingIntervalMillis, connectionRetryEnabled = connectionRetryEnabled ) //确认找到的连接可用并返回 if (candidate.isHealthy(doExtensiveHealthChecks)) { return candidate } ... throw IOException("exhausted all routes") } } @Throws(IOException::class) private fun findConnection( connectTimeout: Int, readTimeout: Int, writeTimeout: Int, pingIntervalMillis: Int, connectionRetryEnabled: Boolean ): RealConnection { if (call.isCanceled()) throw IOException("Canceled") // 1. 尝试重用这个call的连接 比如重定向需要再次请求 那么这里就会重用之前的连接 val callConnection = call.connection if (callConnection != null) { var toClose: Socket? = null synchronized(callConnection) { if (callConnection.noNewExchanges || !sameHostAndPort(callConnection.route().address.url)) { toClose = call.releaseConnectionNoEvents() } } //返回这个连接 if (call.connection != null) { check(toClose == null) return callConnection } // The call's connection was released. toClose?.closeQuietly() eventListener.connectionReleased(call, callConnection) }... // 2. 尝试从连接池中找一个连接 找到就返回连接 if (connectionPool.callAcquirePooledConnection(address, call, null, false)) { val result = call.connection!! eventListener.connectionAcquired(call, result) return result } // 3. 如果连接池中没有 计算出下一次要尝试的路由 val routes: List<Route>? val route: Route if (nextRouteToTry != null) { // Use a route from a preceding coalesced connection. routes = null route = nextRouteToTry!! nextRouteToTry = null } else if (routeSelection != null && routeSelection!!.hasNext()) { // Use a route from an existing route selection. routes = null route = routeSelection!!.next() } else { // Compute a new route selection. This is a blocking operation! var localRouteSelector = routeSelector if (localRouteSelector == null) { localRouteSelector = RouteSelector(address, call.client.routeDatabase, call, eventListener) this.routeSelector = localRouteSelector } val localRouteSelection = localRouteSelector.next() routeSelection = localRouteSelection routes = localRouteSelection.routes if (call.isCanceled()) throw IOException("Canceled") // Now that we have a set of IP addresses, make another attempt at getting a connection from // the pool. We have a better chance of matching thanks to connection coalescing. if (connectionPool.callAcquirePooledConnection(address, call, routes, false)) { val result = call.connection!! eventListener.connectionAcquired(call, result) return result } route = localRouteSelection.next() } // Connect. Tell the call about the connecting call so async cancels work. // 4.到这里还没有找到可用的连接 但是找到了 route 即路由 进行socket/tls连接 val newConnection = RealConnection(connectionPool, route) call.connectionToCancel = newConnection try { newConnection.connect( connectTimeout, readTimeout, writeTimeout, pingIntervalMillis, connectionRetryEnabled, call, eventListener ) } finally { call.connectionToCancel = null } call.client.routeDatabase.connected(newConnection.route()) // If we raced another call connecting to this host, coalesce the connections. This makes for 3 // different lookups in the connection pool! // 4.查找是否有多路复用(http2)的连接,有就返回 if (connectionPool.callAcquirePooledConnection(address, call, routes, true)) { val result = call.connection!! nextRouteToTry = route newConnection.socket().closeQuietly() eventListener.connectionAcquired(call, result) return result } synchronized(newConnection) { //放入连接池中 connectionPool.put(newConnection) call.acquireConnectionNoEvents(newConnection) } eventListener.connectionAcquired(call, newConnection) return newConnection }接下来看看是如何建立连接的
fun connect( connectTimeout: Int, readTimeout: Int, writeTimeout: Int, pingIntervalMillis: Int, connectionRetryEnabled: Boolean, call: Call, eventListener: EventListener ) { ... while (true) { try { if (route.requiresTunnel()) { //创建tunnel,用于通过http代理访问https //其中包含connectSocket、createTunnel connectTunnel(connectTimeout, readTimeout, writeTimeout, call, eventListener) if (rawSocket == null) { // We were unable to connect the tunnel but properly closed down our resources. break } } else { //不创建tunnel就创建socket连接 获取到数据流 connectSocket(connectTimeout, readTimeout, call, eventListener) } //建立协议连接tsl establishProtocol(connectionSpecSelector, pingIntervalMillis, call, eventListener) eventListener.connectEnd(call, route.socketAddress, route.proxy, protocol) break } catch (e: IOException) { ... } }... }建立tsl连接
@Throws(IOException::class) private fun establishProtocol( connectionSpecSelector: ConnectionSpecSelector, pingIntervalMillis: Int, call: Call, eventListener: EventListener ) { //ssl为空 即http请求 明文请求 if (route.address.sslSocketFactory == null) { if (Protocol.H2_PRIOR_KNOWLEDGE in route.address.protocols) { socket = rawSocket protocol = Protocol.H2_PRIOR_KNOWLEDGE startHttp2(pingIntervalMillis) return } socket = rawSocket protocol = Protocol.HTTP_1_1 return }//否则为https请求 需要连接sslSocket 验证证书是否可被服务器接受 保存tsl返回的信息 eventListener.secureConnectStart(call) connectTls(connectionSpecSelector) eventListener.secureConnectEnd(call, handshake) if (protocol === Protocol.HTTP_2) { startHttp2(pingIntervalMillis) } }至此,创建好了连接,返回到最开始的 find() 方法返回 ExchangeCodec 对象,再包装为 Exchange 对象用来下一个拦截器操作。
这个类负责实质的请求与响应的 I/O 操作,即往 Socket ⾥写⼊请求数据,和从 Socket ⾥读取响应数据。
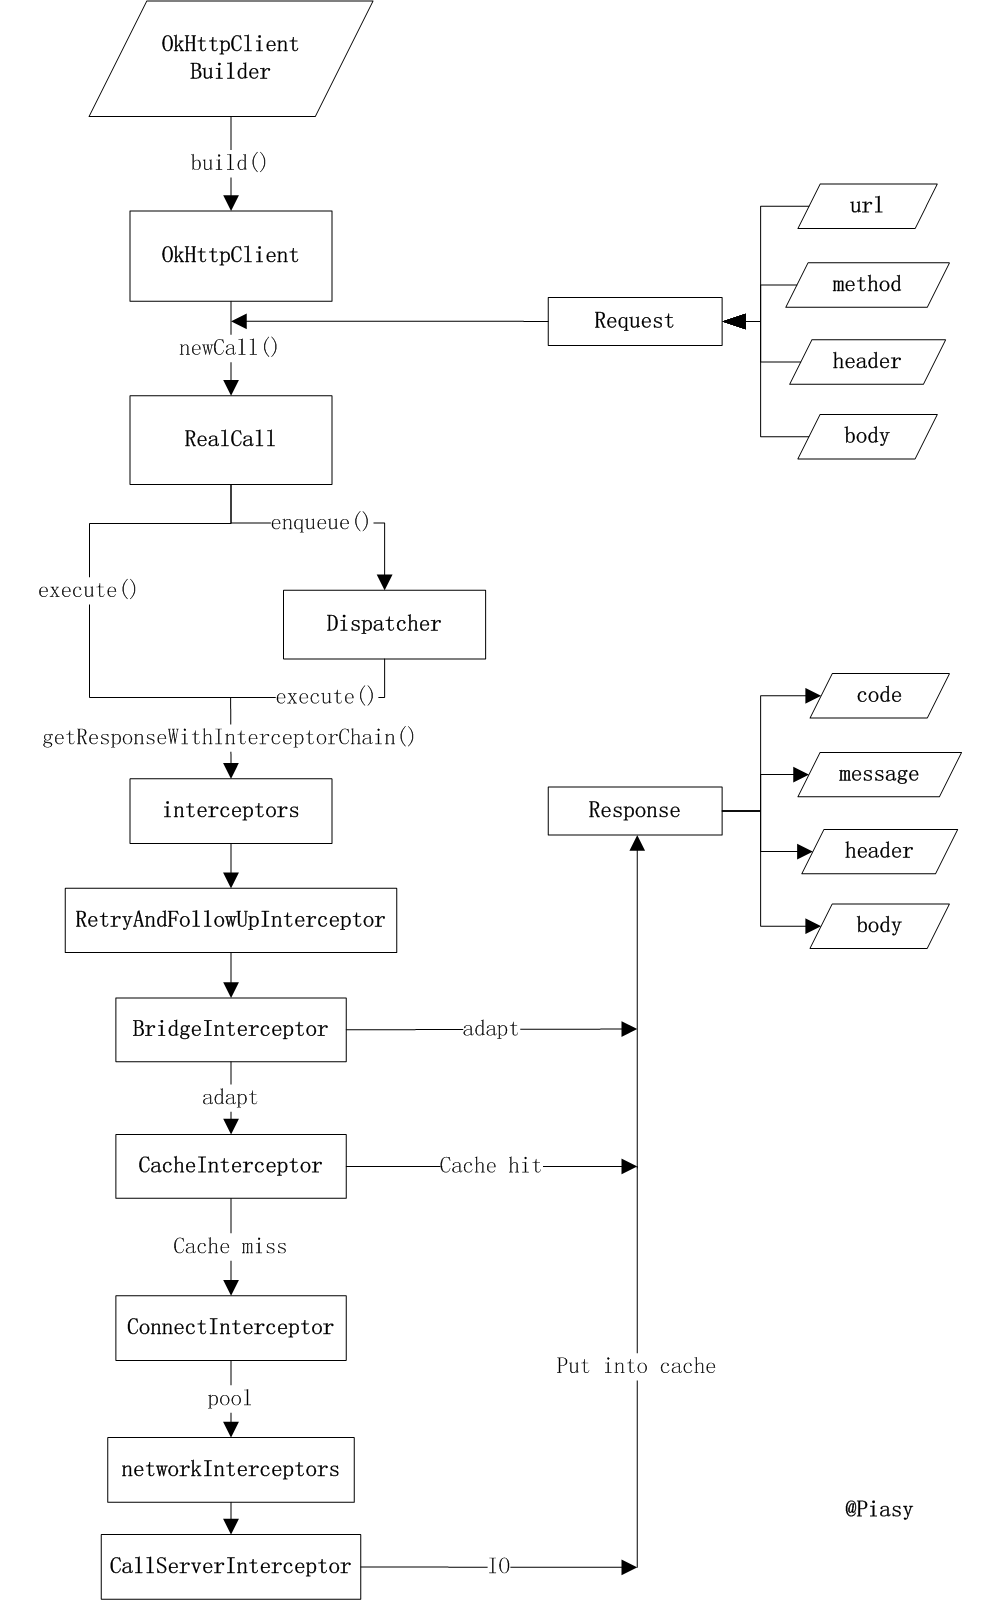
用一张 @piasy 的图来做总结,图很干练结构也很清晰。
看完了这篇文章,相信你对“Android中OkHttp是如何做网络请求的”有了一定的了解,如果想了解更多相关知识,欢迎关注编程网精选频道,感谢各位的阅读!
--结束END--
本文标题: Android中OkHttp是如何做网络请求的
本文链接: https://www.lsjlt.com/news/268496.html(转载时请注明来源链接)
有问题或投稿请发送至: 邮箱/279061341@qq.com QQ/279061341
下载Word文档到电脑,方便收藏和打印~
2024-05-16
2024-05-16
2024-05-16
2024-05-16
2024-05-16
2024-05-16
2024-05-16
2024-05-16
2024-05-16
2024-05-16
回答
回答
回答
回答
回答
回答
回答
回答
回答
回答


官方手机版

微信公众号

商务合作


0