这篇文章主要讲解了“Vue-cropper怎么实现裁剪图片”,文中的讲解内容简单清晰,易于学习与理解,下面请大家跟着小编的思路慢慢深入,一起来研究和学习“vue-cropper怎么实现裁剪图片”吧!先展示一下效果如何使用:1、安装
这篇文章主要讲解了“Vue-cropper怎么实现裁剪图片”,文中的讲解内容简单清晰,易于学习与理解,下面请大家跟着小编的思路慢慢深入,一起来研究和学习“vue-cropper怎么实现裁剪图片”吧!
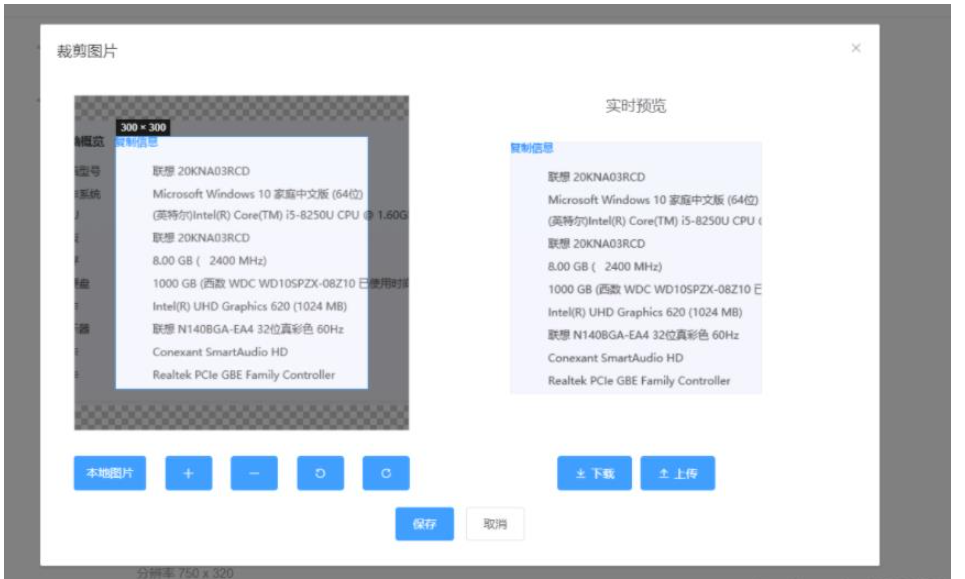
先展示一下效果
如何使用:
1、安装
npm install vue-cropper //(如果安装不上,用cnpm)
2、直接贴代码爽快人就是这样
<template> <el-dialog title="裁剪图片" :visible.sync="visible" @close="onCallback(false)" class="handleDialog" width="1000px" > <div class="wrap"> <div class="main"> <div class="cropperContent"> <div class="cropper"> <vueCropper ref="cropper" :img="option.img" :outputSize="option.size" :outputType="option.outputType" :info="true" :full="option.full" :canMove="option.canMove" :canMoveBox="option.canMoveBox" :original="option.original" :autoCrop="option.autoCrop" :autoCropWidth="option.autoCropWidth" :autoCropHeight="option.autoCropHeight" :fixedBox="option.fixedBox" @realTime="realTime" @imgLoad="imgLoad" ></vueCropper> </div> <div class="previewBox"> <div class="title">实时预览</div> <div class="showPreview" :style="{ width: previews.w + 'px', height: previews.h + 'px', }" > <div : class="preview"> <img :src="previews.url" : /> </div> </div> </div> </div> <div class="footerButton"> <div class="scopeButton"> <label class="localButton" for="uploads">本地图片</label> <input type="file" id="uploads" class="inputFile" accept="image/png, image/jpeg, image/gif, image/jpg" @change="uploadImg($event)" /> <el-button type="primary" @click="changeScale(1)" icon="el-icon-plus" ></el-button> <el-button type="primary" @click="changeScale(-1)" icon="el-icon-minus" ></el-button> <el-button type="primary" @click="rotateLeft" icon="el-icon-refresh-left" ></el-button> <el-button type="primary" @click="rotateRight" icon="el-icon-refresh-right" ></el-button> </div> <div class="uploadButton"> <el-button @click="down('blob')" type="primary" icon="el-icon-download" >下载</el-button > <el-button @click="uploadNewPic" type="primary" icon="el-icon-upload2" >上传</el-button > </div> </div> </div> <div class="end"> <el-button type="primary" @click="saveNewPic">保存</el-button> <el-button @click="onCallback(false)">取消</el-button> </div> </div> </el-dialog></template><script>import { VueCropper } from "vue-cropper";import { imgView, imgUploadUrl, uploadImg } from "services";import { alerts } from "js/yydjs.js";export default { components: { VueCropper }, data() { return { imgView, picId: "", newPicId: "", crap: false, previews: {}, option: { img: "", size: 1, full: false, //输出原图比例截图 props名full outputType: "png", canMove: true, original: false, canMoveBox: false, autoCrop: true, autoCropWidth: 300, autoCropHeight: 300, fixedBox: true, }, downImg: "#", cate: "", ratio: 1, }; }, mounted() { this.option.img = this.imgView + this.picId; this.option.autoCropHeight = this.option.autoCropWidth * this.ratio; }, methods: { saveNewPic() { if (!this.newPicId) { return alerts("请上传裁剪后的图片"); } this.onCallback(this.newPicId); }, changeScale(num) { num = num || 1; this.$refs.cropper.changeScale(num); }, rotateLeft() { this.$refs.cropper.rotateLeft(); }, rotateRight() { this.$refs.cropper.rotateRight(); }, // 实时预览函数 realTime(data) { console.log(data, "realTime"); this.previews = data; }, // 将base64转换为文件 百度随便找的 看需求使用 dataURLtoFile(dataurl, filename) { var arr = dataurl.split(","), mime = arr[0].match(/:(.*?);/)[1], bstr = atob(arr[1]), n = bstr.length, u8arr = new Uint8Array(n); while (n--) { u8arr[n] = bstr.charCodeAt(n); } return new File([u8arr], filename, { type: mime }); }, uploadNewPic() { this.$refs.cropper.getCropData((data) => { let name = new Date().getTime(); let file = this.dataURLtoFile(data, `${name}.png`); console.log(file, "ssss"); let fd = new FORMData(); fd.append("file", file); fd.append("cate", this.cate); uploadImg(fd).then((res) => { if (res) { let { scaleRelativePath = "" } = res.body; this.newPicId = scaleRelativePath; alerts("上传成功", "success"); // 自己写的弹框 } }); }); }, down(type) { // event.preventDefault() var aLink = document.createElement("a"); aLink.download = "author-img"; // 输出 if (type === "blob") { this.$refs.cropper.getCropBlob((data) => { console.log(data, type); this.downImg = window.URL.createObjectURL(data); // aLink.download = this.downImg; console.log(this.downImg); aLink.href = window.URL.createObjectURL(data); aLink.click(); }); } else { this.$refs.cropper.getCropData((data) => { this.downImg = data; aLink.href = data; aLink.click(); }); } }, uploadImg(e) { //上传图片 // this.option.img var file = e.target.files[0]; if (!/\.(gif|jpg|jpeg|png|bmp|GIF|JPG|PNG)$/.test(e.target.value)) { alerts("图片类型必须是.gif,jpeg,jpg,png,bmp中的一种"); return false; } var reader = new FileReader(); reader.onload = (e) => { let data; if (typeof e.target.result === "object") { // 把Array Buffer转化为blob 如果是base64不需要 data = window.URL.createObjectURL(new Blob([e.target.result])); } else { data = e.target.result; } this.option.img = data; }; // 转化为base64 // reader.readAsDataURL(file) // 转化为blob reader.readAsArrayBuffer(file); }, imgLoad(msg) { console.log(msg, "msg"); }, },};</script><style lang="sCSS" scoped>@import "~css/public.scss";.handleDialog { @include cententCenterDialog; .cropperContent { display: flex; justify-content: space-between; padding-left: 20px; .cropper { width: 400px; height: 400px; border: 1px solid #DDD; } .previewBox { flex: 1; display: flex; justify-content: center; flex-direction: column; align-items: center; .title { font-size: 18px; height: 36px; margin-bottom: 20px; } .showPreview { flex: 1; display: flex; justify-content: center; .preview { overflow: hidden; background: #eeeeee; border: 1px solid #eeeeee; } } } } .footerButton { margin-top: 30px; margin-left: 20px; display: flex; justify-content: flex-end; .scopeButton { width: 400px; display: flex; justify-content: space-between; } .uploadButton { flex: 1; display: flex; justify-content: center; } .localButton { cursor: pointer; color: #ffffff; background: #409eff; padding: 10px 15px; border-radius: 3px; appearance: none; display: flex; align-self: center; margin-right: 10px; } .inputFile { width: 180px; position: absolute; clip: rect(0 0 0 0); } }}</style>说明,支持网络图片也支持本地图片,图片如果需要上传,我是通过base64转文件,再上传的。
感谢各位的阅读,以上就是“vue-cropper怎么实现裁剪图片”的内容了,经过本文的学习后,相信大家对vue-cropper怎么实现裁剪图片这一问题有了更深刻的体会,具体使用情况还需要大家实践验证。这里是编程网,小编将为大家推送更多相关知识点的文章,欢迎关注!
--结束END--
本文标题: vue-cropper怎么实现裁剪图片
本文链接: https://www.lsjlt.com/news/329676.html(转载时请注明来源链接)
有问题或投稿请发送至: 邮箱/279061341@qq.com QQ/279061341
下载Word文档到电脑,方便收藏和打印~
2024-05-02
2024-05-02
2024-05-02
2024-05-02
2024-05-02
2024-05-02
2024-05-02
2024-05-02
2024-05-02
2024-05-02
回答
回答
回答
回答
回答
回答
回答
回答
回答
回答


官方手机版

微信公众号

商务合作


0