这篇文章主要介绍“微信小程序如何实现双层嵌套菜单栏”,在日常操作中,相信很多人在微信小程序如何实现双层嵌套菜单栏问题上存在疑惑,小编查阅了各式资料,整理出简单好用的操作方法,希望对大家解答”微信小程序如何实现双层嵌套菜单栏”的疑惑有所帮助!
这篇文章主要介绍“微信小程序如何实现双层嵌套菜单栏”,在日常操作中,相信很多人在微信小程序如何实现双层嵌套菜单栏问题上存在疑惑,小编查阅了各式资料,整理出简单好用的操作方法,希望对大家解答”微信小程序如何实现双层嵌套菜单栏”的疑惑有所帮助!接下来,请跟着小编一起来学习吧!
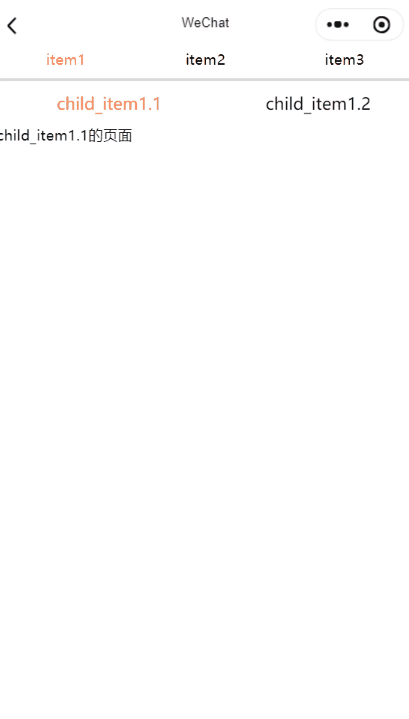
效果图
先把第一层swiper框架搭好,需要能通过滑动和点击切换页面,基本方法可百度
在第一层的<swiper-item>中嵌入第二层的<swiper>,方法照旧
基本功能能实现,问题也来了,如何实现第二层的<swiper-item>滑到尽头时第一层的<swiper>能随之改变,基本实现思路是通过绑定swiper组件的回调方法bindtransition获取swiper-item的位移数据,但是回调的数据并没有swiper-item的下标,所以无法判定当前滑动的swiper-item是否在边缘,所以只能自己动脑筋了,方法就是在边缘的swiper-item容器内加一个充满容器的view,并且绑定touch的相关方法,在方法内设置是否越级翻页的flag为true,当然这个flag在js中默认定义为false,有了这个flag再加上bindtransition的回调偏移量就能够实现越级翻页了
思路上是没问题的,但是写完会发现有许许多多小bug,一不小心就会崩溃的那种,最后经过不断的调整和测试,崩溃是不会了,滑动也挺顺畅的,下面贴完整代码
wxml:
<view class="contain"> <view class='tabbar'> <view class="tabbar_item {{swipeIndex==0 ? 'on' : ''}}" data-current='0' bindtap="swichNav"> <view>item1</view> </view> <view class="tabbar_item {{swipeIndex==1 ? 'on' : ''}}" data-current='1' bindtap="swichNav"> <view>item2</view> </view> <view class="tabbar_item {{swipeIndex==2 ? 'on' : ''}}" data-current='2' bindtap="swichNav"> <view>item3</view> </view> </view> <swiper current="{{currentTab}}" class="swiper-box" duration="300" bindchange="bindChange" > <swiper-item> <view class="swiper1_top"> <view class="swiper1_top_item {{itemIndex1==0 ? 'on' : ''}}" data-current1='0' bindtap="itemSwich2">child_item1.1</view> <view class="swiper1_top_item {{itemIndex1==1 ? 'on' : ''}}" data-current1='1' bindtap="itemSwich2">child_item1.2</view> </view> <swiper current="{{itemCurrent1}}" duration="300" bindchange="swiperItemChange1" bindtransition="swiperTrans"> <swiper-item> child_item1.1的页面 </swiper-item> <swiper-item> <view bindtouchmove="itemTouchRightMove" bindtouchend="itemTouchRightEnd" bindtouchcancel="itemTouchRightEnd">child_item1.2的页面</view> </swiper-item> </swiper> </swiper-item> <swiper-item> <view class="swiper1_top"> <view class="swiper1_top_item {{itemIndex2==0 ? 'on' : ''}}" data-current2='0' bindtap="itemSwich3">child_item2.1</view> <view class="swiper1_top_item {{itemIndex2==1 ? 'on' : ''}}" data-current2='1' bindtap="itemSwich3">child_item2.2</view> <view class="swiper1_top_item {{itemIndex2==2 ? 'on' : ''}}" data-current2='2' bindtap="itemSwich3">child_item2.3</view> </view> <swiper current="{{itemCurrent2}}" duration="300" bindchange="swiperItemChange2" bindtransition="swiperTrans"> <swiper-item bindtouchmove="itemTouchLeftMove" bindtouchend="itemTouchLeftEnd" bindtouchcancel="itemTouchLeftEnd"> child_item2.1的页面 </swiper-item> <swiper-item> <view >child_item2.2的页面</view> </swiper-item> <swiper-item> <view bindtouchmove="itemTouchRightMove" bindtouchend="itemTouchRightEnd" bindtouchcancel="itemTouchRightEnd">child_item2.3的页面</view> </swiper-item> </swiper> </swiper-item> <swiper-item> <view class="swiper1_top"> <view class="swiper1_top_item {{itemIndex3==0 ? 'on' : ''}}" data-current3='0' bindtap="itemSwich4">child_item3.1</view> <view class="swiper1_top_item {{itemIndex3==1 ? 'on' : ''}}" data-current3='1' bindtap="itemSwich4">child_item3.2</view> <view class="swiper1_top_item {{itemIndex3==2 ? 'on' : ''}}" data-current3='2' bindtap="itemSwich4">child_item3.3</view> </view> <swiper current="{{itemCurrent3}}" duration="300" bindchange="swiperItemChange3" bindtransition="swiperTrans"> <swiper-item bindtouchmove="itemTouchLeftMove" bindtouchend="itemTouchLeftEnd" bindtouchcancel="itemTouchLeftEnd"> child_item3.1的页面 </swiper-item> <swiper-item> <view >child_item3.2的页面</view> </swiper-item> <swiper-item> <view >child_item3.3的页面</view> </swiper-item> </swiper> </swiper-item> </swiper></view>wxss:
page { font-size: 3.5vw; height: 100%; width: 100%; display: flex; flex-direction: column;}swiper{ height: 100%; width: 100%;} .contain { display: flex; flex-direction: column; flex: 1; height: 0;} .tabbar { height: 5vw; width: 100vw; display: flex; flex-direction: row; justify-content: space-around; border-bottom: 3px #dbdbdb solid; padding-bottom: 2vw;} .tabbar_item { display: flex; flex: 1; flex-direction: column; align-items: center;} .on { color: coral;} .swiper-box { display: flex; flex-direction: column; flex: 1; height: 0; width: 100%; overflow-x: hidden; overflow-y: scroll;} .swiper1_top { width: 100vw; display: flex; margin-left: 2vw; flex-direction: row; font-size: 4vw; align-items: center; background-color: white;} .swiper1_top_item { flex: 1; display: flex; justify-content: center; align-items: center; padding: 2.5vw 0;}.swiper1_contain { width: 100vw; height: 100%; display: flex; flex-direction: column; align-items: center;}.swiper1_item { margin-bottom: 3vw; width: 94vw;}.dir_row { display: flex; flex-direction: row;}js:
Page({ data: { currentTab: 0, swipeIndex: 0, itemCurrent1: 0, itemIndex1: 0, itemCurrent2: 0, itemIndex2: 0, itemCurrent3: 0, itemIndex3: 0, flag1: false, flag2: false, flag3: true }, bindChange: function(e) { console.log('debugbindcange') var that = this; that.setData({ swipeIndex: e.detail.current }); }, swiperItemChange1: function(e) { var that = this; that.setData({ itemIndex1: e.detail.current }); }, swiperItemChange2: function(e) { var that = this; that.setData({ itemIndex2: e.detail.current }); }, swiperItemChange3: function(e) { var that = this; that.setData({ itemIndex3: e.detail.current }); }, swichNav: function(e) { var that = this; if (this.data.swipeIndex === e.currentTarget.dataset.current) { return false; } else { that.setData({ currentTab: e.currentTarget.dataset.current }) } }, itemSwich2: function(e) { var that = this; if (this.data.itemIndex1 === e.currentTarget.dataset.current1) { return false; } else { that.setData({ itemIndex1: e.currentTarget.dataset.current1, itemCurrent1: e.currentTarget.dataset.current1 }) } }, itemSwich3: function(e) { var that = this; console.log(e) if (this.data.itemIndex2 === e.currentTarget.dataset.current2) { return false; } else { that.setData({ itemIndex2: e.currentTarget.dataset.current2, itemCurrent2: e.currentTarget.dataset.current2 }) } }, itemSwich4: function(e) { var that = this; if (this.data.itemIndex3 === e.currentTarget.dataset.current3) { return false; } else { that.setData({ itemIndex3: e.currentTarget.dataset.current3, itemCurrent3: e.currentTarget.dataset.current3 }) } }, swiperTrans: function(e) { var that = this; var dx = e.detail.dx if (this.data.flag3 && (this.data.flag2) && (dx >= 50) && (dx < 100)) { console.log('debug') that.data.flag3 = false this.setData({ currentTab: that.data.swipeIndex + 1, }) } if (this.data.flag3 && (this.data.flag1) && (dx <= -50) && (dx > -100)) { that.data.flag3 = false this.setData({ currentTab: that.data.swipeIndex - 1, }) } }, itemTouchLeftMove: function(e) { this.data.flag1 = true; }, itemTouchLeftEnd: function(e) { this.data.flag1 = false; this.data.flag3 = true; }, itemTouchRightMove: function(e) { this.data.flag2 = true; }, itemTouchRightEnd: function(e) { this.data.flag2 = false; this.data.flag3 = true; }})到此,关于“微信小程序如何实现双层嵌套菜单栏”的学习就结束了,希望能够解决大家的疑惑。理论与实践的搭配能更好的帮助大家学习,快去试试吧!若想继续学习更多相关知识,请继续关注编程网网站,小编会继续努力为大家带来更多实用的文章!
--结束END--
本文标题: 微信小程序如何实现双层嵌套菜单栏
本文链接: https://www.lsjlt.com/news/343772.html(转载时请注明来源链接)
有问题或投稿请发送至: 邮箱/279061341@qq.com QQ/279061341
下载Word文档到电脑,方便收藏和打印~
2024-05-04
2024-05-04
2024-05-04
2024-05-04
2024-05-04
2024-05-04
2024-05-04
2024-05-04
2024-05-04
2024-05-04
回答
回答
回答
回答
回答
回答
回答
回答
回答
回答


官方手机版

微信公众号

商务合作


0