这篇“javascript怎么使用canvas实现flappy bird”文章的知识点大部分人都不太理解,所以小编给大家总结了以下内容,内容详细,步骤清晰,具有一定的借鉴价值,希望大家阅读完这篇文章能有所收获,下面我们一起来看看这
这篇“javascript怎么使用canvas实现flappy bird”文章的知识点大部分人都不太理解,所以小编给大家总结了以下内容,内容详细,步骤清晰,具有一定的借鉴价值,希望大家阅读完这篇文章能有所收获,下面我们一起来看看这篇“JavaScript怎么使用canvas实现flappy bird”文章吧。
玩家只需要用一根手指来操控,点击或长按屏幕,小鸟就会往上飞,不断的点击就会不断的往高处飞。放松手指,则会快速下降。所以玩家要控制小鸟一直向前飞行,然后注意躲避途中高低不平的管子。小鸟安全飞过的距离既是得分。当然撞上就直接挂掉,只有一条命。
这里主要是创建画布,并调整画布大小,画布自适应屏幕大小。
<!DOCTYPE html><html lang="zh"><head> <meta charset="UTF-8"> <meta Http-equiv="X-UA-Compatible" content="IE=edge"> <meta name="viewport" content="width=device-width, initial-scale=1.0"> <title>Document</title> <style> body { margin: 0; padding: 0; overflow: hidden; } </style></head><body> <canvas id="canvas"> 当前浏览器不支持canvas,请更换浏览器查看。 </canvas> <script> const canvas = document.querySelector('#canvas') const ctx = canvas.getContext('2d') canvas.width = window.innerWidth canvas.height = window.innerHeight window.addEventListener('resize', () => { canvas.width = window.innerWidth canvas.height = window.innerHeight }) </script></body></html>图片等资源的加载是异步的,只有当所有的资源都加载完了才能开始游戏,所以这里需要对图片等资源进行统一的监控和管理。 将图片资源用JSON进行描述,通过fetch进行统一加载。
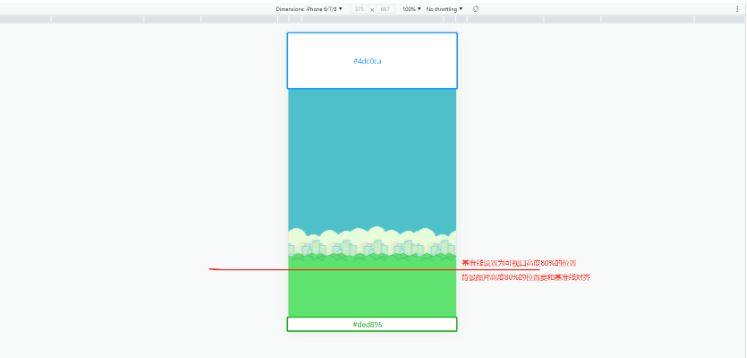
// 资源管理器class SourceManager { static images = {}; static instance = new SourceManager(); constructor() { return SourceManager.instance;} loadImages() { return new Promise((resolve) => { fetch("./assets/images/image.json") .then((res) => res.json()) .then((res) => { res.forEach((item, index) => { const image = new Image(); image.src = item.url; image.onload = () => { SourceManager.images[item.name] = image; ctx.clearRect(0, 0, canvas.width, canvas.height); ctx.font = "24px 黑体"; ctx.textAlign = "center"; ctx.fillText(`资源加载中${index + 1}/${res.length}...`, canvas.width / 2, (canvas.height / 2) * 0.618); if (index === res.length - 1) { console.log(index, "加载完成"); resolve(); } }; }); }); });}}async function main() { // 加载资源 await new SourceManager().loadImages();}main();为了适应不同尺寸的屏幕尺寸和管子能正确渲染到对应的位置,不能将背景图片拉伸,要定一个基准线固定背景图片所在屏幕中的位置。我们发现背景图并不能充满整个画面,上右下面是空缺的,这个时候需要使用小手段填充上,这里就用矩形对上部进行填充。接下来,需要让背景有一种无限向左移动的效果,就要并排绘制3张背景图片,这样在渲染的时候,当背景向左移动的距离dx等于一张背景图的宽度时,将dx=0,这样就实现了无限向左移动的效果,类似于轮播图。

// 背景class GameBackground { constructor() { this.dx = 0 this.image = SourceManager.images.bg_day this.dy = 0.8 * (canvas.height - this.image.height) this.render()} update() { this.dx -= 1 if (this.dx + this.image.width <= 0) { this.dx = 0 } this.render()} render() { ctx.fillStyle = '#4DC0CA' ctx.fillRect(0, 0, canvas.width, 0.8 * (canvas.height - this.image.height) + 10) ctx.drawImage(this.image, this.dx, this.dy) ctx.drawImage(this.image, this.dx + this.image.width, this.dy) ctx.drawImage(this.image, this.dx + this.image.width * 2, this.dy)}}let gameBg = nullmain();// 渲染函数function render() { ctx.clearRect(0, 0, canvas.width, canvas.height); gameBg.update(); requestAnimationFrame(render)}async function main() { // 加载资源 await new SourceManager().loadImages(); // 背景 gameBg = new GameBackground() // 渲染动画 render()}地面要在背景的基础上将地面图上边对齐基准线(canvas.height * 0.8),并把下面空缺的部分通过和填补背景上半部分一致的方式填上。同时使用与背景无限向左移动一样的方法实现地面的无限向左移动。
// 地面class Land { constructor() { this.dx = 0; this.dy = canvas.height * 0.8; this.image = SourceManager.images.land; this.render();} update() { this.dx -= 1.5; if (this.dx + this.image.width <= 0) { this.dx = 0; } this.render();} render() { ctx.fillStyle = "#DED895"; ctx.fillRect( 0, canvas.height * 0.8 + this.image.height - 10, canvas.width, canvas.height * 0.2 - this.image.height + 10 ); ctx.drawImage(this.image, this.dx, this.dy); ctx.drawImage(this.image, this.dx + this.image.width, this.dy); ctx.drawImage(this.image, this.dx + this.image.width * 2, this.dy);}}let land = nullmain();// 渲染函数function render() { ctx.clearRect(0, 0, canvas.width, canvas.height); gameBg.update(); requestAnimationFrame(render)}async function main() { // 加载资源 await new SourceManager().loadImages(); // 此处省略其他元素 // 地面 land = new Land() // 渲染动画 render()}管道有上下两部分,上部分管道需要贴着屏幕的顶部渲染,下部分要贴着地面也就是基准线渲染,上下两部分的管道长度要随机生成,且两部分之间的距离不能小于80(我自己限制的);管道渲染速度为2s一次,并且也需要无限向左移动,这个效果和背景同理。
// 管道class Pipe { constructor() { this.dx = canvas.width; this.dy = 0; this.upPipeHeight = (Math.random() * canvas.height * 0.8) / 2 + 30; this.downPipeHeight = (Math.random() * canvas.height * 0.8) / 2 + 30; if (canvas.height * 0.8 - this.upPipeHeight - this.downPipeHeight <= 80) { console.log("///小于80了///"); this.upPipeHeight = 200; this.downPipeHeight = 200; } this.downImage = SourceManager.images.pipe_down; this.upImage = SourceManager.images.pipe_up;} update() { this.dx -= 1.5;// 记录管道四个点的坐标,在碰撞检测的时候使用this.upCoord = {tl: {x: this.dx,y: canvas.height * 0.8 - this.upPipeHeight,},tr: {x: this.dx + this.upImage.width,y: canvas.height * 0.8 - this.upPipeHeight,},bl: {x: this.dx,y: canvas.height * 0.8,},br: {x: this.dx + this.upImage.width,y: canvas.height * 0.8,},};this.downCoord = {bl: {x: this.dx,y: this.downPipeHeight,},br: {x: this.dx + this.downImage.width,y: this.downPipeHeight,},}; this.render();} render() { ctx.drawImage( this.downImage, 0, this.downImage.height - this.downPipeHeight, this.downImage.width, this.downPipeHeight, this.dx, this.dy, this.downImage.width, this.downPipeHeight ); ctx.drawImage( this.upImage, 0, 0, this.upImage.width, this.upPipeHeight, this.dx, canvas.height * 0.8 - this.upPipeHeight, this.upImage.width, this.upPipeHeight );}}let pipeList = []main();function render() { ctx.clearRect(0, 0, canvas.width, canvas.height); // 此处省略其他元素渲染步骤 pipeList.forEach((item) => item.update()); requestAnimationFrame(render)}async function main() { // 此处省略其他元素渲染步骤 // 管道 setInterval(() => { pipeList.push(new Pipe()); // 清理移动过去的管道对象,一屏最多展示3组,所以这里取大于3 if (pipeList.length > 3) { pipeList.shift(); }}, 2000); // 渲染动画 render()}小鸟要有飞行的动作,这个通过不断重复渲染3张小鸟不同飞行姿势的图片来实现;还要通过改变小鸟的在Y轴的值来制作上升下坠的效果,并且能够通过点击或长按屏幕来控制小鸟的飞行高度。
// 小鸟class Bird { constructor() { this.dx = 0; this.dy = 0; this.speed = 2; this.image0 = SourceManager.images.bird0_0; this.image1 = SourceManager.images.bird0_1; this.image2 = SourceManager.images.bird0_2; this.loopCount = 0; this.control(); setInterval(() => { if (this.loopCount === 0) { this.loopCount = 1; } else if (this.loopCount === 1) { this.loopCount = 2; } else { this.loopCount = 0; } }, 200);} // 添加控制小鸟的事件 control() { let timer = true; canvas.addEventListener("touchstart", (e) => { timer = setInterval(() => { this.dy -= this.speed; }); e.preventDefault(); }); canvas.addEventListener("touchmove", () => { clearInterval(timer); }); canvas.addEventListener("touchend", () => { clearInterval(timer); });} update() { this.dy += this.speed; // 记录小鸟四个点的坐标,在碰撞检测的时候使用 this.birdCoord = { tl: { x: this.dx, y: this.dy, }, tr: { x: this.dx + this.image0.width, y: this.dy, }, bl: { x: this.dx, y: this.dy + this.image0.height, }, br: { x: this.dx + this.image0.width, y: this.dy + this.image0.height, }, }; this.render();} render() { // 渲染小鸟飞行动作 if (this.loopCount === 0) { ctx.drawImage(this.image0, this.dx, this.dy); } else if (this.loopCount === 1) { ctx.drawImage(this.image1, this.dx, this.dy); } else { ctx.drawImage(this.image2, this.dx, this.dy); }}}let bird = nullmain();function render() { ctx.clearRect(0, 0, canvas.width, canvas.height); // 省略其他元素渲染 bird.update(); requestAnimationFrame(render);}async function main() { // 省略其他元素渲染 // 笨鸟 bird = new Bird() // 渲染动画 render()}我们发现小鸟好像是只美国鸟,有点太freedom了~,不符合我们的游戏规则,要想办法控制一下。
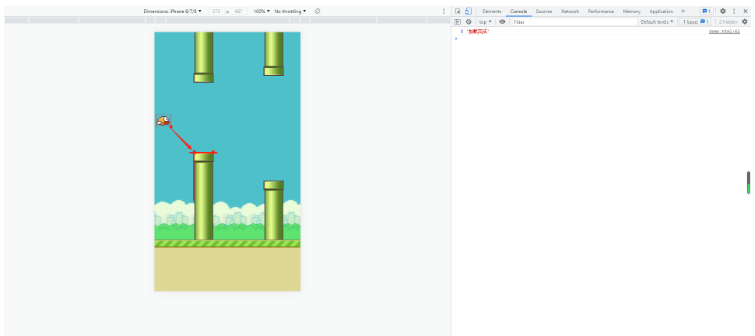
碰撞检测的原理就是不断检测小鸟图四个顶点坐标是否在任一管道所占的坐标区域内或小鸟图下方的点纵坐标小于地面纵坐标(基准线),在就结束游戏。上面管道和小鸟类中记录的坐标就是为了实现碰撞检测的。

let gameBg = nulllet land = nulllet bird = nulllet pipeList = []main();function render() { ctx.clearRect(0, 0, canvas.width, canvas.height); gameBg.update(); land.update(); bird.update(); pipeList.forEach((item) => item.update()); requestAnimationFrame(render); // 碰撞检测-地面 if (bird.dy >= canvas.height * 0.8 - bird.image0.height + 10) { gg();} //碰撞检测-管道 pipeList.forEach((item) => { if ( bird.birdCoord.bl.x >= item.upCoord.tl.x - 35 && bird.birdCoord.bl.x <= item.upCoord.tr.x && bird.birdCoord.bl.y >= item.upCoord.tl.y + 10 ) { gg(); } else if ( bird.birdCoord.tl.x >= item.downCoord.bl.x - 35 && bird.birdCoord.tl.x <= item.downCoord.br.x && bird.birdCoord.tl.y <= item.downCoord.bl.y - 10 ) { gg(); }});}async function main() { // 加载资源 await new SourceManager().loadImages(); // 背景 gameBg = new GameBackground() // 地面 land = new Land() // 笨鸟 bird = new Bird() // 管道 setInterval(() => { pipeList.push(new Pipe()); // 清理移动过去的管道对象,一屏最多展示3组,所以这里取大于3 if (pipeList.length > 3) { pipeList.shift(); }}, 2000); // 渲染动画 render()}function gg() { const ggImage = SourceManager.images.text_game_over; ctx.drawImage( ggImage, canvas.width / 2 - ggImage.width / 2, (canvas.height / 2) * 0.618);};以上就是关于“JavaScript怎么使用canvas实现flappy bird”这篇文章的内容,相信大家都有了一定的了解,希望小编分享的内容对大家有帮助,若想了解更多相关的知识内容,请关注编程网精选频道。
--结束END--
本文标题: JavaScript怎么使用canvas实现flappy bird
本文链接: https://www.lsjlt.com/news/350589.html(转载时请注明来源链接)
有问题或投稿请发送至: 邮箱/279061341@qq.com QQ/279061341
下载Word文档到电脑,方便收藏和打印~
2024-05-24
2024-05-24
2024-05-24
2024-05-24
2024-05-24
2024-05-24
2024-05-24
2024-05-24
2024-05-24
2024-05-24
回答
回答
回答
回答
回答
回答
回答
回答
回答
回答
一口价域名售卖能注册吗?域名是网站的标识,简短且易于记忆,为在线用户提供了访问我们网站的简单路径。一口价是在域名交易中一种常见的模式,而这种通常是针对已经被注册的域名转售给其他人的一种方式。
一口价域名买卖的过程通常包括以下几个步骤:
1.寻找:买家需要在域名售卖平台上找到心仪的一口价域名。平台通常会为每个可售的域名提供详细的描述,包括价格、年龄、流
443px" 443px) https://www.west.cn/docs/wp-content/uploads/2024/04/SEO图片294.jpg https://www.west.cn/docs/wp-content/uploads/2024/04/SEO图片294-768x413.jpg 域名售卖 域名一口价售卖 游戏音频 赋值/切片 框架优势 评估指南 项目规模
0