这篇文章主要介绍了基于vue3和elementplus如何实现登录功能的相关知识,内容详细易懂,操作简单快捷,具有一定借鉴价值,相信大家阅读完这篇基于Vue3和elementplus如何实现登录功能文章都会有所收获,下面我们一起来看看吧。登
这篇文章主要介绍了基于vue3和elementplus如何实现登录功能的相关知识,内容详细易懂,操作简单快捷,具有一定借鉴价值,相信大家阅读完这篇基于Vue3和elementplus如何实现登录功能文章都会有所收获,下面我们一起来看看吧。
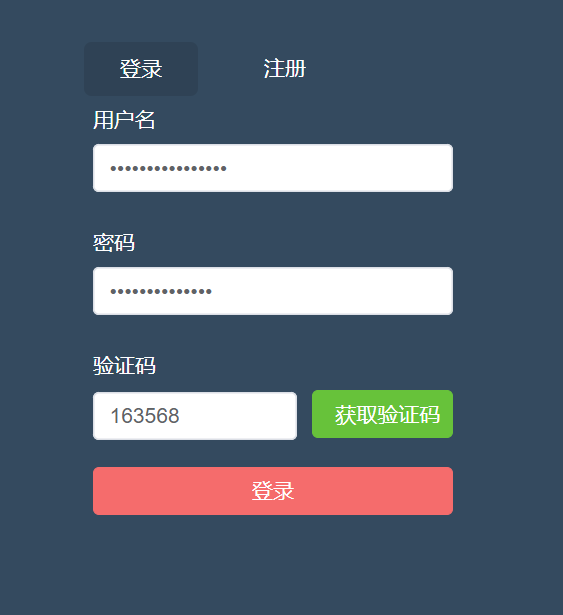
登录页面:
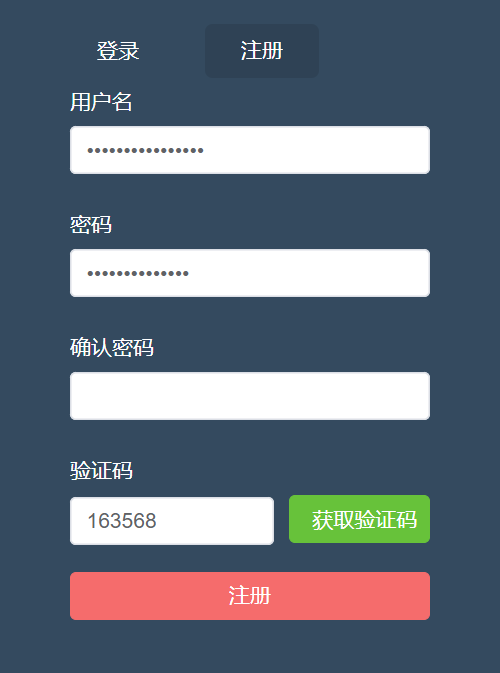
注册页面:
(1)引入element-plus组件库
引入组件库的方式有好多种,在这里我就在main.js全局引入了.
npm i element-plus -Smain.js中代码:
import { createApp } from "vue";//element-plusimport ElementPlus from "element-plus";import "element-plus/dist/index.CSS";import App from "./App.vue";import router from "./router";import axiOS from "axios";import store from "./store";//创建实例const app = createApp(App);//全局应用配置app.config.globalProperties.$axios = axios; app.use(ElementPlus).use(store).use(router).mount("#app");引入之后自己可以用几个按钮测试一下是否引入成功.
(2)登录及注册页面
html部分
views/account/Login.vue
<template> <div id="login"> <div> <div class="fORM-wrap"> <ul class="menu-tab"> <li :class="{ current: current_menu === item.type }" v-for="item in data.tab_menu" :key="item.type" @click="toggleMenu(item.type)" > {{ item.label }} </li> </ul> <el-form :model="data.form" ref="account_form" :rules="data.form_rules" label-width="80px" > <el-form-item prop="username"> <label class="form-label">用户名</label> <el-input type="passWord" v-model="data.form.username" /> </el-form-item> <el-form-item prop="password"> <label class="form-label">密码</label> <el-input type="password" v-model="data.form.password" /> </el-form-item> <el-form-item v-show="current_menu === 'reGISter'" prop="passwords "> <label class="form-label">确认密码</label> <el-input type="password" v-model="data.form.passwords" /> </el-form-item> <el-form-item prop="code"> <label class="form-label">验证码</label> <el-row :gutter="10"> <el-col :span="14"> <el-input v-model="data.form.code"></el-input> </el-col> <el-col :span="10"> <el-button type="success" class="el-button-block" @click="handleGetCode" >获取验证码</el-button ></el-col > </el-row> </el-form-item> <el-form-item> <el-button type="danger" class="el-button-block" :disabled="data.submit_button_disabled" :loading="data.submit_button_loading" @click="submitForm" >{{ current_menu === "login" ? "登录" : "注册" }}</el-button > </el-form-item> </el-form> </div> </div> </div></template>js部分
<script>import { Reactive, ref, getCurrentInstance, onBeforeUnmount } from "vue";import { validate_email, validate_password, validate_code,} from "@/utils/validate";import { GetCode } from "@/api/common";import { Register, Login } from "@/api/account";import sha1 from "js-sha1"; //密码加密// ErrorHttpexport default { setup() { const instance = getCurrentInstance(); const { proxy } = getCurrentInstance(); console.log("instance", instance); // console.log("proxy", proxy); // 用户名校验 const validate_name_rules = (rule, value, callback) => { let regEmail = validate_email(value); if (value === "") { callback(new Error("请输入邮箱")); } else if (!regEmail) { callback(new Error("邮箱格式不正确")); } else { callback(); } }; //获取验证码 const handleGetCode = () => { const username = data.form.username; const password = data.form.password; const passwords = data.form.passwords; //校验用户名 if (!validate_email(username)) { proxy.$message({ message: "用户名不能为空 或 格式不正确", type: "error", }); return false; } //校验密码 if (!validate_password(password)) { proxy.$message({ message: "密码不能为空 或 格式不正确", type: "error", }); return false; } //判断为注册时,校验两次密码 if (data.current_menu === "redister" ** (password !== passwords)) { proxy.$message({ message: "两次密码不一致", type: "error", }); return false; } //获取验证码接口 const requestData = { username: data.form.username, module: "register", }; data.code_button_loading = true; data.code_button_text = "发送中"; GetCode(requestData) .then((res) => { // console.log("123", res.data);验证码 // const data=res.resCode const data = res; if (data.resCode === 1024) { proxy.$message.error(data.message); return false; } // 成功 Elementui 提示 proxy.$message({ message: data.message, type: "success", }); //执行倒计时 countdown(); }) .catch((err) => { console.log(err); data.code_button_loading = false; data.code_button_text = "发送验证码"; }); // ErrorHttp(requestData) // .then((res) => { // console.log(res.data); // // const data=res.resCode // const data = res.data; // if (data.resCode === 1024) { // proxy.$message.error(data.message); // return false; // } // // 成功 Elementui 提示 // proxy.$message({ // message: data.message, // type: "success", // }); // //执行倒计时 // countdown(); // }) // .catch((err) => { // console.log(err); // data.code_button_loading = false; // data.code_button_text = "发送验证码"; // }); }; const countdown = (time) => { if (time && typeof time !== "number") { return false; } let second = time || 60; // 默认时间 data.code_button_loading = false; // 取消加载 data.code_button_disabled = true; // 禁用按钮 data.code_button_text = `倒计进${second}秒`; // 按钮文本 // 判断是否存在定时器,存在则先清除 if (data.code_button_timer) { clearInterval(data.code_button_timer); } // 开启定时器 data.code_button_timer = setInterval(() => { second--; data.code_button_text = `倒计进${second}秒`; // 按钮文本 if (second <= 0) { data.code_button_text = `重新获取`; // 按钮文本 data.code_button_disabled = false; // 启用按钮 clearInterval(data.code_button_timer); // 清除倒计时 } }, 1000); }; // 组件销毁之前 - 生命周期 onBeforeUnmount(() => { clearInterval(data.code_button_timer); // 清除倒计时 }); // 校验确认密码 const validate_password_rules = (rule, value, callback) => { let regPassword = validate_password(value); if (value === "") { callback(new Error("请输入密码")); } else if (!regPassword) { callback(new Error("请输入>=6并且<=20位的密码,包含数字、字母")); } else { callback(); } }; // 校验确认密码 const validate_passwords_rules = (rule, value, callback) => { // 如果是登录,不需要校验确认密码,默认通过 if (data.current_menu === "login") { callback(); } let regPassword = validate_password(value); // 获取“密码” const passwordValue = data.form.password; if (value === "") { callback(new Error("请输入密码")); } else if (!regPassword) { callback(new Error("请输入>=6并且<=20位的密码,包含数字、字母")); } else if (passwordValue && passwordValue !== value) { callback(new Error("两次密码不一致")); } else { callback(); } }; const validate_code_rules = (rule, value, callback) => { let reGCode = validate_code(value); // 激活提交按钮 data.submit_button_disabled = false; if (value === "") { callback(new Error("请输入验证码")); } else if (!regCode) { callback(new Error("请输入6位的验证码")); } else { callback(); } }; // 提交表单 const submitForm = () => { // let res = proxy.$refs.account_form; proxy.$refs.account_form.validate((valid) => { if (valid) { console.log("提交表单", current_menu.value); current_menu.value === "login" ? login() : register(); // register(); } else { alert("error submit!"); return false; } }); // console.log(" 提交表单", res); }; const login = () => { const requestData = { username: data.form.username, password: sha1(data.form.password), code: data.form.code, }; data.submit_button_loading = true; Login(requestData) .then((response) => { console.log("login", response); data.submit_button_loading = false; proxy.$message({ message: response.message, type: "success", }); reset(); }) .catch((error) => { console.log("登录失败", error); data.submit_button_loading = false; }); }; //注册 const register = () => { const requestData = { username: data.form.username, password: sha1(data.form.password), code: data.form.code, }; data.submit_button_loading = true; Register(requestData) .then((res) => { proxy.$message({ message: res.message, type: "success", }); }) .catch((error) => { console.log("注册错误", error); data.submit_button_loading = false; }); }; const reset = () => { // 重置表单 proxy.$refs.form.resetFields(); // 切回登录模式 data.current_menu = "login"; // 清除定时器 data.code_button_timer && clearInterval(data.code_button_timer); // 获取验证码重置文本 data.code_button_text = "获取验证码"; // 获取验证码激活 data.code_button_disabled = false; // 禁用提交按钮 data.submit_button_disabled = true; // 取消提交按钮加载 data.submit_button_loading = false; }; const data = reactive({ form_rules: { username: [{ validator: validate_name_rules, trigger: "change" }], password: [{ validator: validate_password_rules, trigger: "change" }], passwords: [{ validator: validate_passwords_rules, trigger: "change" }], code: [{ validator: validate_code_rules, trigger: "change" }], }, form: { username: "", // 用户名 password: "", // 密码 passwords: "", // 确认密码 code: "", // 验证码 }, tab_menu: [ { type: "login", label: "登录" }, { type: "register", label: "注册" }, ], code_button_disabled: false, code_button_loading: false, code_button_text: "获取验证码", code_button_timer: null, // 提交按钮 submit_button_disabled: true, }); const toggleMenu = (type) => { current_menu.value = type; }; let current_menu = ref(data.tab_menu[0].type); // const dataItem = toRefs(data); return { // ...dataItem, data, current_menu, toggleMenu, handleGetCode, submitForm, register, reset, login, }; },};</script>css部分(使用了scss)
<style lang="scss" scoped>#login { height: 100vh; background-color: #344a5f;}.form-wrap { width: 320px; padding-top: 100px; margin: auto;}.menu-tab { text-align: center; li { display: inline-block; padding: 10px 24px; margin: 0 10px; color: #fff; font-size: 14px; border-radius: 5px; cursor: pointer; &.current { background-color: rgba(0, 0, 0, 0.1); } }}.form-label { display: block; color: #fff; font-size: 14px;}</style>(3)封装一些公共方法及样式
新建styles文件夹,然后新建几个样式文件:
normalize.scss
html, body, span, applet, object, iframe, h2, h3, h4, h5, h6, h7, p, blockquote, pre, a, abbr, acronym, address, big, cite, code, del, dfn, em, img, ins, kbd, q, s, samp, small, strike, strong, sub, sup, tt, var, b, u, i, center, dl, dt, dd, ol, ul, fieldset, form, legend, table, caption, tbody, tfoot, thead, tr, th, td, article, aside, canvas, details, embed, figure, figcaption, footer, header, hgroup, menu, nav, output, ruby, section, summary, time, mark, audio, video { margin: 0; padding: 0; font-size: 100%; font: inherit; vertical-align: baseline; } article, aside, details, figcaption, figure, footer, header, hgroup, menu, nav, section { display: block; } html { line-height: 1.15; -WEBkit-text-size-adjust: 100%; } body { margin: 0; font-family: 'Microsoft YaHei'; font-size: 14px; } main { display: block; } hr { box-sizing: content-box; height: 0; overflow: visible; } pre { font-family: monospace, monospace; font-size: 1em; } a { background-color: transparent; text-decoration: none; } abbr[title] { border-bottom: none; text-decoration: underline; text-decoration: underline dotted; } b, strong { font-weight: bolder; } code, kbd, samp { font-family: monospace, monospace; font-size: 1em; } small { font-size: 80%; } sub, sup { font-size: 75%; line-height: 0; position: relative; vertical-align: baseline; } sub { bottom: -0.25em; } sup { top: -0.5em; } img { display: block; border-style: none; } button, input, optgroup, select, textarea { font-family: inherit; font-size: 100%; margin: 0; } button, input { overflow: visible; } button, select { text-transform: none; } button, [type="button"], [type="reset"], [type="submit"] { -webkit-appearance: button; } button::-moz-focus-inner, [type="button"]::-moz-focus-inner, [type="reset"]::-moz-focus-inner, [type="submit"]::-moz-focus-inner { border-style: none; padding: 0; } button:-moz-focusring, [type="button"]:-moz-focusring, [type="reset"]:-moz-focusring, [type="submit"]:-moz-focusring { outline: 1px dotted ButtonText; } fieldset { padding: 0.35em 0.75em 0.625em; } legend { box-sizing: border-box; color: inherit; display: table; max-width: 100%; padding: 0; white-space: normal; } progress { vertical-align: baseline; } textarea { overflow: auto; } [type="checkbox"], [type="radio"] { box-sizing: border-box; padding: 0; } [type="number"]::-webkit-inner-spin-button, [type="number"]::-webkit-outer-spin-button { height: auto; } [type="search"] { -webkit-appearance: textfield; outline-offset: -2px; } [type="search"]::-webkit-search-decoration { -webkit-appearance: none; } ::-webkit-file-upload-button { -webkit-appearance: button; font: inherit; } details { display: block; } summary { display: list-item; } template { display: none; } [hidden] { display: none; } ul, li { list-style: none; }elementui.scss(当时测试时用的)
.el-button-block{ display: block; width: 100%;}新建main.scss(引入上方两个样式文件)
@import "./normalize.scss";@import './elementui.scss'vue.config.js配置一下样式文件
css: { // 是否使用css分离插件 ExtractTextPlugin extract: true, // 开启 CSS source maps? sourceMap: false, // css预设器配置项 loaderOptions: { scss: { additionalData: `@import "./src/styles/main.scss";`, }, }, // requireModuleExtension: true, },登录中封装的校验方法
新建utils文件夹,
a.validate.js
// 校验邮箱export function validate_email(value) { let regEmail = /^([a-zA-Z]|[0-9])(\w|\-)+@[a-zA-Z0-9]+\.([a-zA-Z]{2,4})$/; return regEmail.test(value);} // 校验密码export function validate_password(value) { let regPassword = /^(?!\D+$)(?![^a-zA-Z]+$)\S{6,20}$/; return regPassword.test(value);} // 校验验证码export function validate_code(value) { let regCode = /^[a-z0-9]{6}$/; return regCode.test(value);}封装请求方法
npm i axios -S记得先在main.js中引入axios
import axios from "axios";utils中新建request.js
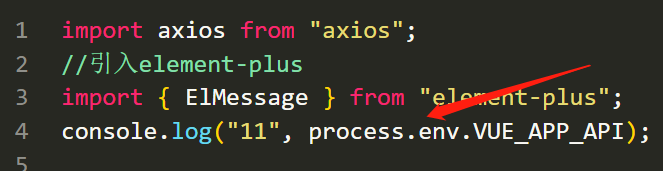
import axios from "axios";//引入element-plusimport { ElMessage } from "element-plus";console.log("11", process.env.VUE_APP_API); //undefined?? //创建实例const service = axios.create({ baseURL: "/devApi", //请求地址 timeout: 5000, //超时}); //添加请求拦截器service.interceptors.request.use( function (config) { //在发送请求之前做些什么 return config; }, function (error) { console.log(error.request); const errorData = JSON.parse(error.request.response); if (errorData.message) { //判断是否具有message属性 ElMessage({ message: errorData.message, type: "error", }); } //对请求错误做些什么 return Promise.reject(errorData); }); //添加响 应拦截器service.interceptors.response.use( function (response) { //对响应数据做些什么 console.log("响应数据", response); const data = response.data; if (data.resCode === 0) { return Promise.resolve(data); } else { ElMessage({ message: data.message, type: "error", }); return Promise.reject(data); } }, function (error) { //对响应错误做些什么 const errorData = JSON.parse(error.request.response); if (errorData.message) { //判断是否具有message属性 ElMessage({ message: errorData.message, type: "error", }); } return Promise.reject(errorData); }); //暴露serviceexport default service;(4)配置环境变量
和项目根路径同级,新建几个文件:
.env.development
VUE_APP_API = '/devApi'可以自定义,但是必须是VUE_APP_XXX的格式
.env.production
VUE_APP_API = '/production'.env.test
VUE_APP_API = '/test'配置完后记得在axios文件中打印一下,看下能输出自己配置的环境变量吗.
(5)配置代理(跨域)
基本大同小异,代理地址改成自己的就可以了.
devServer: { open: false, //编译完成是否自动打开网页 host: "0.0.0.0", //指定使用地址,默认是localhost,0.0.0.0代表可以被外界访问 port: 8080, proxy: { "/devApi": { target: "http://v3.web-jshtml.cn/api", //(必选)API服务器的地址 changeOrigin: true, //(必选) 是否允许跨域 ws: false, //(可选) 是否启用websockets secure: false, //(可选) 是否启用https接口 pathRewrite: { "^/devApi": "", //匹配开头为/devApi的字符串,并替换成空字符串 }, }, }, },关于“基于Vue3和elementplus如何实现登录功能”这篇文章的内容就介绍到这里,感谢各位的阅读!相信大家对“基于Vue3和elementplus如何实现登录功能”知识都有一定的了解,大家如果还想学习更多知识,欢迎关注编程网精选频道。
--结束END--
本文标题: 基于Vue3和elementplus如何实现登录功能
本文链接: https://www.lsjlt.com/news/350917.html(转载时请注明来源链接)
有问题或投稿请发送至: 邮箱/279061341@qq.com QQ/279061341
下载Word文档到电脑,方便收藏和打印~
2024-05-24
2024-05-24
2024-05-24
2024-05-24
2024-05-24
2024-05-24
2024-05-24
2024-05-24
2024-05-24
2024-05-24
回答
回答
回答
回答
回答
回答
回答
回答
回答
回答


官方手机版

微信公众号

商务合作


0