这篇文章主要介绍了SpringBoot下集成缓存工具类CacheManager怎么使用的相关知识,内容详细易懂,操作简单快捷,具有一定借鉴价值,相信大家阅读完这篇springBoot下集成缓存工具类CacheManager怎么使用文章都会有
这篇文章主要介绍了SpringBoot下集成缓存工具类CacheManager怎么使用的相关知识,内容详细易懂,操作简单快捷,具有一定借鉴价值,相信大家阅读完这篇springBoot下集成缓存工具类CacheManager怎么使用文章都会有所收获,下面我们一起来看看吧。
package com.demo.utils;import org.springframework.util.StringUtils;import java.util.LinkedList;import java.util.List;import java.util.Map;import java.util.concurrent.*;import java.util.concurrent.atomic.AtomicInteger;public class Cache { private Cache(){} public static final long CACHE_HOLD_TIME_30M = 30 * 60 * 1000L; public static final long CACHE_HOLD_TIME_1H = 2 * CACHE_HOLD_TIME_30M; public static final long CACHE_HOLD_TIME_24H = 24 * CACHE_HOLD_TIME_1H; public static final long CACHE_HOLD_TIME_FOREVER = -1L; private static final int CACHE_MAX_CAP = 1000; private static final int CLEAN_LRU_CAP = 800; private static AtomicInteger CACHE_CURRENT_SIZE = new AtomicInteger(0); private static final Map<String,node> CACHE_MAP = new ConcurrentHashMap<>(CACHE_MAX_CAP); private static final List<String> LRU_LIST = new LinkedList<>(); private static volatile boolean CLEAN_RUN_FLAG = false; public static void put(String key,Object val){ put(key,val,CACHE_HOLD_TIME_30M); } public static void putForever(String key,Object val){ put(key,val,CACHE_HOLD_TIME_FOREVER); } public static void put(String key,Object val,long ttlTime){ if (!StringUtils.hasLength(key) || null == val){ return; } checkSize(); updateCacheLru(key); CACHE_MAP.put(key,new Node(val,ttlTime)); } public static <T> T get(String key,Class<T> clazz){ if (!StringUtils.hasLength(key) || !CACHE_MAP.containsKey(key)){ return null; } updateCacheLru(key); return (T) CACHE_MAP.get(key).getVal(); } private static void updateCacheLru(String key){ synchronized (LRU_LIST){ LRU_LIST.remove(key); LRU_LIST.add(0,key); } } private static boolean remove(String key){ Node node = CACHE_MAP.remove(key); if (null!=node){ CACHE_CURRENT_SIZE.getAndDecrement(); return true; } return false; } private static void checkSize(){ if (CACHE_CURRENT_SIZE.intValue() > CACHE_MAX_CAP){ deleteTimeOut(); } if (CACHE_CURRENT_SIZE.intValue() > CLEAN_LRU_CAP){ deleteLru(); } } private static void deleteLru(){ synchronized (LRU_LIST){ while (LRU_LIST.size() > CLEAN_LRU_CAP){ int lastIndex = LRU_LIST.size() - 1; String key = LRU_LIST.get(lastIndex); if (!CACHE_MAP.get(key).isForever() && remove(key)){ LRU_LIST.remove(lastIndex); } } } } private static void deleteTimeOut(){ List<String> del = new LinkedList<>(); for (Map.Entry<String,Node> entry:CACHE_MAP.entrySet()){ if (entry.getValue().isExpired()){ del.add(entry.geTKEy()); } } for (String k:del){ remove(k); } } public static boolean contains(String key){ if (CACHE_MAP.containsKey(key)){ if (!CACHE_MAP.get(key).isExpired()){ return true; } if (remove(key)){ return false; } return true; } return false; } public static void clear(){ CACHE_MAP.clear(); CACHE_CURRENT_SIZE.set(0); LRU_LIST.clear(); } public static void setCleanRunFlag(boolean flag){ CLEAN_RUN_FLAG = flag; } private static void startAutoClean(){ if (!CLEAN_RUN_FLAG){ setCleanRunFlag(true); ScheduledExecutorService scheduledExecutor = new ScheduledThreadPoolExecutor(1); scheduledExecutor.scheduleAtFixedRate(()->{ try { Cache.setCleanRunFlag(true); while (CLEAN_RUN_FLAG){ Cache.deleteTimeOut(); } } catch (Exception e) { e.printStackTrace(); } },10,Cache.CACHE_HOLD_TIME_1H, TimeUnit.SECONDS); } } public static class Node{ private Object val; private long ttlTime; public Node(Object val,long ttlTime){ this.val = val; if (ttlTime<0){ this.ttlTime = ttlTime; }else{ this.ttlTime = System.currentTimeMillis() + ttlTime; } } public Object getVal(){ return this.val; } public boolean isExpired(){ if (this.ttlTime<0){ return false; } return System.currentTimeMillis() > this.ttlTime; } public boolean isForever(){ if (this.ttlTime<0){ return true; } return false; } }}| 缓存组件 | 类型 |
|---|---|
| HAZELCAST | 分布式缓存 |
| INFINISPAN | 分布式缓存 |
| COUCHBase | 分布式缓存 |
| REDIS | 分布式缓存 |
| CAFFEINE | 本地缓存 |
| CACHE2K | 本地缓存 |
随着硬件系统系统扩展和软件升级,缓存在应用中的地位和可应用性日渐提升,SpringBoot 为此设计了一套通用缓存机制(规范)
此规范设计了两个顶层接口 Cache 和 CacheManager 即缓存和缓存管理,通过实现CacheManager 引入缓存组件,即可在SpringBoot项目内通过注解方便的设置缓存
通过 SpringBoot 的缓存自动配置类,查看其可支持哪些缓存组件的使用,部分源码如下:
//org.springframework.boot.autoconfigure.cache.CacheConfigurationsstatic { Map<CacheType, String> mappings = new EnumMap<>(CacheType.class); mappings.put(CacheType.GENERIC, GenericCacheConfiguration.class.getName()); mappings.put(CacheType.HAZELCAST, HazelcastCacheConfiguration.class.getName()); mappings.put(CacheType.INFINISPAN, InfinispanCacheConfiguration.class.getName()); mappings.put(CacheType.JCACHE, JCacheCacheConfiguration.class.getName()); mappings.put(CacheType.COUCHBASE, CouchbaseCacheConfiguration.class.getName()); mappings.put(CacheType.Redis, RedisCacheConfiguration.class.getName()); mappings.put(CacheType.CAFFEINE, CaffeineCacheConfiguration.class.getName()); mappings.put(CacheType.CACHE2K, Cache2kCacheConfiguration.class.getName()); mappings.put(CacheType.SIMPLE, SimpleCacheConfiguration.class.getName()); mappings.put(CacheType.NONE, NoOpCacheConfiguration.class.getName()); MAPPINGS = Collections.unmodifiableMap(mappings);}| 注解 | 功能 |
|---|---|
| @EenableCacheing | 启用注解式缓存的功能,一般加在项目启动类上 |
| @Cacheable | 如果存在缓存,则返回缓存信息;不存在则获取值并添加到缓存 |
| @CachePut | 添加缓存,可用于更新方法(强制将方法返回值添加到指定Key) |
| @CacheEvict | 删除缓存 |
| @Caching | 打包操作,将上面几种注解打包在一起作用 |
| @CacheConfig | 通用配置注解,如果要对某个对象设置缓存,可以将此注解标注在类上设置缓存名、主键生成器等 |
通过 SpringBoot 集成 Caffeine 进行缓存注解演示,相关版本信息参考依赖
<?xml version="1.0" encoding="UTF-8"?><project xmlns="Http://Maven.apache.org/POM/4.0.0" xmlns:xsi="http://www.w3.org/2001/XMLSchema-instance" xsi:schemaLocation="http://maven.apache.org/POM/4.0.0 http://maven.apache.org/xsd/maven-4.0.0.xsd"> <modelVersion>4.0.0</modelVersion> <groupId>org.example</groupId> <artifactId>LenovoTest</artifactId> <version>1.0-SNAPSHOT</version> <properties> <maven.compiler.source>19</maven.compiler.source> <maven.compiler.target>19</maven.compiler.target> <project.build.sourceEncoding>UTF-8</project.build.sourceEncoding> <spring.version>3.0.0</spring.version> </properties> <dependencies> <dependency> <groupId>org.springframework.boot</groupId> <artifactId>spring-boot-starter-WEB</artifactId> <version>${spring.version}</version> <exclusions> <exclusion> <groupId>org.springframework.boot</groupId> <artifactId>spring-boot-starter-logging</artifactId> </exclusion> </exclusions> </dependency> <dependency> <groupId>org.springframework.boot</groupId> <artifactId>spring-boot-starter-log4j2</artifactId> <version>${spring.version}</version> </dependency> <dependency> <groupId>org.springframework.boot</groupId> <artifactId>spring-boot-starter-aop</artifactId> <version>${spring.version}</version> </dependency> <dependency> <groupId>org.springframework.boot</groupId> <artifactId>spring-boot-starter-cache</artifactId> <version>${spring.version}</version> </dependency> <dependency> <groupId>com.GitHub.ben-manes.caffeine</groupId> <artifactId>caffeine</artifactId> <version>3.1.2</version> </dependency> <dependency> <groupId>org.projectlombok</groupId> <artifactId>lombok</artifactId> <version>1.18.24</version> </dependency> <dependency> <groupId>com.alibaba</groupId> <artifactId>fastJSON</artifactId> <version>2.0.14.graal</version> </dependency> </dependencies></project>server: port: 8088spring: cache: type: caffeinecustom-caffeine: specs: ## 用户信息写入10S后过期 userInfo: maximumSize=10,expireAfterWrite=10s ## 登陆信息写入5S后过期 accessInfo: maximumSize=10,expireAfterWrite=5spackage com.demo;import org.springframework.boot.SpringApplication;import org.springframework.boot.autoconfigure.SpringBootApplication;import org.springframework.cache.annotation.EnableCaching;@EnableCaching@SpringBootApplicationpublic class TestApplication { public static void main(String[] args) { SpringApplication.run(TestApplication.class,args); }}如果不通过Yml指定缓存实现类型,则将使用默认实现
package com.demo.comfig;import com.github.benmanes.caffeine.cache.Caffeine;import org.springframework.beans.factory.annotation.Qualifier;import org.springframework.boot.autoconfigure.cache.CacheAutoConfiguration;import org.springframework.boot.context.properties.ConfigurationProperties;import org.springframework.cache.CacheManager;import org.springframework.cache.caffeine.CaffeineCacheManager;import org.springframework.context.annotation.Bean;import org.springframework.context.annotation.Configuration;import org.springframework.context.annotation.Primary;import java.util.HashMap;import java.util.Iterator;import java.util.Map;@Configurationpublic class CustomCaffeineConfig { @Bean(name = "caffeineProperties") @ConfigurationProperties(prefix = "custom-caffeine.specs") public Map<String,String> caffeineProperties(){ return new HashMap(16); } @Bean @Primary public CacheManager caffeineManager(@Qualifier("caffeineProperties") Map<String,String> properties){ CaffeineCacheManager manager = new CaffeineCacheManager(); Map.Entry<String,String> entry; Iterator<Map.Entry<String,String>> iterator = properties.entrySet().iterator(); while (iterator.hasNext()){ entry = iterator.next(); manager.reGISterCustomCache(entry.getKey(), Caffeine.from(entry.getValue()).build()); } return manager; }}定义一个 User 对象
package com.demo.entity;import lombok.Data;@Datapublic class UserInfo { private String name; private String account; private long age;}定义一个 Controller 类用于测试
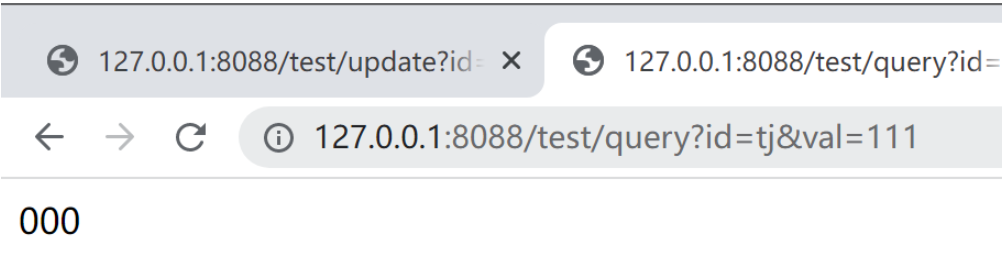
package com.demo.controller;import com.demo.entity.UserInfo;import org.springframework.beans.factory.annotation.Autowired;import org.springframework.cache.Cache;import org.springframework.cache.CacheManager;import org.springframework.cache.annotation.CacheEvict;import org.springframework.cache.annotation.CachePut;import org.springframework.cache.annotation.Cacheable;import org.springframework.web.bind.annotation.GetMapping;import org.springframework.web.bind.annotation.RequestMapping;import org.springframework.web.bind.annotation.RequestParam;import org.springframework.web.bind.annotation.RestController;@RestController@RequestMapping("/test")public class TestController { @Autowired CacheManager cacheManager; @GetMapping("/update") @CachePut(cacheNames = "test" ,key = "#id") public String update(String id,String val){ //TODO Query Data By @{id} return val; } @GetMapping("/query") @Cacheable(cacheNames = "test" ,key = "#id" ) public String query(String id,String val){ //TODO Query Data By @{id} return val; } @GetMapping("/deleteTest") @CacheEvict(cacheNames = "test",key = "#id") public void deleteTest(String id){ } @GetMapping("/deleteByNameAndKet") public void deleteByNameAndKet(String cacheNames,String id){ Cache cache = cacheManager.getCache(cacheNames); cache.evict(id); } @GetMapping("/updateUser") @CachePut(cacheNames = "userInfo" ,key = "#id") public String updateUser(String id,String val){ return val; } @GetMapping("/queryUser") @Cacheable(cacheNames = "userInfo" ,key = "#id") public String queryUser(String id,String val){ return val; } @GetMapping("/queryUserById") @Cacheable(cacheNames = "userInfo" ,key = "#id") public UserInfo getUserInfo(String id,String val){ UserInfo info = new UserInfo(); info.setAccount(id); info.setName(val); info.setAge(System.currentTimeMillis()); return info; }}启动项目,添加强制缓存
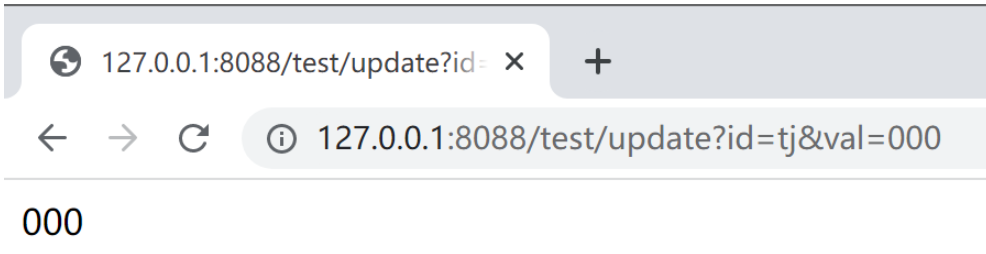
利用 Cacheable 尝试刷新缓存(返回已存在值)
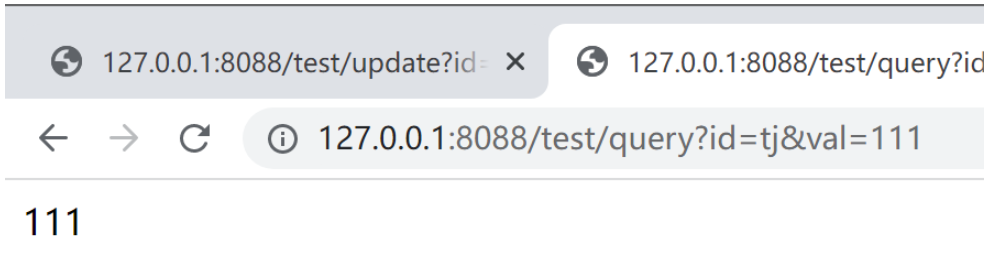
删除缓存

再次利用 Cacheable 尝试刷新缓存(上面清除后则可刷新)
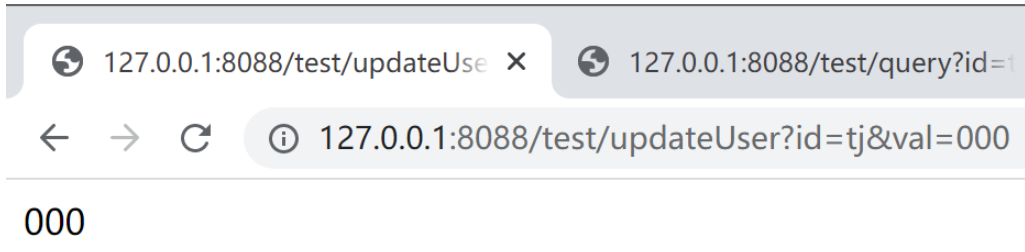
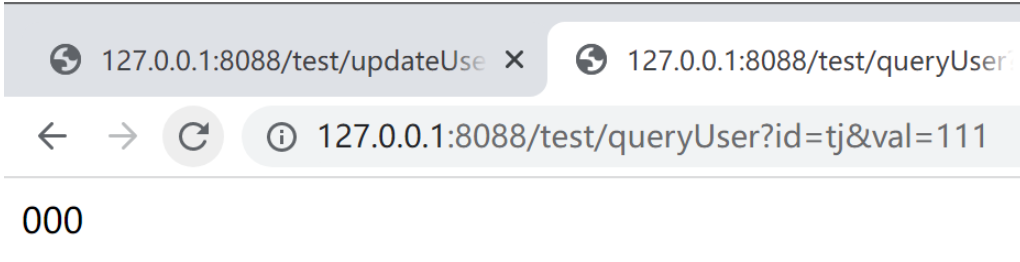
自动过期测试,通过 CachePut 添加用户信息
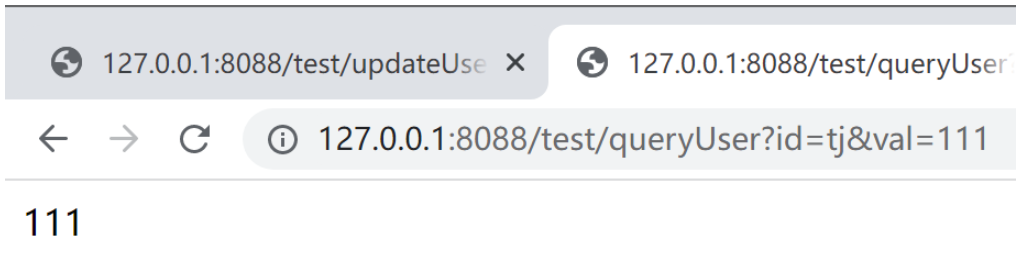
尝试用 Cacheable 刷新缓存,则 10S 后可生效
10 秒后
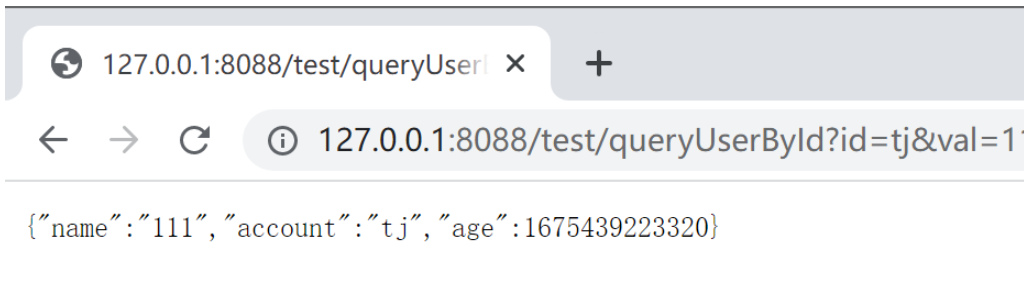
缓存对象信息
关于“SpringBoot下集成缓存工具类CacheManager怎么使用”这篇文章的内容就介绍到这里,感谢各位的阅读!相信大家对“SpringBoot下集成缓存工具类CacheManager怎么使用”知识都有一定的了解,大家如果还想学习更多知识,欢迎关注编程网精选频道。
--结束END--
本文标题: SpringBoot下集成缓存工具类CacheManager怎么使用
本文链接: https://www.lsjlt.com/news/353261.html(转载时请注明来源链接)
有问题或投稿请发送至: 邮箱/279061341@qq.com QQ/279061341
下载Word文档到电脑,方便收藏和打印~
2024-05-10
2024-05-10
2024-05-10
2024-05-10
2024-05-10
2024-05-10
2024-05-10
2024-05-10
2024-05-10
2024-05-10
回答
回答
回答
回答
回答
回答
回答
回答
回答
回答


官方手机版

微信公众号

商务合作


0