文章目录 1、Excel Cell单元格背景色+颜色名称对照关系2、Excel Cell单元格背景填充样式+颜色填充对照关系3、Excel Cell字体样式设置+对照图4、Excel 行高、列宽设置5、Excel单元格边框设置+边框
org.apache.poi poi 5.2.2 org.apache.poi poi-ooxml 5.2.2 部分需要注意的问题,通过注释的方式写在代码里面了,看代码的时候需要注意下注释
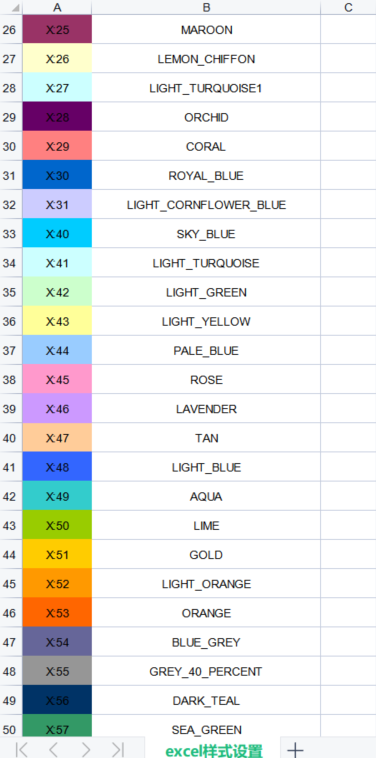
public static void setBackgroundColorCellStyle() throws ioException { HSSFWorkbook workbook = new HSSFWorkbook(); HSSFSheet sheet = workbook.createSheet("excel样式设置"); int rowIndex = 0; for (IndexedColors color : IndexedColors.values()) { short colorIndex = color.getIndex(); HSSFCellStyle cell1Style = workbook.createCellStyle(); // 设置的背景颜色 cell1Style.setFillForegroundColor(colorIndex); // 填充效果(全景填充) cell1Style.setFillPattern(FillPatternType.SOLID_FOREGROUND); cell1Style.setAlignment(HorizontalAlignment.CENTER); cell1Style.setVerticalAlignment(VerticalAlignment.CENTER); HSSFRow row = sheet.createRow(rowIndex++); row.setHeight((short) (25 * 20)); // 第一列 HSSFCell cell1 = row.createCell(0); cell1.setCellStyle(cell1Style); cell1.setCellValue("X:" + colorIndex); // 第二列 HSSFCellStyle cell2Style = workbook.createCellStyle(); cell2Style.setAlignment(HorizontalAlignment.CENTER); cell2Style.setVerticalAlignment(VerticalAlignment.CENTER); HSSFCell cell2 = row.createCell(1); cell2.setCellStyle(cell2Style); cell2.setCellValue(color.name()); // 设置列宽 sheet.setColumnWidth(0, 10 * 256 + 185); sheet.setColumnWidth(1, 35 * 256 + 185); } FileOutputStream outputStream = new FileOutputStream("D:/temp/Excel背景颜色列表.xlsx"); workbook.write(outputStream); outputStream.close(); workbook.close(); }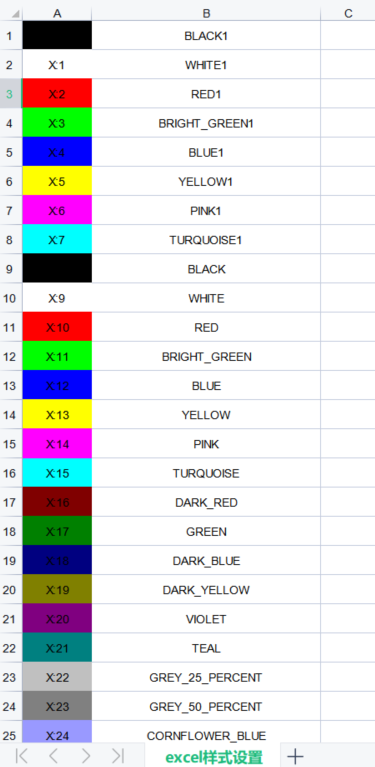

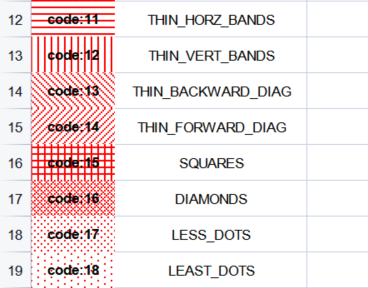
public static void setFillBackgroundColor() throws IOException { HSSFWorkbook workbook = new HSSFWorkbook(); HSSFSheet sheet = workbook.createSheet("excel填充设置"); int rowIndex = 0; short colorIndex = IndexedColors.RED.getIndex(); // 选择红色(可参照上图背景色色号) --> 10 // 填充样式 for (FillPatternType patternType : FillPatternType.values()) { HSSFCellStyle cell1Style = workbook.createCellStyle(); // 设置的背景颜色 cell1Style.setFillForegroundColor(colorIndex); // 填充效果(全景填充) cell1Style.setFillPattern(patternType); // 设置垂直居中 cell1Style.setAlignment(HorizontalAlignment.CENTER); cell1Style.setVerticalAlignment(VerticalAlignment.CENTER); // 设置字体 HSSFFont font = workbook.createFont(); // 加粗 font.setBold(true); cell1Style.setFont(font); HSSFRow row = sheet.createRow(rowIndex++); // 设置行高:height = 磅 * 20 (1磅=0.353毫米=20缇)-> POI中行高是"缇(twips)" row.setHeight((short) (25 * 20)); // 第一列 HSSFCell cell1 = row.createCell(0); cell1.setCellStyle(cell1Style); cell1.setCellValue("code:" + patternType.getCode()); HSSFCellStyle cell2Style = workbook.createCellStyle(); // 设置垂直居中 cell2Style.setAlignment(HorizontalAlignment.CENTER); cell2Style.setVerticalAlignment(VerticalAlignment.CENTER); // 第二列 HSSFCell cell2 = row.createCell(1); cell2.setCellStyle(cell2Style); cell2.setCellValue(patternType.name()); // 设置列宽: width = 256*磅 + 185 sheet.setColumnWidth(0, 10 * 256 + 185); sheet.setColumnWidth(1, 24 * 256 + 185); } FileOutputStream outputStream = new FileOutputStream("D:/temp/Excel背景填充效果.xlsx"); workbook.write(outputStream); outputStream.close(); workbook.close(); }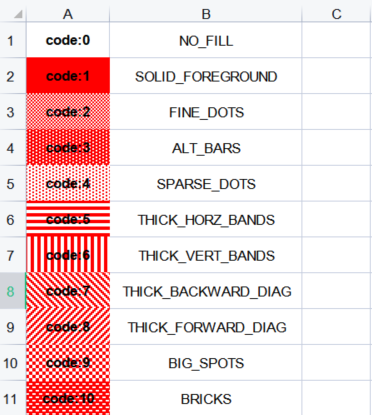
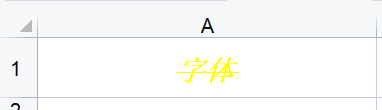
public static void setCellFontStyle() throws IOException { HSSFWorkbook workbook = new HSSFWorkbook(); HSSFSheet sheet = workbook.createSheet("excel字体样式"); HSSFCellStyle cellStyle = workbook.createCellStyle(); HSSFFont font = workbook.createFont(); // 字体加粗 font.setBold(true); // 字体倾斜 font.setItalic(true); // 字体删除线 font.setStrikeout(true); // 字体颜色 font.setColor(IndexedColors.YELLOW.getIndex()); // 字体大小:字号 font.setFontHeightInPoints((short) 14); // 设置行高 // font.setFontHeight((short) 14); // 字体 font.setFontName("宋体"); cellStyle.setFont(font); // 设置文字垂直居中 cellStyle.setAlignment(HorizontalAlignment.CENTER); cellStyle.setVerticalAlignment(VerticalAlignment.CENTER); // 设置单元格内容自动换行(文字超出列宽自动换行) cellStyle.setWrapText(true); HSSFRow row = sheet.createRow(0); HSSFCell cell = row.createCell(0); cell.setCellStyle(cellStyle); cell.setCellValue("字体"); row.setHeight((short) (30 * 20)); sheet.setColumnWidth(0, 30 * 256 + 185); FileOutputStream outputStream = new FileOutputStream("D:/temp/Excel字体样式.xlsx"); workbook.write(outputStream); outputStream.close(); workbook.close(); }
public static void setRowHeightAndCellWidth() throws IOException { HSSFWorkbook workbook = new HSSFWorkbook(); HSSFSheet sheet = workbook.createSheet("excel行高、列宽"); // 定义一个5行、5列的数据 int[][] data = {{1, 2, 3, 4, 5}, {6, 7, 8, 9, 10}, {11, 12, 13, 14, 15}, {16, 17, 18, 19, 20}, {21, 22, 23, 24, 25}}; for (int rowIndex = 0; rowIndex < data.length; rowIndex++) { int[] cellData = data[rowIndex]; HSSFRow row = sheet.createRow(rowIndex); // 行高计算方式:缇(twips) = 磅 * 20 ==> 换算 1磅=20缇 row.setHeight((short) (25 * 20)); for (int cellIndex = 0; cellIndex < cellData.length; cellIndex++) { HSSFCell cell = row.createCell(cellIndex); // 列宽计算方式:8磅 * 256 + 185 sheet.setColumnWidth(cellIndex, 8 * 256 + 185); cell.setCellValue(cellData[cellIndex]); } } FileOutputStream outputStream = new FileOutputStream("D:/temp/Excel行高、列宽.xlsx"); workbook.write(outputStream); outputStream.close(); workbook.close(); }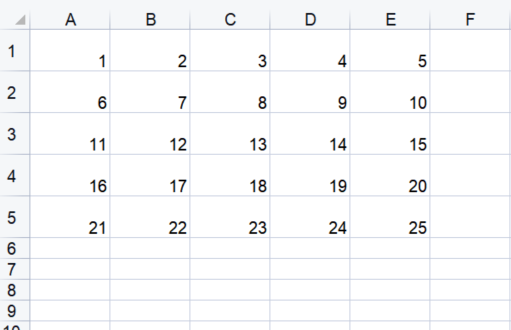
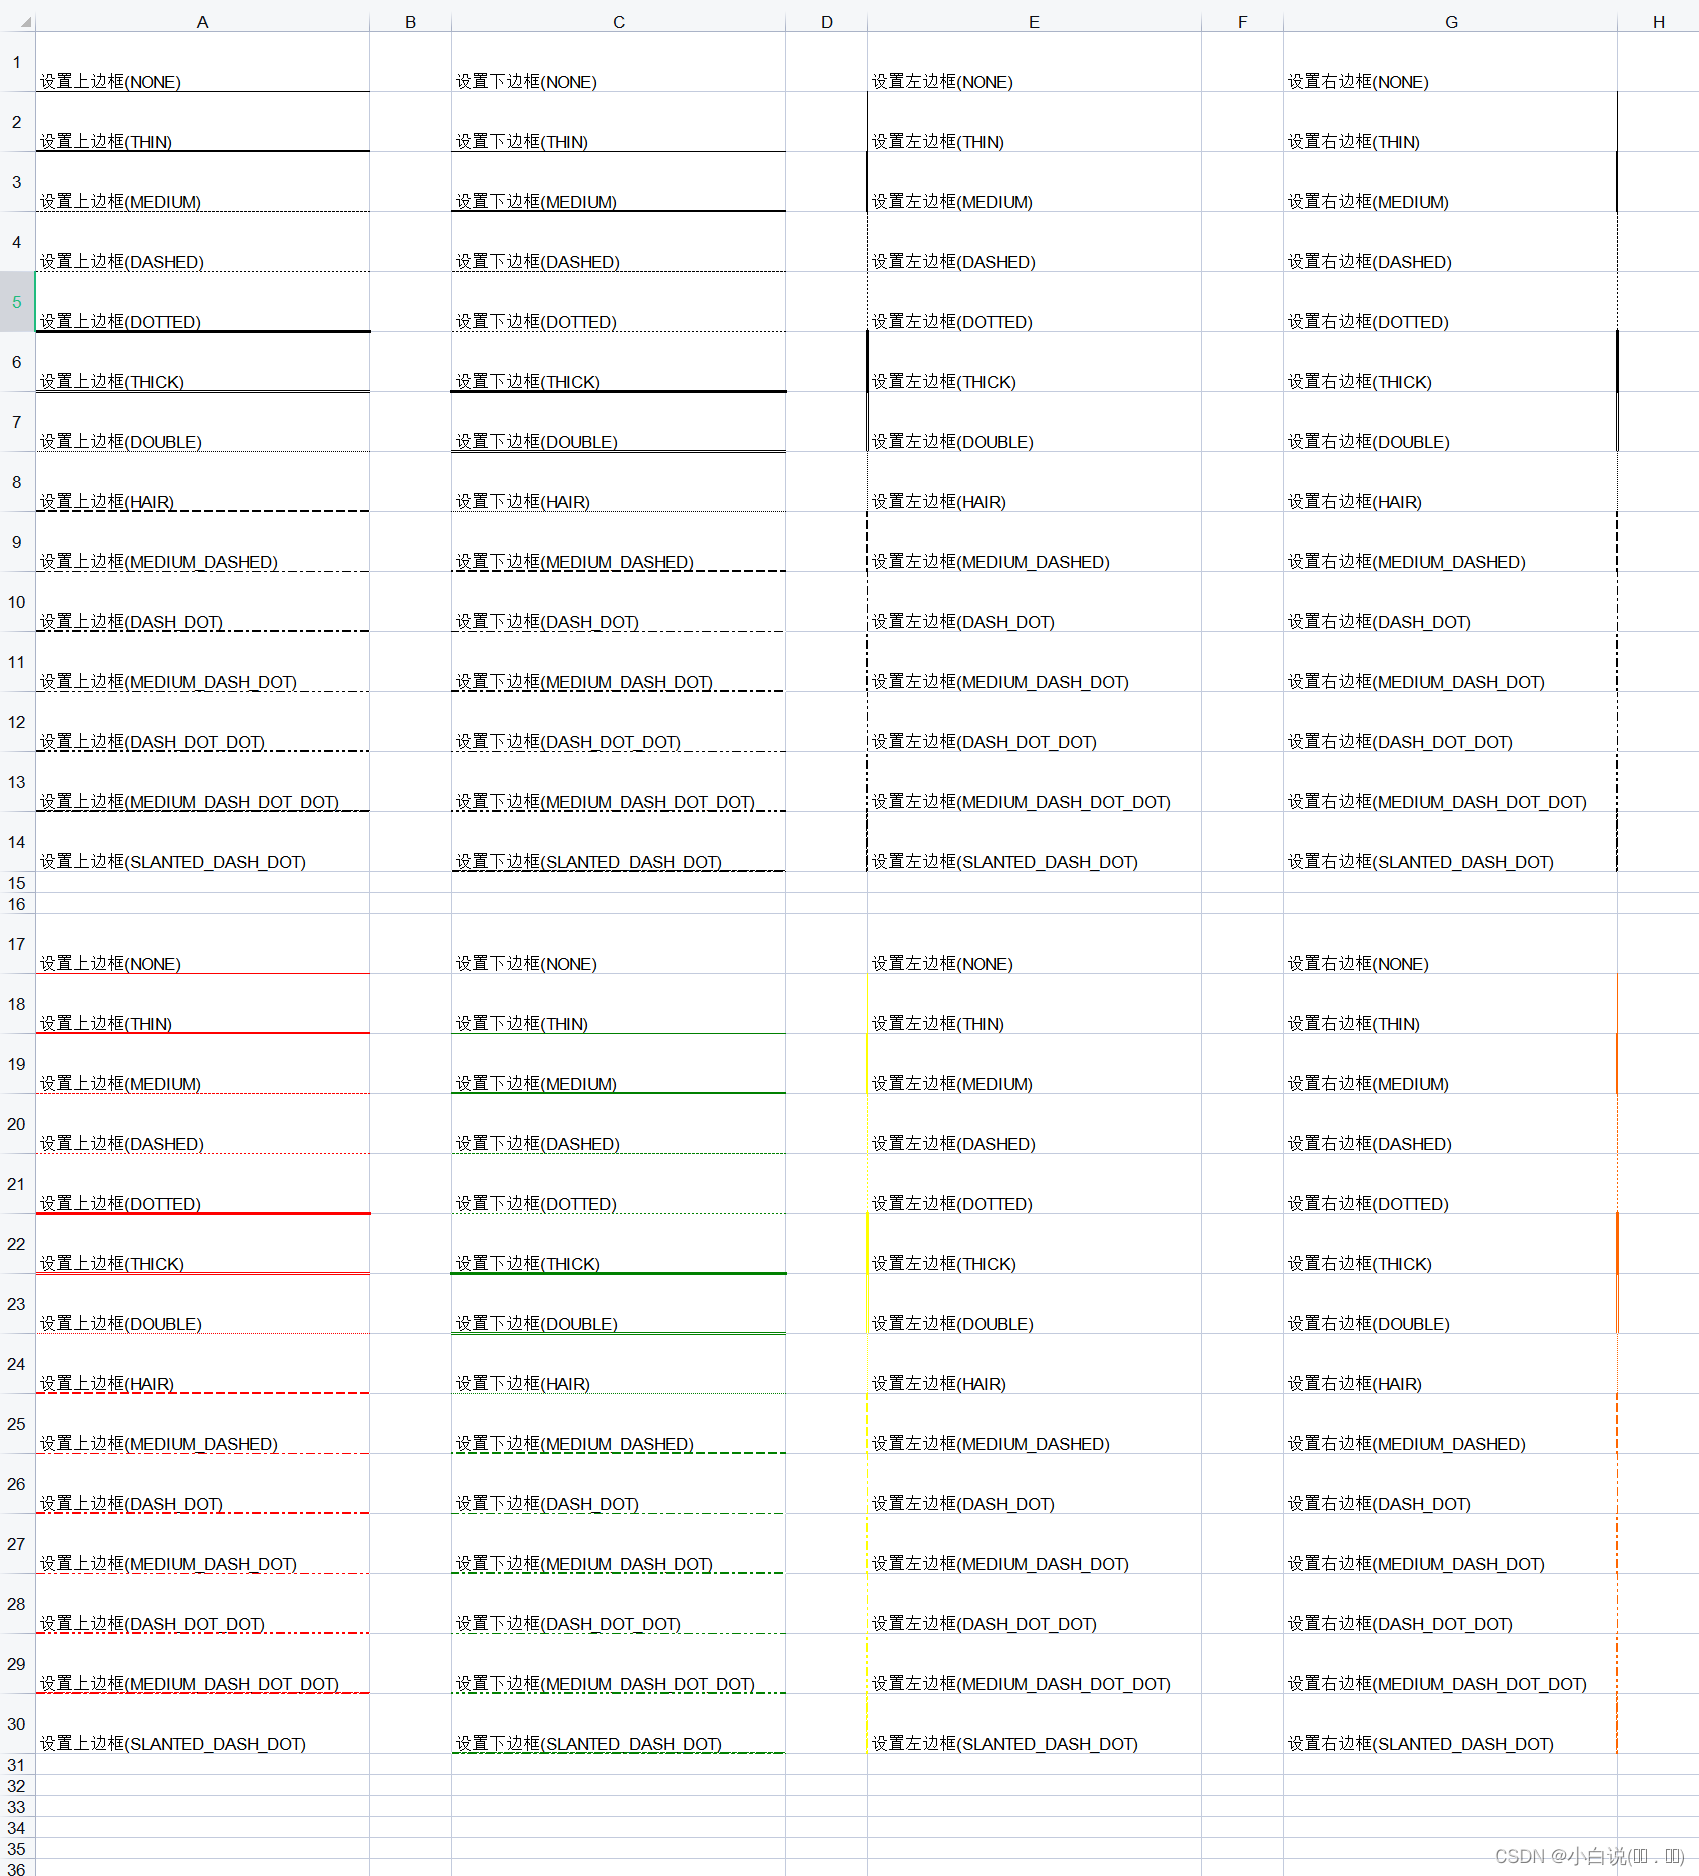
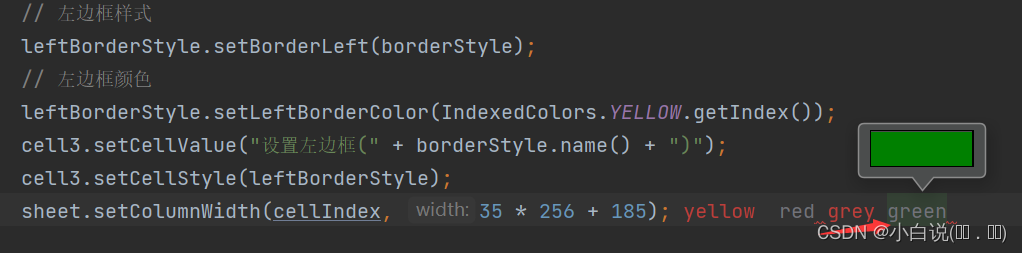
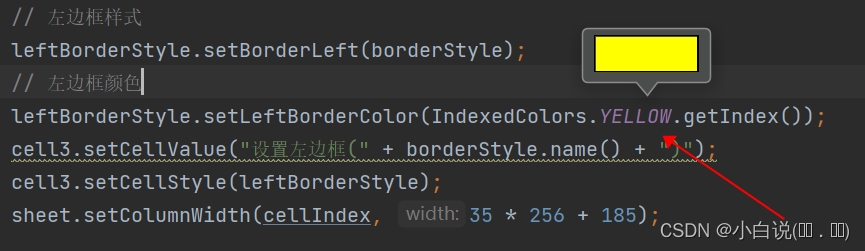
public static void setAllBorderStyle() throws IOException { HSSFWorkbook workbook = new HSSFWorkbook(); HSSFSheet sheet = workbook.createSheet("excel单元格边框样式"); // ======================= 设置边框 int rowIndex = 0; for (BorderStyle borderStyle : BorderStyle.values()) { int cellIndex = 0; HSSFRow row = sheet.createRow(rowIndex++); row.setHeight((short) (35 * 20)); // 第一列 HSSFCell cell = row.createCell(cellIndex); HSSFCellStyle topBorderStyle = workbook.createCellStyle(); // 上边框样式 topBorderStyle.setBorderTop(borderStyle); cell.setCellValue("设置上边框(" + borderStyle.name() + ")"); cell.setCellStyle(topBorderStyle); sheet.setColumnWidth(cellIndex, 35 * 256 + 185); cellIndex += 2; // 第三列 HSSFCell cell2 = row.createCell(cellIndex); HSSFCellStyle bottomBorderStyle = workbook.createCellStyle(); // 下边框样式 bottomBorderStyle.setBorderBottom(borderStyle); cell2.setCellValue("设置下边框(" + borderStyle.name() + ")"); cell2.setCellStyle(bottomBorderStyle); sheet.setColumnWidth(cellIndex, 35 * 256 + 185); cellIndex += 2; // 第五列 HSSFCell cell3 = row.createCell(cellIndex); HSSFCellStyle leftBorderStyle = workbook.createCellStyle(); // 左边框样式 leftBorderStyle.setBorderLeft(borderStyle); cell3.setCellValue("设置左边框(" + borderStyle.name() + ")"); cell3.setCellStyle(leftBorderStyle); sheet.setColumnWidth(cellIndex, 35 * 256 + 185); cellIndex += 2; // 第七列 HSSFCell cell4 = row.createCell(cellIndex); HSSFCellStyle rightBorderStyle = workbook.createCellStyle(); // 左边框样式 rightBorderStyle.setBorderRight(borderStyle); cell4.setCellValue("设置右边框(" + borderStyle.name() + ")"); cell4.setCellStyle(rightBorderStyle); sheet.setColumnWidth(cellIndex, 35 * 256 + 185); } // ================= 设置边框并设置颜色 rowIndex += 2; for (BorderStyle borderStyle : BorderStyle.values()) { int cellIndex = 0; HSSFRow row = sheet.createRow(rowIndex++); row.setHeight((short) (35 * 20)); // 第一列 HSSFCell cell = row.createCell(cellIndex); HSSFCellStyle topBorderStyle = workbook.createCellStyle(); // 上边框样式 topBorderStyle.setBorderTop(borderStyle); // 上边框颜色 topBorderStyle.setTopBorderColor(IndexedColors.RED.getIndex()); cell.setCellValue("设置上边框(" + borderStyle.name() + ")"); cell.setCellStyle(topBorderStyle); sheet.setColumnWidth(cellIndex, 35 * 256 + 185); cellIndex += 2; // 第三列 HSSFCell cell2 = row.createCell(cellIndex); HSSFCellStyle bottomBorderStyle = workbook.createCellStyle(); // 下边框样式 bottomBorderStyle.setBorderBottom(borderStyle); // 下边框颜色 bottomBorderStyle.setBottomBorderColor(IndexedColors.GREEN.getIndex()); cell2.setCellValue("设置下边框(" + borderStyle.name() + ")"); cell2.setCellStyle(bottomBorderStyle); sheet.setColumnWidth(cellIndex, 35 * 256 + 185); cellIndex += 2; // 第五列 HSSFCell cell3 = row.createCell(cellIndex); HSSFCellStyle leftBorderStyle = workbook.createCellStyle(); // 左边框样式 leftBorderStyle.setBorderLeft(borderStyle); // 左边框颜色 leftBorderStyle.setLeftBorderColor(IndexedColors.YELLOW.getIndex()); cell3.setCellValue("设置左边框(" + borderStyle.name() + ")"); cell3.setCellStyle(leftBorderStyle); sheet.setColumnWidth(cellIndex, 35 * 256 + 185); cellIndex += 2; // 第七列 HSSFCell cell4 = row.createCell(cellIndex); HSSFCellStyle rightBorderStyle = workbook.createCellStyle(); // 左边框样式 rightBorderStyle.setBorderRight(borderStyle); // 右边框颜色 rightBorderStyle.setRightBorderColor(IndexedColors.ORANGE.getIndex()); cell4.setCellValue("设置右边框(" + borderStyle.name() + ")"); cell4.setCellStyle(rightBorderStyle); sheet.setColumnWidth(cellIndex, 35 * 256 + 185); } FileOutputStream outputStream = new FileOutputStream("D:/temp/Excel单元格边框样式.xlsx"); workbook.write(outputStream); outputStream.close(); workbook.close(); }边框样式对照表,括号内为BorderStyle枚举对象

如果整个Excel中存在空行(整行空),当时若干空行下面存在其他数据,这时候获取到的最终行号就不对了,尤其是存在合并单元格的情况最容易出现这类问题。

很明显10、11、13、14全都是空行了,这时候的lastNum就是不正确的,这种情况要尤为注意。
避免这种情况的出现最直接的一种方式就是,预先知道数据存在多少行,先把所有行都生成sheet.createRow(0)。
同样地,空白的单元格也会出现这种情况,如果单元格不存在或没有样式,获取到的最后一个单元格列数也是不正确的。
像素、磅、点、缇等各种单位换算_点和像素换算_tanghuan的博客-CSDN博客
JAVA对excle创建、读取、设置单元格颜色、背景色、跨行跨列_java设置excel背景色_谷同学的博客-CSDN博客
POI4颜色名称,颜色汉语名称,颜色对应关系_软件工程师文艺的博客-CSDN博客
POI设置Excel单元格背景色(setFillForegroundColor与setFillPattern的使用) - 大墨垂杨 - 博客园
java用POI设置Excel的列宽_sheet.setcolumnwidth_duqian42707的博客-CSDN博客
Java POI 设置Excel单元格的宽度和高度_java poi 设置单元格宽度_aosica的博客-CSDN博客
来源地址:https://blog.csdn.net/dongzi_yu/article/details/131577857
--结束END--
本文标题: Java POI excel单元格背景色(填充)、字体颜色(对齐)、边框(颜色)、行高、列宽设置
本文链接: https://www.lsjlt.com/news/373031.html(转载时请注明来源链接)
有问题或投稿请发送至: 邮箱/279061341@qq.com QQ/279061341
下载Word文档到电脑,方便收藏和打印~
2024-04-03
2024-04-03
2024-04-01
2024-01-21
2024-01-21
2024-01-21
2024-01-21
2023-12-23
回答
回答
回答
回答
回答
回答
回答
回答
回答
回答


官方手机版

微信公众号

商务合作


0