安装环境:操作系统:oracle linux 5.8 64位集群软件:linux.x64_11gR2_grid.zip数据库:linux.x64_11gR2_database_1of1.zip,linux.
安装环境:
集群软件:linux.x64_11gR2_grid.zip
数据库:linux.x64_11gR2_database_1of1.zip,linux.x64_11gR2_database_1of2.zip
cpu:1颗
内存:必须1.5G以上(一般是2G)
本地磁盘:20G(根分区9G,swap是2G,home分区是9G)
asm软件:oracleasm-2.6.18-194.el5-2.0.5-1.el5.x86_64.rpm
oracleasmlib-2.0.4-1.el5.x86_64.rpm
oracleasm-support-2.1.7-1.el5.x86_64.rpm
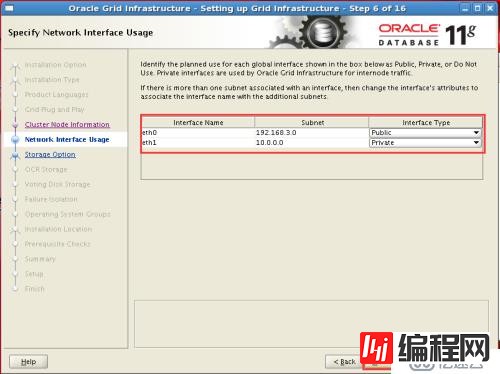
IP地址划分:192.168.3.100 rac1 eth0
192.168.3.101 rac2 eth0
192.168.3.200 rac1-vip eth0:1
192.168.3.201 rac2-vip eth0:1
10.0.0.1 rac1-priv eth2
10.0.0.2 rac2-priv eth2
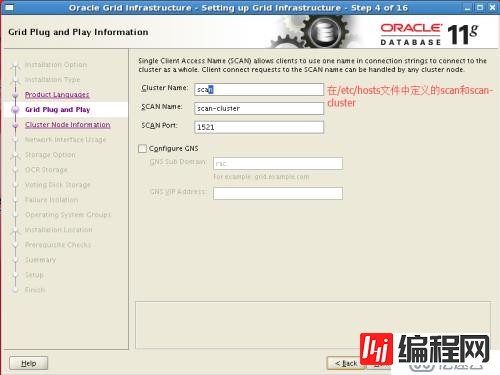
192.168.3.155 scan-cluster eth0
IP说明:
每台服务器必须两块网卡, public ip,priv ip和scan ip必须在同一网段.public和priv必须在网卡中写明地址,vip在地址是自己添加的.
1.安装操作系统,图形化安装
安装系统时将iptable和selinux全部禁用
2.配置虚拟机的网卡
rac1节点:
[root@rac1 ~]# vim /etc/sysconfig/network-scripts/ifcfg-eth0
DEVICE=eth0
BOOTPROTO=static
HWADDR=00:0C:29:BE:51:CE
ONBOOT=yes
DHCP_HOSTNAME=rac1
IPADDR=192.168.3.100
NETMASK=255.255.255.0
[root@rac1 ~]# vim /etc/sysconfig/network-scripts/ifcfg-eth2
DEVICE=eth2
BOOTPROTO=static
HWADDR=00:0C:29:BE:51:D8
ONBOOT=yes
HOTPLUG=no
DHCP_HOSTNAME=rac1
IPADDR=10.0.0.1
[root@rac1 ~]# /etc/init.d/network restart
Shutting down interface eth0: [ OK ]
Shutting down interface eth2: [ OK ]
Shutting down loopback interface: [ OK ]
Bringing up loopback interface: [ OK ]
Bringing up interface eth0: [ OK ]
Bringing up interface eth2: [ OK ]
[root@rac1 ~]#
rac2节点:
[root@rac2 ~]# vim /etc/sysconfig/network-scripts/ifcfg-eth0
DEVICE=eth0
BOOTPROTO=static
HWADDR=00:0C:29:7B:C0:13
ONBOOT=yes
DHCP_HOSTNAME=rac2
IPADDR=192.168.3.101
NETMASK=255.255.255.0
[root@rac2 ~]# vim /etc/sysconfig/network-scripts/ifcfg-eth2
DEVICE=eth2
BOOTPROTO=static
HWADDR=00:0C:29:7B:C0:1D
ONBOOT=yes
DHCP_HOSTNAME=rac2
IPADDR=10.0.0.2
[root@rac2 ~]#
3.配置hosts文件,主机名与IP地址解析(两个节点都是一样的)
[root@rac1 ~]# vim /etc/hosts
192.168.3.100 rac1.localdomain rac1
192.168.3.101 rac2.localdomain rac2
192.168.3.200 rac1-vip.localdomain rac1-vip
192.168.3.201 rac2-vip.localdomain rac2-vip
10.0.0.1 rac1-priv.localdomain rac1-priv
10.0.0.2 rac2-priv.localdomain rac2-priv
#192.168.3.155 scan-cluster.localdomain scan-cluster --注意,scan是用DNS解析的,在hosts文件中就不需要要定义了,否则会出错
[root@rac1 ~]#
4.光盘镜像挂载,安装软件依赖包(两个节点是一样的)
[root@rac1 ~]# mount /dev/cdrom /mnt/
mount: block device /dev/cdrom is write-protected, mounting read-only
[root@rac1 ~]# vim /etc/yum.repos.d/Centos.repo
[centos]
name=centos
baseurl=file:///mnt/Server
gpGCheck=1
enabled=1
gpgkey=file:///mnt/RPM-GPG-KEY-oracle
[root@rac1 ~]# yum repolist
[root@rac1 ~]# yum -y install compat-libstdc++-33 elfutils-libelf-devel gcc gcc-c++ glibc-devel glibc-headers libaio-devel libstdc++-devel sysstat unixODBC unixODBC-devel bind bind-chroot bind-lib -y
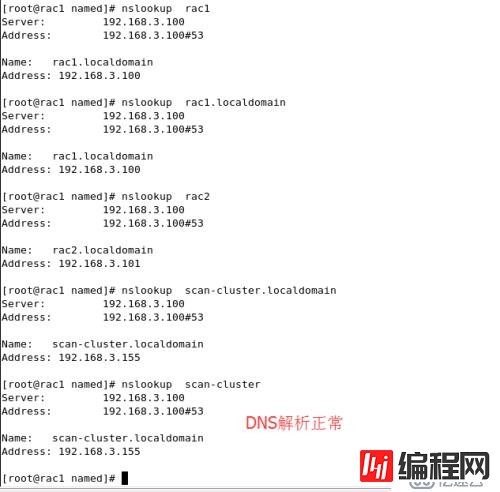
5.配置DNS,解析rac1,rac2,scan-cluster的IP地址
[root@rac1 ~]# cd /var/named/chroot/etc/
[root@rac1 etc]# cp -p named.caching-nameserver.conf named.conf
[root@rac1 etc]# vim named.conf
listen-on port 53 { any; };
allow-query { any; };
allow-query-cache { any; };
match-clients { any; };
match-destinations { any; };
[root@rac1 etc]# vim named.rfc1912.zones --添加域名反向解析
zone "3.168.192.in-addr.arpa" IN {
type master;
file "3.168.192.in-addr.arpa";
allow-update { none; };
};
[root@rac1 etc]# cd /var/named/chroot/var/named/
[root@rac1 named]# cp -p localdomain.zone 3.168.192.in-addr.arpa
[root@rac1 named]# vim 3.168.192.in-addr.arpa
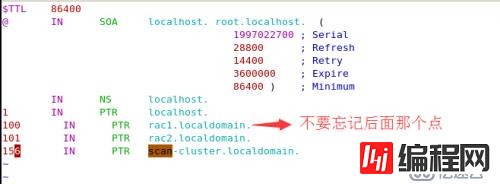
[root@rac1 named]# vim localdomain.zone

[root@rac1 named]# /etc/init.d/named restart
6.修改内核参数(两个节点必须一至)
[root@rac1 ~]# vim /etc/sysctl.conf
fs.aio-max-nr = 1048576
fs.file-max = 6815744
kernel.shmmax = 4294967295
kernel.shmall = 2097152
kernel.shmmni = 4096
kernel.sem = 250 32000 100 128
net.ipv4.ip_local_port_range = 9000 65500
net.core.rmem_default = 4194304
net.core.rmem_max = 4194304
net.core.wmem_default = 262144
net.core.wmem_max = 1048586
[root@rac1 ~]#sysctl -p --使配置生效
7.创建用户,用户组,用户设置密码(两个节点必须一至)
[root@rac1 ~]# groupadd -g 1000 oinstall
[root@rac1 ~]# groupadd -g 1001 dba
[root@rac1 ~]# groupadd -g 1002 oper
[root@rac1 ~]# groupadd -g 1003 asmadmin
[root@rac1 ~]# groupadd -g 1004 asmdba
[root@rac1 ~]# groupadd -g 1005 asmoper
[root@rac2 ~]# useradd -u 1000 -g oinstall -G dba,oper,asmdba -d /home/oracle oracle
[root@rac1 ~]# passwd oracle
Changing passWord for user oracle.
New UNIX password:
BAD PASSWORD: it is based on a dictionary word
Retype new UNIX password:
passwd: all authentication tokens updated successfully.
[root@rac2 ~]# useradd -u 1001 -g oinstall -G dba,asmadmin,asmoper,asmdba -d /home/grid grid
[root@rac1 ~]# passwd grid
Changing password for user grid.
New UNIX password:
BAD PASSWORD: it is based on a dictionary word
Retype new UNIX password:
passwd: all authentication tokens updated successfully.
[root@rac1 ~]#
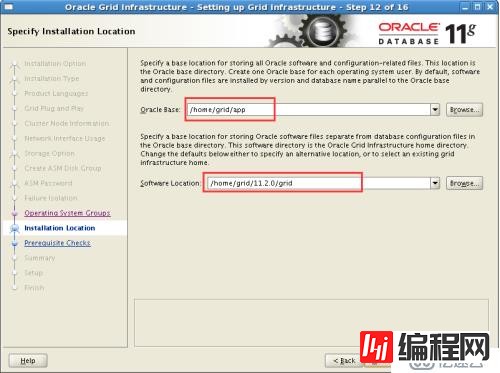
8.创建oracle与grid存放的目录(两个节点必须一至)
[root@rac1 ~]# mkdir -p /home/grid/app
[root@rac1 ~]# mkdir -p /home/grid/11.2.0/grid --ORACLE_HOME目录不能在ORACLE_BASE目录在下面,否则会报错
[root@rac1 ~]# chown -R grid:oinstall /home/grid/app
[root@rac1 ~]# mkdir /home/oracle/app -p
[root@rac1 ~]# mkdir /home/oracle/app/oracle/product/11.2.0/db_1 -p
[root@rac1 ~]# chown -R oracle:oinstall /home/oracle/
[root@rac1 ~]#
9.修改用户对文件打开的限制(两个节点一至)
[root@rac1 ~]# vim /etc/security/limits.conf
grid soft nofile 1024
grid hard nofile 65536
grid soft nproc 2047
grid hard nproc 16384
oracle soft nofile 1024
oracle hard nofile 65536
oracle soft nproc 2047
oracle hard nproc 16384
[root@rac1 ~]#
10.登陆oracle用户添加环境变量和ssh互相信任
rac1节点:
[root@rac1 ~]# su - oracle
[oracle@rac1 ~]$ vim .bash_profile
export ORACLE_BASE=/home/oracle/app
export ORACLE_HOME=/home/oracle/app/oracle/product/11.2.0/db_1
export ORACLE_SID=racdb01 --rac2节点就是racdb02
[oracle@rac1 ~]$ ssh-keygen -t rsa
Generating public/private rsa key pair.
Enter file in which to save the key (/home/oracle/.ssh/id_rsa):
Created directory '/home/oracle/.ssh'.
Enter passphrase (empty for no passphrase):
Enter same passphrase again:
Your identification has been saved in /home/oracle/.ssh/id_rsa.
Your public key has been saved in /home/oracle/.ssh/id_rsa.pub.
The key fingerprint is:
f4:4a:af:8d:36:26:ce:5e:b9:75:75:08:09:56:a3:77 oracle@rac1
[oracle@rac1 ~]$ cd .ssh/
[oracle@rac1 .ssh]$ cat id_rsa.pub > authorized_keys
[oracle@rac1 .ssh]$ scp authorized_keys oracle@10.0.0.2:/home/oracle/
The authenticity of host '10.0.0.2 (10.0.0.2)' can't be established.
RSA key fingerprint is b7:fa:04:54:02:f7:84:c3:c1:75:9b:35:8c:de:17:82.
Are you sure you want to continue connecting (yes/no)? yes
Warning: Permanently added '10.0.0.2' (RSA) to the list of known hosts.
oracle@10.0.0.2's password:
authorized_keys 100% 393 0.4KB/s 00:00
[oracle@rac1 .ssh]$
rac2节点:
[root@rac2 ~]# su - oracle
[oracle@rac2 ~]$ vim .bash_profile
export ORACLE_BASE=/home/oracle/app
export ORACLE_HOME=/home/oracle/app/oracle/product/11.2.0/db_1
export ORACLE_SID=racdb02
[oracle@rac2 ~]$ ssh-keygen -t rsa
Generating public/private rsa key pair.
Enter file in which to save the key (/home/oracle/.ssh/id_rsa):
Created directory '/home/oracle/.ssh'.
Enter passphrase (empty for no passphrase):
Enter same passphrase again:
Your identification has been saved in /home/oracle/.ssh/id_rsa.
Your public key has been saved in /home/oracle/.ssh/id_rsa.pub.
The key fingerprint is:
83:5c:10:bf:a5:19:c3:56:07:da:48:52:86:39:d0:e7 oracle@rac2
[oracle@rac2 ~]$ mv authorized_keys .ssh/
[oracle@rac2 ~]$ cd .ssh/
[oracle@rac2 .ssh]$ cat id_rsa.pub >> authorized_keys
[oracle@rac2 .ssh]$ chmod 600 authorized_keys
[oracle@rac2 .ssh]$ ll
total 12
-rw------- 1 oracle oinstall 786 Sep 14 10:26 authorized_keys
-rw------- 1 oracle oinstall 1679 Sep 14 10:26 id_rsa
-rw-r--r-- 1 oracle oinstall 393 Sep 14 10:26 id_rsa.pub
[oracle@rac2 .ssh]$
rac1节点:
[oracle@rac1 .ssh]$ scp oracle@10.0.0.2:/home/oracle/.ssh/authorized_keys .
authorized_keys 100% 786 0.8KB/s 00:00
[oracle@rac1 .ssh]$ chmod 600 authorized_keys
[oracle@rac1 .ssh]$ ll
total 16
-rw------- 1 oracle oinstall 786 Sep 14 10:27 authorized_keys
-rw------- 1 oracle oinstall 1675 Sep 14 10:23 id_rsa
-rw-r--r-- 1 oracle oinstall 393 Sep 14 10:23 id_rsa.pub
-rw-r--r-- 1 oracle oinstall 390 Sep 14 10:24 known_hosts
[oracle@rac1 .ssh]$ ssh rac2-priv date --这时要检查(rac1,rac2,rac1-priv,rac2-priv全部通过,否则安装时会报错,在rac2节点上也要一个一个检查)
The authenticity of host 'rac2-priv (10.0.0.2)' can't be established.
RSA key fingerprint is b7:fa:04:54:02:f7:84:c3:c1:75:9b:35:8c:de:17:82.
Are you sure you want to continue connecting (yes/no)? yes
Warning: Permanently added 'rac2-priv' (RSA) to the list of known hosts.
Wed Sep 14 10:31:16 CST 2016
[oracle@rac1 .ssh]$ ssh rac2-priv date
Wed Sep 14 10:31:17 CST 2016
[oracle@rac1 .ssh]$
11.登陆grid用户添加环境变量,ssh互相信任
rac1节点:
[root@rac1 ~]# su - grid
[grid@rac1 ~]$ vim .bash_profile
export ORACLE_BASE=/home/grid/app
export ORACLE_HOME=/home/grid/11.2.0/grid
export ORACLE_SID=+ASM1
[grid@rac1 ~]$ ssh-keygen -t rsa
Generating public/private rsa key pair.
Enter file in which to save the key (/home/grid/.ssh/id_rsa):
Created directory '/home/grid/.ssh'.
Enter passphrase (empty for no passphrase):
Enter same passphrase again:
Your identification has been saved in /home/grid/.ssh/id_rsa.
Your public key has been saved in /home/grid/.ssh/id_rsa.pub.
The key fingerprint is:
f8:89:6c:fc:59:84:92:d8:88:a1:82:c3:ca:1c:a7:35 grid@rac1
[grid@rac1 ~]$ cd .ssh/
[grid@rac1 .ssh]$ cat id_rsa.pub > authorized_keys
[grid@rac1 .ssh]$ scp authorized_keys grid@10.0.0.2:/home/grid/
authorized_keys 100% 391 0.4KB/s 00:00
[grid@rac1 .ssh]$
rac2节点:
[root@rac2 ~]# su - grid
[grid@rac2 ~]$ vim .bash_profile
export ORACLE_BASE=/home/grid
export ORACLE_HOME=/home/grid/11.2.0/grid
export ORACLE_SID=+ASM2
[grid@rac2 ~]$ ssh-keygen -t rsa
Generating public/private rsa key pair.
Enter file in which to save the key (/home/grid/.ssh/id_rsa):
Created directory '/home/grid/.ssh'.
Enter passphrase (empty for no passphrase):
Enter same passphrase again:
Your identification has been saved in /home/grid/.ssh/id_rsa.
Your public key has been saved in /home/grid/.ssh/id_rsa.pub.
The key fingerprint is:
04:f4:a0:05:13:bd:3c:fc:39:d1:04:40:a1:b1:a6:b4 grid@rac2
[grid@rac2 ~]$ mv authorized_keys .ssh/
[grid@rac2 ~]$ cd .ssh/
[grid@rac2 .ssh]$ cat id_rsa.pub >> authorized_keys
[grid@rac2 .ssh]$ chmod 600 authorized_keys
[grid@rac2 .ssh]$ ll
total 12
-rw------- 1 grid oinstall 782 Sep 14 10:40 authorized_keys
-rw------- 1 grid oinstall 1675 Sep 14 10:40 id_rsa
-rw-r--r-- 1 grid oinstall 391 Sep 14 10:40 id_rsa.pub
[grid@rac2 .ssh]$
rac1节点:
[grid@rac1 .ssh]$ scp grid@10.0.0.2:/home/grid/.ssh/authorized_keys .
authorized_keys 100% 782 0.8KB/s 00:00
[grid@rac1 .ssh]$ chmod 600 authorized_keys
[grid@rac1 .ssh]$ ll
total 20
-r--r----- 1 grid oinstall 391 Sep 14 10:38 authorized_keys
-rw------- 1 grid oinstall 1675 Sep 14 10:38 id_rsa
-rw-r--r-- 1 grid oinstall 391 Sep 14 10:38 id_rsa.pub
-rw-r--r-- 1 grid oinstall 390 Sep 14 10:38 known_hosts
[grid@rac1 .ssh]$ ssh rac1 date --检查ssh是否生效(rac1,rac2,rac1-priv,rac2-priv都要测试通过,否则安装时会报错,rac2节点也要测试)
The authenticity of host 'rac1 (127.0.0.1)' can't be established.
RSA key fingerprint is b4:90:ba:90:1e:0e:9e:ce:5a:23:70:17:76:e0:6a:9d.
Are you sure you want to continue connecting (yes/no)? yes
Warning: Permanently added 'rac1' (RSA) to the list of known hosts.
Wed Sep 14 10:43:14 CST 2016
[grid@rac1 .ssh]$ ssh rac1 date
Wed Sep 14 10:43:15 CST 2016
[grid@rac1 .ssh]$
12.修改用户登陆模块,停止ntpd服务(两个节点一样)
[root@rac1 ~]# vim /etc/pam.d/login
session required /lib64/security/pam_limits.so
session required pam_limits.so
[root@rac1 ~]# mv /etc/ntp.conf /etc/ntp.conf.back
[root@rac1 ~]# /etc/init.d/ntpd stop
Shutting down ntpd: [FAILED]
[root@rac1 ~]#
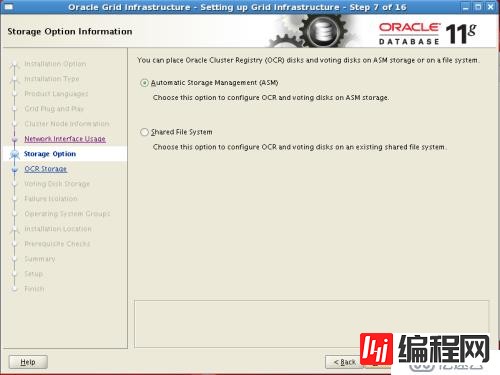
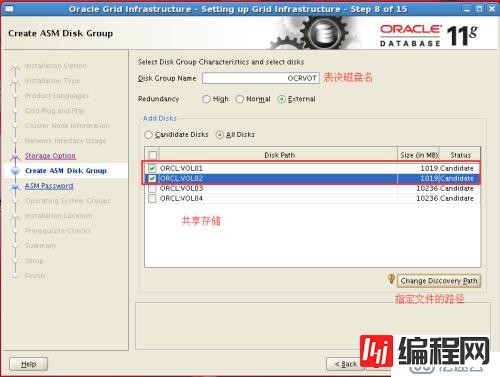
13.关闭rac1节点,添加本地磁盘,使用iscsi共享存储
ocr盘:1G /dev/sdb
voting disk盘:1G /dev/sdc
flask recovery盘:10G /dev/sdd
DATA disk盘:10G /dev/sde
rac1节点:(添加磁盘的节点)
(1).在rac1节点添加磁盘

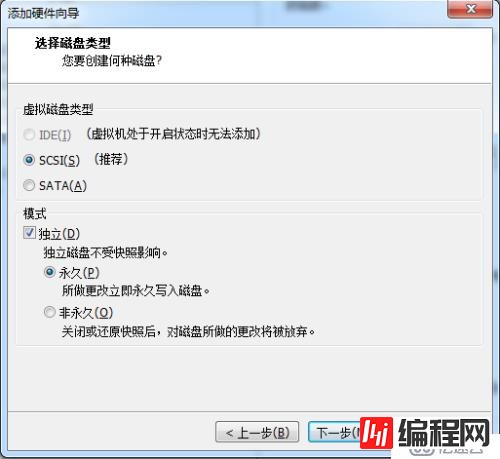


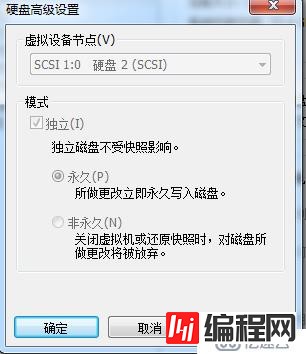
(2).在rac1和rac2的配置文件添加参数
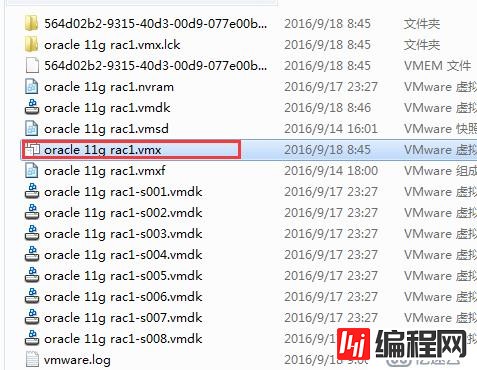
disk.locking="FALSE"
scsi1.SharedBus="Virtual"
scsi1.shared="TRUE"
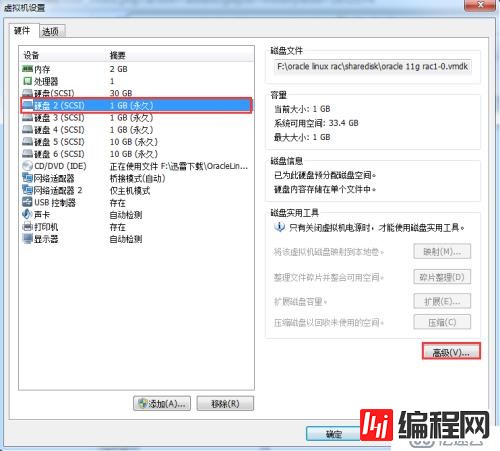
(3).在rac2添加已有的磁盘,在rac1创建的磁盘
14.安装oracleasm软件包,创建自动存储(两个节点必须全部安装)
[root@rac1 ~]# yum install oracleasm*
[root@rac1 ~]# rpm -ivh oracleasmlib-2.0.4-1.el5.x86_64.rpm
[root@rac1 ~]# /etc/init.d/oracleasm configure -i
Configuring the Oracle ASM library driver.
This will configure the on-boot properties of the Oracle ASM library
driver. The following questions will determine whether the driver is
loaded on boot and what permissions it will have. The current values
will be shown in brackets ('[]'). Hitting <ENTER> without typing an
answer will keep that current value. Ctrl-C will abort.
Default user to own the driver interface []: grid
Default group to own the driver interface []: asmadmin
Start Oracle ASM library driver on boot (y/n) [n]: y
Scan for Oracle ASM disks on boot (y/n) [y]: y
Writing Oracle ASM library driver configuration: done
Initializing the Oracle ASMLib driver: [ OK ]
Scanning the system for Oracle ASMLib disks: [ OK ]
[root@rac1 ~]# /usr/sbin/oracleasm init
[root@rac1 ~]# /usr/sbin/oracleasm status
Checking if ASM is loaded: yes
Checking if /dev/oracleasm is mounted: yes
[root@rac1 ~]# /usr/sbin/oracleasm configure
ORACLEASM_ENABLED=true
ORACLEASM_UID=grid
ORACLEASM_GID=asmadmin
ORACLEASM_SCANBOOT=true
ORACLEASM_SCANORDER=""
ORACLEASM_SCANEXCLUDE=""
[root@rac1 ~]# oracleasm createdisk VOL01 /dev/sdb1
Writing disk header: done
Instantiating disk: done
[root@rac1 ~]# oracleasm createdisk VOL02 /dev/sdc1
Writing disk header: done
Instantiating disk: done
[root@rac1 ~]# oracleasm createdisk VOL03 /dev/sdd1
Writing disk header: done
Instantiating disk: done
[root@rac1 ~]# oracleasm createdisk VOL04 /dev/sde1
Writing disk header: done
Instantiating disk: done
[root@rac1 ~]# oracleasm listdisks
VOL01
VOL02
VOL03
VOL04
[root@rac1 ~]# oracleasm querydisk /dev/sd*
Device "/dev/sda" is not marked as an ASM disk
Device "/dev/sda1" is not marked as an ASM disk
Device "/dev/sda2" is not marked as an ASM disk
Device "/dev/sda3" is not marked as an ASM disk
Device "/dev/sdb" is not marked as an ASM disk
Device "/dev/sdb1" is marked an ASM disk with the label "VOL01"
Device "/dev/sdc" is not marked as an ASM disk
Device "/dev/sdc1" is marked an ASM disk with the label "VOL02"
Device "/dev/sdd" is not marked as an ASM disk
Device "/dev/sdd1" is marked an ASM disk with the label "VOL03"
Device "/dev/sde" is not marked as an ASM disk
Device "/dev/sde1" is marked an ASM disk with the label "VOL04"
[root@rac1 ~]#
rac2节点:
在rac2节点只需要扫描磁盘就行了,不需要全新安装和创建
[root@rac2 ~]# /usr/sbin/oracleasm scandisks
Reloading disk partitions: done
Cleaning any stale ASM disks...
Scanning system for ASM disks...
Instantiating disk "VOL04"
Instantiating disk "VOL03"
Instantiating disk "VOL01"
Instantiating disk "VOL02"
[root@rac2 ~]# /usr/sbin/oracleasm listdisks
VOL01
VOL02
VOL03
VOL04
[root@rac2 ~]#
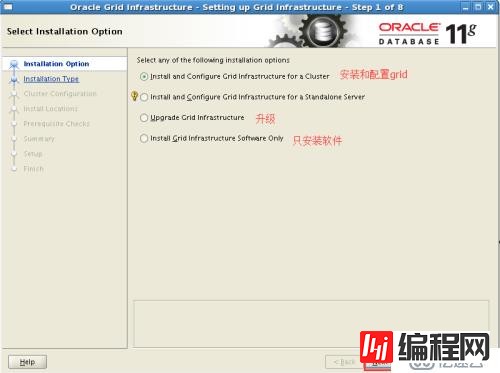
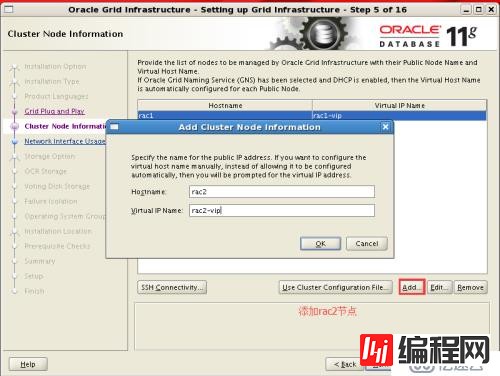
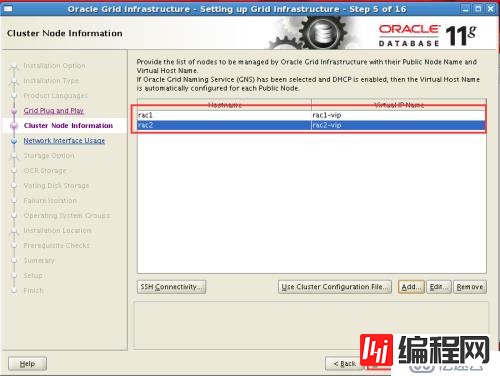
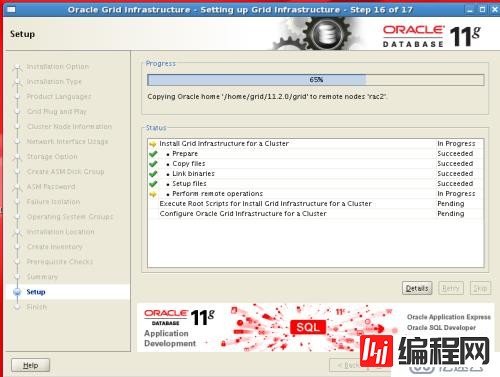
15.grid集群软件安装(安装之前检查下条件)
[grid@rac1 grid]# ./runcluvfy.sh stage -pre crsinst -n rac1,rac2 -fixup -verbose
####检查结果必须是:Pre-check for cluster services setup was successful .否则安装不成功


下面图有点问题:Cluster Name:应该是scan-cluster,SCAN Name:应该是scan-cluster.localdomain

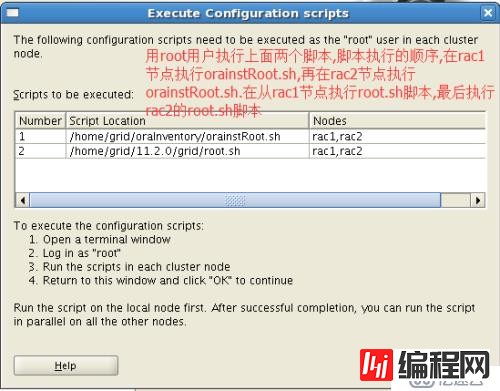
脚本执行顺序:
先在rac1节点执行orainstRoot.sh脚本

然后在rac2节点执行orainstRoot.sh脚本

最后在rac1节点执行root.sh脚本
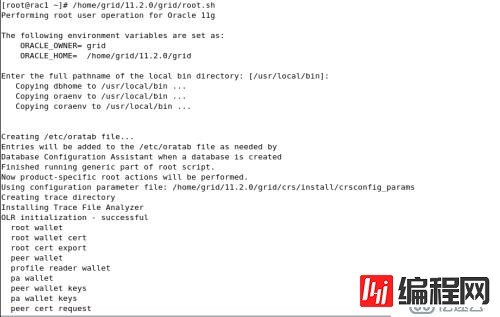
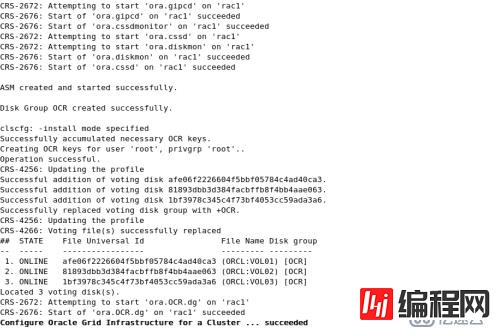
最后在rac2节点执行root.sh脚本

完成

--结束END--
本文标题: oracle linux 5.8安装oracle 11g rac环境之grid安装
本文链接: https://www.lsjlt.com/news/37453.html(转载时请注明来源链接)
有问题或投稿请发送至: 邮箱/279061341@qq.com QQ/279061341
下载Word文档到电脑,方便收藏和打印~
2024-03-01
2024-03-01
2024-03-01
2024-03-01
2024-03-01
2024-02-29
2024-02-29
2024-02-29
2024-02-29
2024-02-29
回答
回答
回答
回答
回答
回答
回答
回答
回答
回答


官方手机版

微信公众号

商务合作


0