Python 官方文档:入门教程 => 点击学习
文章目录 YOLOV5 + 双目相机实现三维测距1. 项目流程2. 测距原理3. 代码部分解析4. 实验结果 YOLOV5 + 双目相机实现三维测距 1. zed + yolov7
1. zed + yolov7 实现双目测距
2. zed+yolov4实现双目测距(直接调用,免标定)
3. zed+yolov5实现双目测距(直接调用,免标定)
4. 本文具体实现效果已在哔哩哔哩发布,点击跳转(欢迎投币点赞)
5. 如果有用zed相机的,可以参考我上边的两边文章👆👆👆直接调用内部相机参数,精度比双目测距好很多
下载链接1: https://download.csdn.net/download/qq_45077760/87233955 (CSDN)
下载链接2:https://github.com/up-up-up-up/yolov5_ceju (github)
注:我所做的是在10m以内的检测,没计算过具体误差,当然标定误差越小精度会好一点,其次注意光线、亮度等影响因素,当然检测范围效果跟相机的好坏也有很大关系
在三维测距基础上做了三维跟踪,详见 YOLOv5+双目实现三维跟踪(python) 和 YOLOv7+双目实现三维跟踪(python)
大致流程: 双目标定→双目校正→立体匹配→结合yolov5→深度测距
如果想了解双目测距原理,请移步该文章 双目三维测距(python)
双目相机参数stereoconfig.py
双目相机标定误差越小越好,我这里误差为0.1,尽量使误差在0.2以下
import numpy as np# 双目相机参数class stereoCamera(object): def __init__(self): self.cam_matrix_left = np.array([[1101.89299, 0, 1119.89634], [0, 1100.75252, 636.75282], [0, 0, 1]]) self.cam_matrix_right = np.array([[1091.11026, 0, 1117.16592], [0, 1090.53772, 633.28256], [0, 0, 1]]) self.distortion_l = np.array([[-0.08369, 0.05367, -0.00138, -0.0009, 0]]) self.distortion_r = np.array([[-0.09585, 0.07391, -0.00065, -0.00083, 0]]) self.R = np.array([[1.0000, -0.000603116945856524, 0.00377055351856816], [0.000608108737333211, 1.0000, -0.00132288199083992], [-0.00376975166958581, 0.00132516525298933, 1.0000]]) self.T = np.array([[-119.99423], [-0.22807], [0.18540]]) self.baseline = 119.99423 以下我stereo.py里的对图像进行处理的代码
这些都是网上现成的,直接套用就可以
class stereo_dd: def __init__(self,imgl,imgr): self.left = imgl self.right = imgr # 预处理 def preprocess(self, img1, img2): # 彩色图->灰度图 if(img1.ndim == 3):#判断为三维数组 img1 = cv2.cvtColor(img1, cv2.COLOR_BGR2GRAY) # 通过OpenCV加载的图像通道顺序是BGR if(img2.ndim == 3): img2 = cv2.cvtColor(img2, cv2.COLOR_BGR2GRAY) # 直方图均衡 img1 = cv2.equalizeHist(img1) img2 = cv2.equalizeHist(img2) return img1, img2 ''' # 消除畸变 def undistortion(self, image, camera_matrix, dist_coeff): undistortion_image = cv2.undistort(image, camera_matrix, dist_coeff) return undistortion_image ''' # 消除畸变 def undistortion(self, imagleft,imagright, camera_matrix_left, camera_matrix_right, dist_coeff_left,dist_coeff_right): undistortion_imagleft = cv2.undistort(imagleft, camera_matrix_left, dist_coeff_left ) undistortion_imagright = cv2.undistort(imagright, camera_matrix_right, dist_coeff_right) return undistortion_imagleft, undistortion_imagright # 畸变校正和立体校正 def rectifyImage(self, image1, image2, map1x, map1y, map2x, map2y): rectifyed_img1 = cv2.remap(image1, map1x, map1y, cv2.INTER_AREA) rectifyed_img2 = cv2.remap(image2, map2x, map2y, cv2.INTER_AREA) return rectifyed_img1, rectifyed_img2 # 立体校正检验----画线 def draw_line(self, image1, image2): # 建立输出图像 height = max(image1.shape[0], image2.shape[0]) width = image1.shape[1] + image2.shape[1] output = np.zeros((height, width, 3), dtype=np.uint8) output[0:image1.shape[0], 0:image1.shape[1]] = image1 output[0:image2.shape[0], image1.shape[1]:] = image2 # 绘制等间距平行线 line_interval = 50 # 直线间隔:50 for k in range(height // line_interval): cv2.line(output, (0, line_interval * (k + 1)), (2 * width, line_interval * (k + 1)), (0, 255, 0), thickness=2, lineType=cv2.LINE_AA) return output # 视差计算 def stereoMatchSGBM(self, left_image, right_image, down_scale=False): # SGBM匹配参数设置 if left_image.ndim == 2: img_channels = 1 else: img_channels = 3 blockSize = 3 paraml = {'minDisparity': 0, 'numDisparities': 128, 'blockSize': blockSize, 'P1': 8 * img_channels * blockSize ** 2, 'P2': 32 * img_channels * blockSize ** 2, 'disp12MaxDiff': -1, 'preFilterCap': 63, 'uniquenessRatio': 10, 'specklewindowsize': 100, 'speckleRange': 1, 'mode': cv2.STEREO_SGBM_MODE_SGBM_3WAY } # 构建SGBM对象 left_matcher = cv2.StereoSGBM_create(**paraml) paramr = paraml paramr['minDisparity'] = -paraml['numDisparities'] right_matcher = cv2.StereoSGBM_create(**paramr) # 计算视差图 size = (left_image.shape[1], left_image.shape[0]) if down_scale == False: disparity_left = left_matcher.compute(left_image, right_image) disparity_right = right_matcher.compute(right_image, left_image) else: left_image_down = cv2.pyrDown(left_image) right_image_down = cv2.pyrDown(right_image) factor = left_image.shape[1] / left_image_down.shape[1] disparity_left_half = left_matcher.compute(left_image_down, right_image_down) disparity_right_half = right_matcher.compute(right_image_down, left_image_down) disparity_left = cv2.resize(disparity_left_half, size, interpolation=cv2.INTER_AREA) disparity_right = cv2.resize(disparity_right_half, size, interpolation=cv2.INTER_AREA) disparity_left = factor * disparity_left disparity_right = factor * disparity_right trueDisp_left = disparity_left.astype(np.float32) / 16. trueDisp_right = disparity_right.astype(np.float32) / 16. return trueDisp_left, trueDisp_right测距代码部分解析
这一部分我直接计算了目标检测框中心点的深度值,把中心点的深度值当作了距离
你也可以写个循环,计算平均值或者中位数,把他们当作深度值
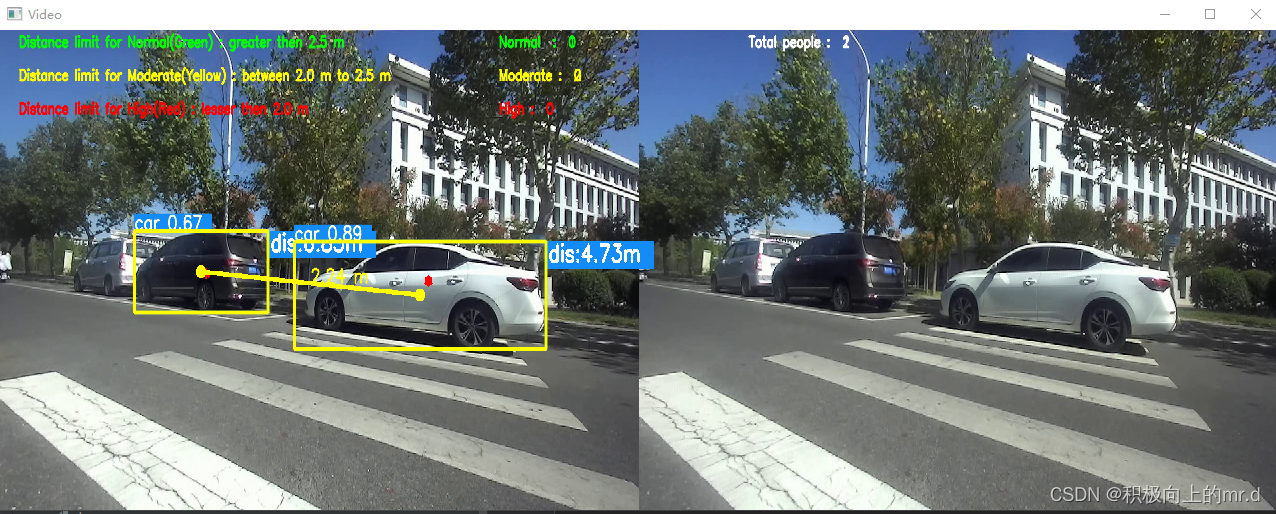
if (accel_frame % fps_set == 0): t3 = time.time() thread.join() points_3D = thread.get_result() t4 = time.time() a = points_3d[int(y_0), int(x_0), 0] / 1000 b = points_3d[int(y_0), int(x_0), 1] / 1000 c = points_3d[int(y_0), int(x_0), 2] / 1000 dis = ((a**2+b**2+c**2)**0.5)这里我加入了检测人与车之间的三维距离,分为了正常、中等、高风险三个距离等级
你也可以替换成人与人或者车与车等等
########## plot_one_box 系列 ###########if (distance != 0): ## Add bbox to image label = f'{names[int(cls)]} {conf:.2f} ' '''下边这几行如果不需要,可以改成 plot_one_box(xyxy, im0, label=label, color=colors[int(cls)], line_thickness=3) 我是做了分类,是为了计算人与汽车之间的距离写的''' if label is not None: if (label.split())[0] == 'person': people_coords.append(xyxy) if (label.split())[0] == 'car' or (label.split())[0] =='truck': car_coords.append(xyxy) #plot_dots_on_car(xyxy, im0) plot_one_box(xyxy, im0, label=label, color=colors[int(cls)],line_thickness=3)########## annotator.box_label 系列 ###########if names[int(cls)] == "person": people_coords.append(xyxy) c = int(cls) # integer class 整数类 1111111111 label = None if hide_labels else ( names[c] if hide_conf else f'{names[c]} {conf:.2f}') # 111 print("x:", point_cloud_value[0], "y:", point_cloud_value[1], "z:", point_cloud_value[2], "dis:", distance, '', label) # print("dis:", distance, "W:", wide) txt = '{0} dis:{1} '.fORMat(label, distance) # annotator.box_label(xyxy, txt, color=(255, 0, 255)) annotator.box_label(xyxy, txt, color=colors(c, True)) if names[int(cls)] == "chair": car_coords.append(xyxy) c = int(cls) # integer class 整数类 1111111111 label = None if hide_labels else (names[c] if hide_conf else f'{names[c]} {conf:.2f}') # 111 print("x:", point_cloud_value[0], "y:", point_cloud_value[1], "z:", point_cloud_value[2], "dis:", distance, '',label) #print("dis:", distance, "W:", wide) txt = '{0} dis:{1} '.format(label,distance) #annotator.box_label(xyxy, txt, color=(255, 0, 255)) annotator.box_label(xyxy, txt, color = colors(c, True))normal, intermediate, high = distancing(people_coords,car_coords, im0, intermediate, high,normal,dist_thres_lim=(2, 3))主代码
加入了多线程处理,加快处理速度
import argparseimport timefrom pathlib import Pathimport threadingfrom threading import Threadimport cv2import torchimport torch.backends.cudnn as cudnnfrom numpy import randomimport numpy as npfrom utils.datasets import * ##1111111111#from utils.utils import * # 111111111111from PIL import Image, ImageDraw, ImageFontfrom models.experimental import attempt_loadfrom utils.datasets import LoadStreams, LoadImagesfrom utils.general import check_img_size, check_requirements, check_imshow, non_max_suppression, apply_classifier, \ scale_coords, xyxy2xywh, strip_optimizer, set_logging, increment_pathfrom utils.plots import plot_one_boxfrom utils.torch_utils import select_device, load_classifier, time_synchronizedfrom stereo.dianyuntu_yolo import preprocess, undistortion, getRectifyTransform, draw_line, rectifyImage, \ stereoMatchSGBM # , hw3ToN3, view_cloud ,DepthColor2Cloudfrom stereo import stereoconfigfrom stereo.stereo import stereo_ddfrom stereo.stereo import get_median, stereo_threading, MyThreadintermediate = 0high = 0normal = 0people_label = " "normal_label = " "inter_label = " "high_label = " "def detect(save_img=False): accel_frame = 0 source, weights, view_img, save_txt, imgsz = opt.source, opt.weights, opt.view_img, opt.save_txt, opt.img_size WEBcam = source.isnumeric() or source.endswith('.txt') or source.lower().startswith( ('rtsp://', 'rtmp://', 'Http://')) # Initialize set_logging() device = select_device(opt.device) half = device.type != 'cpu' # Load model model = attempt_load(weights, map_location=device) stride = int(model.stride.max()) imgsz = check_img_size(imgsz,s=stride) if half: model.half() # Second-stage classifier classify = False if classify: modelc = load_classifier(name='resnet101', n=2) modelc.load_state_dict(torch.load('weights/resnet101.pt', map_location=device)['model']).to(device).eval() # Set Dataloader vid_path, vid_writer = None, None if webcam: save_stream_dir = Path( increment_path(Path("./runs/streams") / opt.name, exist_ok=opt.exist_ok)) (save_stream_dir / 'labels' if save_txt else save_stream_dir).mkdir(parents=True, exist_ok=True) flag = 0 view_img = check_imshow() cudnn.benchmark = True dataset = LoadStreams(source, img_size=imgsz, stride=stride) # 获取视频信息,线程抓取图片dataset类中imgs[0]是0个摄像头的图片,LoadStreams是迭代类---》dataset是一个迭代器 else: # Directories save_dir = Path(increment_path(Path(opt.project) / opt.name, exist_ok=opt.exist_ok)) (save_dir / 'labels' if save_txt else save_dir).mkdir(parents=True, exist_ok=True) save_img = True dataset = LoadImages(source, img_size=imgsz, stride=stride) print("img_size:") print(imgsz) names = model.module.names if hasattr(model, 'module') else model.names colors = [[random.randint(0, 255) for _ in range(3)] for _ in names] ################################ stereo ############################# if device.type != 'cpu': model(torch.zeros(1, 3, imgsz, imgsz).to(device).type_as(next(model.parameters()))) # run once t0 = time.time() # 整个推理过程的开始计时 config = stereoconfig_040_2.stereoCamera() # 立体校正 map1x, map1y, map2x, map2y, Q = getRectifyTransform(720, 1280, config) # -----------------摄像头从此处开始反复循环-dataset为迭代器类-------------------------------- for path, img, im0s, vid_cap in dataset: img = torch.from_numpy(img).to(device) img = img.half() if half else img.float() img /= 255.0 if img.ndimension() == 3: img = img.unsqueeze(0) t1 = time_synchronized() pred = model(img, augment=opt.augment)[0] pred = non_max_suppression(pred, opt.conf_thres, opt.iou_thres, classes=opt.classes, agnostic=opt.agnostic_nms) t2 = time_synchronized() # Apply Classifier if classify: pred = apply_classifier(pred, modelc, img, im0s) # List to store bounding coordinates of people 1111111 people_coords = [] # 1111111111 car_coords = [] # Process detections for i, det in enumerate(pred): if webcam: p, s, im0, frame = path[i], '%g: ' % i, im0s[ i].copy(), dataset.count else: p, s, im0, frame = path, '', im0s, getattr(dataset, 'frame', 0) fps_set = 10 # setting the frame if (accel_frame % fps_set == 0): thread = MyThread(stereo_threading,args=(config, im0, map1x, map1y, map2x, map2y, Q)) thread.start() print(threading.active_count()) print(threading.enumerate()) print("############## Frame is %d !##################" % accel_frame) p = Path(p) if webcam: save_stream_path = str(save_stream_dir / "stream0.mp4") else: save_path = str(save_dir / p.name) txt_path = str(save_dir / 'labels' / p.stem) + ( '' if dataset.mode == 'image' else f'_{frame}') s += '%gx%g ' % img.shape[2:] gn = torch.tensor(im0.shape)[[1, 0, 1, 0]] if len(det): det[:, :4] = scale_coords(img.shape[2:], det[:, :4], im0.shape).round() for c in det[:, -1].unique(): n = (det[:, -1] == c).sum() s += f"{n} {names[int(c)]} {'s' * (n > 1)} , " for *xyxy, conf, cls in reversed(det): if (0 < xyxy[2] < 1280): if save_txt:xywh = (xyxy2xywh(torch.tensor(xyxy).view(1, 4)) / gn).view(-1).tolist()print("xywh x : %d, y : %d" % (xywh[0], xywh[1]))line = (cls, *xywh, conf) if opt.save_conf else (cls, *xywh)with open(txt_path + '.txt', 'a') as f: f.write(('%g ' * len(line)).rstrip() % line + '\n') if save_img or view_img:x_center = (xyxy[0] + xyxy[2]) / 2y_center = (xyxy[1] + xyxy[3]) / 2x_0 = int(x_center)y_0 = int(y_center)if (0 < x_0 < 1280): x1 = xyxy[0] x2 = xyxy[2] y1 = xyxy[1] y2 = xyxy[3] if (accel_frame % fps_set == 0): t3 = time.time() thread.join() points_3d = thread.get_result() t4 = time.time() print(f'{s}Stereo Done. ({t4 - t3:.3f}s)') a = points_3d[int(y_0), int(x_0), 0] / 1000 b = points_3d[int(y_0), int(x_0), 1] / 1000 c = points_3d[int(y_0), int(x_0), 2] / 1000 dis = ((a**2+b**2+c**2)**0.5) distance = [] distance.append(dis) if (distance != 0): ## Add bbox to image label = f'{names[int(cls)]} {conf:.2f} ' '''下边这几行如果不需要,可以改成 plot_one_box(xyxy, im0, label=label, color=colors[int(cls)], line_thickness=3) 我是做了分类,是为了计算人与汽车之间的距离写的''' if label is not None: if (label.split())[0] == 'person': people_coords.append(xyxy) if (label.split())[0] == 'car' or (label.split())[0] =='truck': car_coords.append(xyxy) #plot_dots_on_car(xyxy, im0) plot_one_box(xyxy, im0, label=label, color=colors[int(cls)],line_thickness=3) text_xy_0 = "*" cv2.putText(im0, text_xy_0, (int(x_0), int(y_0)), cv2.FONT_ITALIC, 1.2,(0, 0, 255), 3) print() print('点 (%d, %d) 的 %s 距离左摄像头的相对距离为 %0.2f m' % (x_center, y_center, label, distance)) text_dis_avg = "dis:%0.2fm" % distance # only put dis on frame cv2.rectangle(im0, (int(x1 + (x2 - x1)), int(y1)),(int(x1 + (x2 - x1) + 5 + 210), int(y1 + 40)), colors[int(cls)],-1) # 画框存三维坐标 cv2.putText(im0, text_dis_avg, (int(x1 + (x2 - x1) + 5), int(y1 + 30)),cv2.FONT_ITALIC, 1.2, (255, 255, 255), 3) '''同理,下边这一行如果不需要可以去除,我也是做行人与车辆之间距离用的''' normal, intermediate, high = distancing(people_coords,car_coords, im0, intermediate, high,normal,dist_thres_lim=(2, 3)) t5 = time_synchronized() # stereo time end print(f'{s}yolov5 Done. ({t2 - t1:.3f}s)') if (accel_frame % fps_set == 0): print(f'{s}yolov5+stereo Done. ({t5 - t1:.3f}s)') if cv2.waiTKEy(1) & 0xFF == ord('q'): if save_txt or save_img: s = f"\n{len(list(save_dir.glob('labels/*.txt')))} labels saved to {save_dir / 'labels'}" if save_txt else '' if view_img: s = save_stream_path print(f"Results saved to {s}") print(f'All Done. ({time.time() - t0:.3f}s)') vid_writer.release() exit() # Stream results if view_img: if (dataset.mode == 'stream') & (flag == 0): if isinstance(vid_writer, cv2.VideoWriter): vid_writer.release() # release previous video writer fourcc = 'mp4v' # output video codec fps = 24 # vid_cap.get(cv2.CAP_PROP_FPS) w = 2560 # int(vid_cap.get(cv2.CAP_PROP_FRAME_WIDTH)) h = 720 # int(vid_cap.get(cv2.CAP_PROP_FRAME_HEIGHT)) print("save_stream_dir is %s" % save_stream_dir) print("save_stream_path is %s" % save_stream_path) vid_writer = cv2.VideoWriter(save_stream_path, cv2.VideoWriter_fourcc(*fourcc), fps, (w, h)) flag = 1 vid_writer.write(im0) cv2.namedWindow("Webcam", cv2.WINDOW_NORMAL) cv2.resizeWindow("Webcam", 1280, 480) cv2.moveWindow("Webcam", 0, 100) cv2.imshow("Webcam", im0) cv2.waitKey(1) # Save results if save_img: if dataset.mode == 'image': cv2.imwrite(save_path, im0) else: if vid_path != save_path: vid_path = save_path if isinstance(vid_writer, cv2.VideoWriter):vid_writer.release() fourcc = 'mp4v' fps = 24 w = int(vid_cap.get(cv2.CAP_PROP_FRAME_WIDTH)) h = int(vid_cap.get(cv2.CAP_PROP_FRAME_HEIGHT)) vid_writer = cv2.VideoWriter(save_path, cv2.VideoWriter_fourcc(*fourcc), fps, (w, h)) vid_writer.write(im0) cv2.namedWindow("Video", cv2.WINDOW_NORMAL) cv2.resizeWindow("Video", 1280, 480) cv2.moveWindow("Video", 0, 0) cv2.imshow("Video", im0) cv2.waitKey(1) print("frame %d is done!" % accel_frame) accel_frame += 1 if save_txt or save_img: s = f"\n{len(list(save_dir.glob('labels/*.txt')))} labels saved to {save_dir / 'labels'}" if save_txt else '' print(f"Results saved to {save_dir}{s}") print(f'All Done. ({time.time() - t0:.3f}s)')if __name__ == '__main__': parser = argparse.ArgumentParser() parser.add_argument('--weights', nargs='+', type=str, default='./yolov5s.pt', help='model.pt path(s)') parser.add_argument('--source', type=str, default='./data/video/test.mp4',help='source') parser.add_argument('--img-size', type=int, default=640, help='inference size (pixels)') parser.add_argument('--conf-thres', type=float, default=0.25, help='object confidence threshold') parser.add_argument('--iou-thres', type=float, default=0.45, help='IOU threshold for NMS') parser.add_argument('--device', default='', help='cuda device, i.e. 0 or 0,1,2,3 or cpu') parser.add_argument('--view-img', action='store_true', help='display results') parser.add_argument('--save-txt', action='store_true', help='save results to *.txt') parser.add_argument('--save-conf', action='store_true', help='save confidences in --save-txt labels') parser.add_argument('--classes', nargs='+', type=int, help='filter by class: --class 0, or --class 0 2 3') parser.add_argument('--agnostic-nms', action='store_true', help='class-agnostic NMS') parser.add_argument('--augment', action='store_true', help='augmented inference') parser.add_argument('--update', action='store_true', help='update all models') parser.add_argument('--project', default='runs/detect', help='save results to project/name') parser.add_argument('--name', default='exp', help='save results to project/name') parser.add_argument('--exist-ok', action='store_true', help='existing project/name ok, do not increment') opt = parser.parse_args() print(opt) check_requirements() with torch.no_grad(): if opt.update: for opt.weights in ['yolov5s.pt', 'yolov5m.pt', 'yolov5l.pt', 'yolov5x.pt']: detect() strip_optimizer(opt.weights) else: detect()有点乱,后续会慢慢完善,下边是测距后的图,精度不是很高
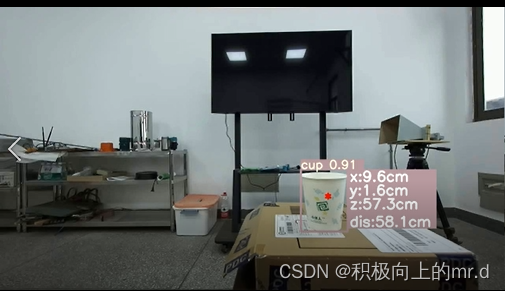
单目标测距
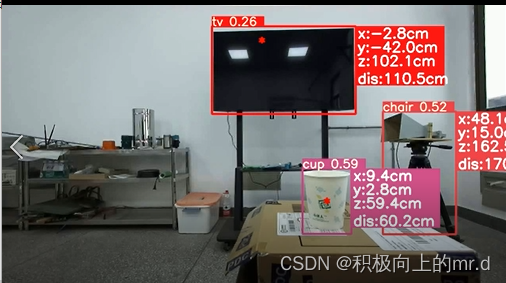
多目标测距
目标之间三维距离检测计数
检测效果(视频展示)
文章内容后续会慢慢完善…
来源地址:https://blog.csdn.net/qq_45077760/article/details/124731530
--结束END--
本文标题: YOLOV5 + 双目测距(python)
本文链接: https://www.lsjlt.com/news/389357.html(转载时请注明来源链接)
有问题或投稿请发送至: 邮箱/279061341@qq.com QQ/279061341
下载Word文档到电脑,方便收藏和打印~
2024-03-01
2024-03-01
2024-03-01
2024-02-29
2024-02-29
2024-02-29
2024-02-29
2024-02-29
2024-02-29
2024-02-29
回答
回答
回答
回答
回答
回答
回答
回答
回答
回答


官方手机版

微信公众号

商务合作


0