官网地址 概述 poi-tl,简单的说,就是通过一些标记,如{{text}},{{@image}}等,放到你指定的Word模板里,然后去读取替换这些值,再输出填充数据后的word,可以做生成报表的功能
poi-tl,简单的说,就是通过一些标记,如{{text}},{{@image}}等,放到你指定的Word模板里,然后去读取替换这些值,再输出填充数据后的word,可以做生成报表的功能
com.deepoove poi-tl 1.10.0 注意apache.poi版本要对应
org.apache.poi poi 4.1.2 org.apache.poi poi-ooxml 4.1.2 org.apache.poi poi-ooxml-schemas 4.1.2 在D盘,自己创建两个文件夹,一个是用来存储模板文件,另一个是用来存储生成的文件
我这里是在D盘
D:\data\template 存放模板
D:\data\word 存放生成的文件
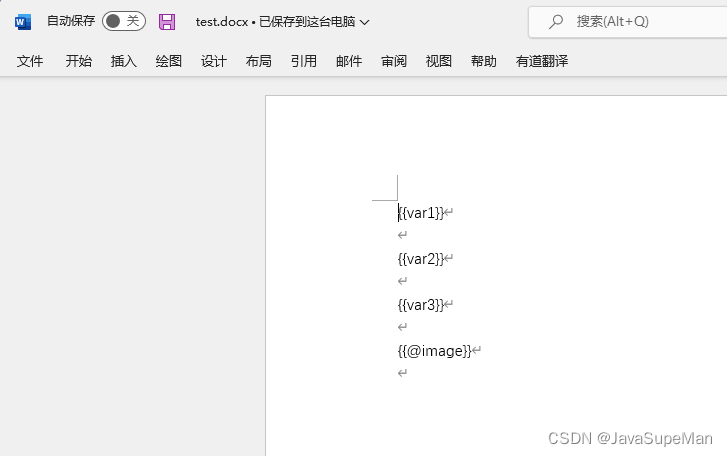
注意,{{}}是官方指定的格式,可以查看官网,当然也可以自定义,这个后面来讲
@PostMapping(value = "/testdoc01") public void Tx01() throws ioException { //存放要填充的数据 Map<String, Object> datas = new HashMap<String, Object>(); //模板地址 String templateFilePath = "d:/data/template/"; //生成文件的保存地址 String destFilePath = "d:/data/template/word"; //文字 这里介绍两种数据填充方式 //1.可以设置一些通用样式 Style style = Style.builder().buildUnderlineColor("00FF00").buildFontSize(18).buildColor("00FF00").build(); datas.put("var1", Texts.of("内容1").style(style).create()); datas.put("var2", Texts.of("超链接").link("Http://deepoove.com").style(style).create()); //2.文字可以通过Texts创建,也可以使用对象new TextRenderData("000000", "Sayi") datas.put("var3",new TextRenderData("000000", "内容3")); //图片 datas.put("image", Pictures.ofUrl("http://deepoove.com/images/icecream.png") .size(100, 100).create()); //渲染文件 XWPFTemplate compile = XWPFTemplate.compile(templateFilePath + "test1.docx"); compile.render(datas); //输出为文件,指定输出文件名 compile.writeToFile(destFilePath+"out_test01.docx"); }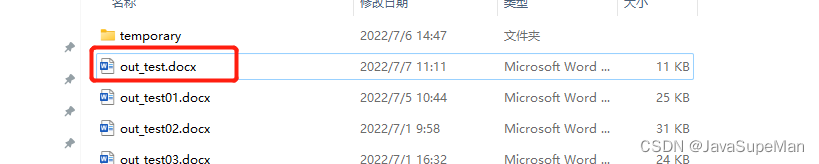
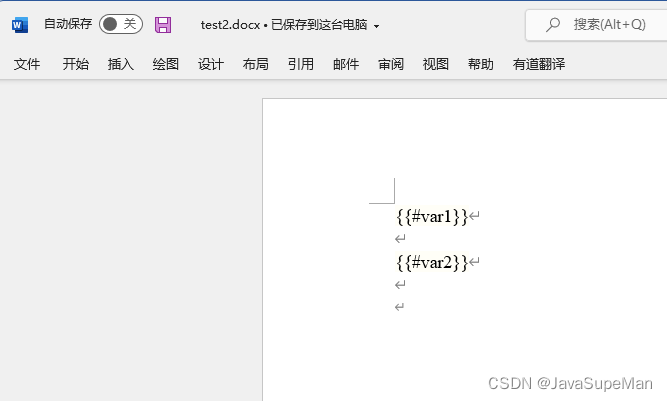
@PostMapping(value = "/Tx02") public void Tx02() throws IOException { //存放要填充的数据 Map<String, Object> datas = new HashMap<String, Object>(); //模板地址 String templateFilePath = "d:/data/template/"; //生成文件的保存地址 String destFilePath = "d:/data/template/word"; //RowRenderData就是指定每一行数据的,可以去官网查阅,这里相当于设置了三行,row0就是表头,row1,row2是表内容 RowRenderData row0 = Rows.of("姓名", "学历").textColor("FFFFFF") .bGColor("4472C4").center().create(); RowRenderData row1 = Rows.create("李四", "博士"); RowRenderData row2 = Rows.create("李四", "博士"); datas.put("var1", Tables.create(row0, row1,row2)); //合并单元格 RowRenderData roW0 = Rows.of("列0", "列1", "列2", "列3").center().bgColor("4472C4").textColor("7F7f7F").textFontFamily("Hei").textFontSize(15).create(); RowRenderData roW1 = Rows.create("没有数据", null, null, null);//第一行 //合并第几行第几列 到 第几行第几列 MergeCellRule rule = MergeCellRule.builder().map(MergeCellRule.Grid.of(1, 0), MergeCellRule.Grid.of(1, 2)).build(); datas.put("var2", Tables.of(roW0, roW1).mergeRule(rule).create()); //渲染文件 XWPFTemplate compile = XWPFTemplate.compile(templateFilePath + "test2.docx"); compile.render(datas); //输出为文件,指定输出文件名 compile.writeToFile(destFilePath+"out_test2.docx"); }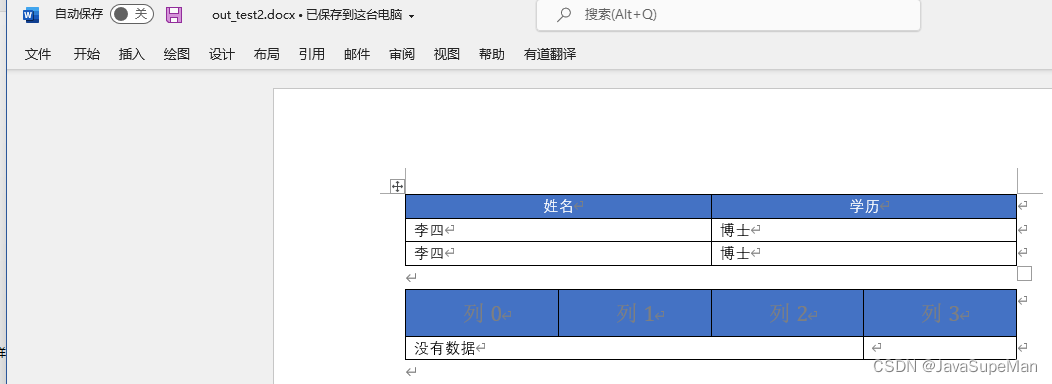
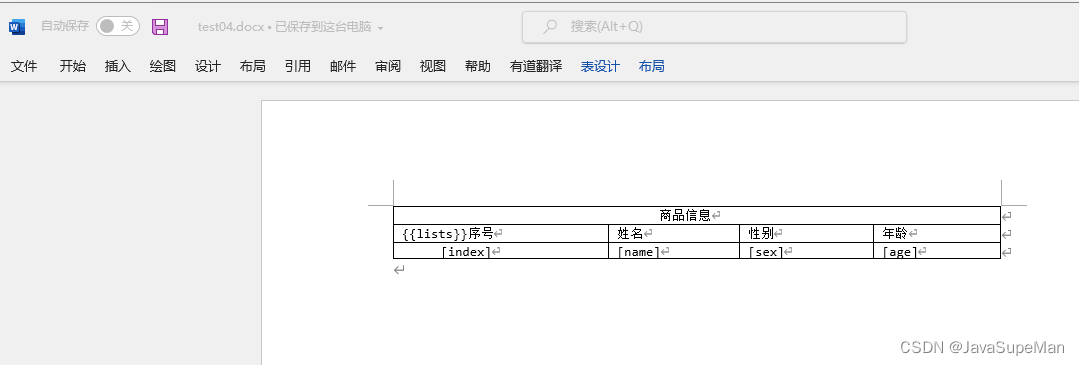
//模板地址 String templateFilePath = "d:/data/template/"; //生成文件的保存地址 String destFilePath = "d:/data/template/word"; Map<String, Object> datas = new HashMap<String, Object>(); Student student1 = new Student(); student1.setAge("12"); student1.setIndex("1"); student1.setName("张三"); student1.setSex("男"); Student student2 = new Student(); student2.setAge("122"); student2.setIndex("11"); student2.setName("张三1"); student2.setSex("男1"); List<Student> studentList = List.of(student1,student2); datas.put("lists",studentList);// 插件列表,可以去官网查看,有列循环,还有行循环,这里是行循环实例 LoopRowTableRenderPolicy policy = new LoopRowTableRenderPolicy(); //这里可以指定一个config类,用来指定一些规则,也可以改变模板中{{}}的这种格式 Configure config = Configure.builder() .bind("lists", policy).build(); XWPFTemplate compile = XWPFTemplate.compile(templateFilePath + "test3.docx",config); compile.render(datas); compile.writeToFile(destFilePath+"out_test3.docx");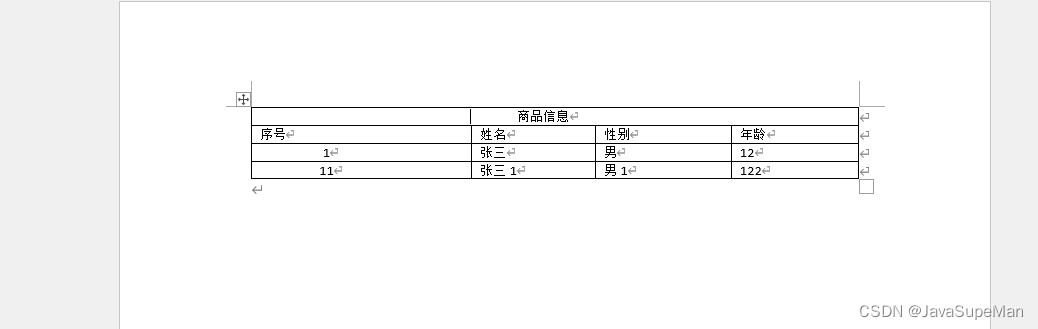
简述:结构体的应用,说白了,就是指定模板中的某一块内容,然后通过多个map,可以对这一块进行渲染,也就渲染出了多个这块的内容
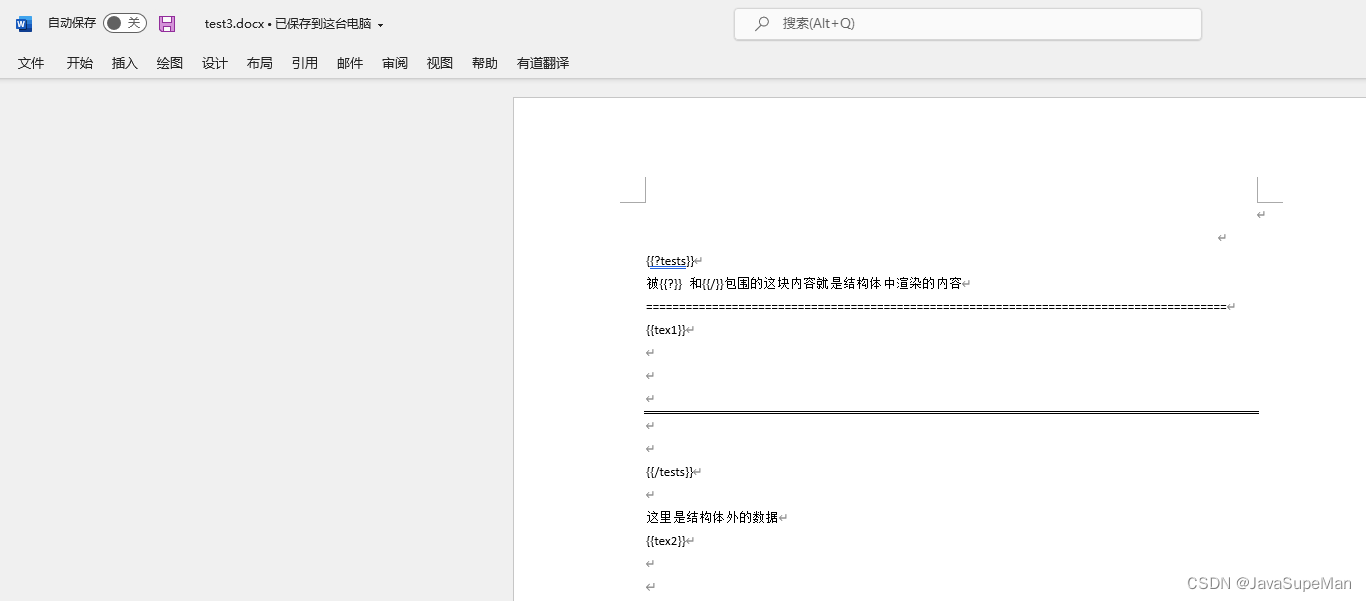
@PostMapping(value = "/Tx03") public void Tx03() throws IOException { //模板地址 String templateFilePath = "d:/data/template/"; //生成文件的保存地址 String destFilePath = "d:/data/template/word"; Map<String,Object> map = new HashMap<>(); Map<String,Object> map1 = new HashMap<>(){ { put("tex1","hhhhh11"); } }; Map<String,Object> map2 = new HashMap<>(){ { put("tex1","hhhhh22"); } }; List<Map<String,Object>> maps = Arrays.asList(map1,map2); map.put("tests",maps); map.put("tex2","哈哈"); ConfigureBuilder builder = Configure.builder(); XWPFTemplate compile = XWPFTemplate.compile(templateFilePath + "test4.docx",builder.build()); compile.render(map); compile.writeToFile(destFilePath+"out_test4.docx"); }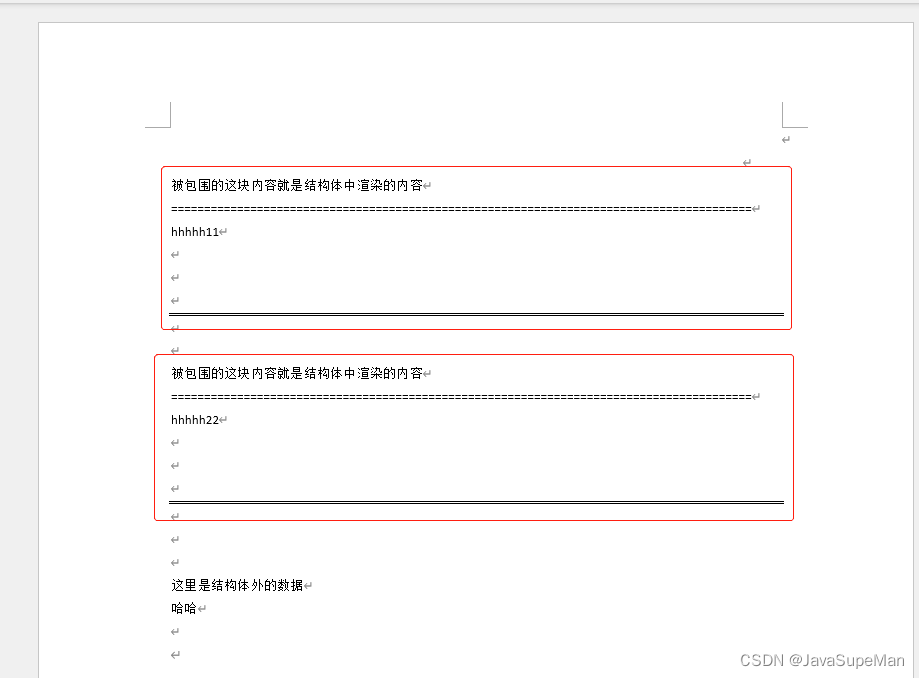
以上就是一些简单的例子了,上面都是输出的文件,当然也可以已流的形式输出,用于文件下载
只需要修改一个地方
准备一个word模板,命名为test4.docx,放到D:\data\template 下
渲染的对象
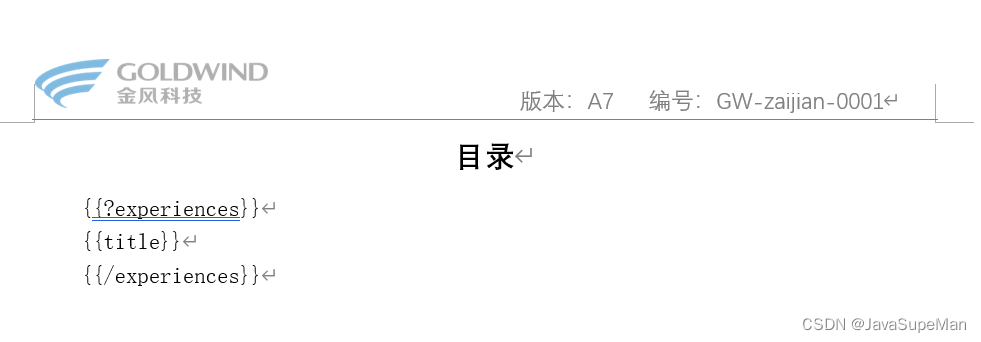
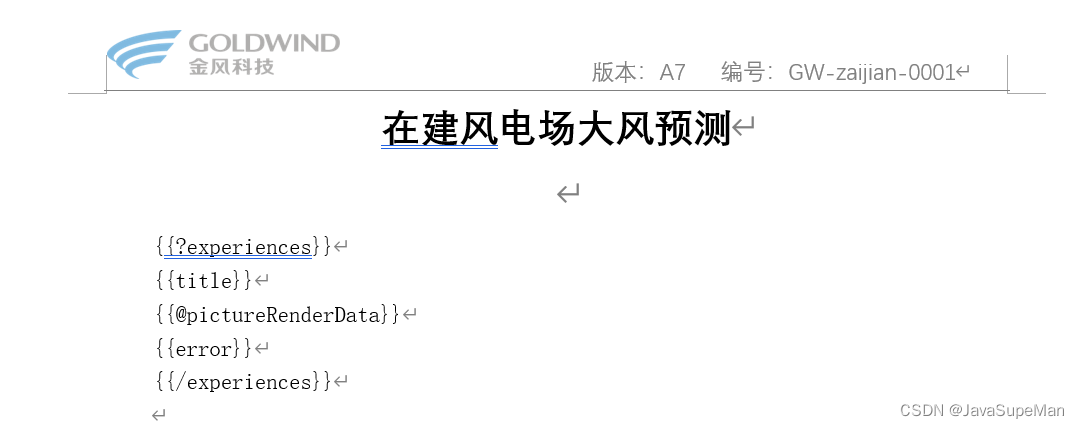
@Data@Builder@AllArgsConstructor@NoArgsConstructorpublic class WarningData { private List<ExperienceData> experiences;}@Data@Builder@AllArgsConstructor@NoArgsConstructorpublic class ExperienceData { private String title; private String error;//渲染图片的对象 private PictureRenderData pictureRenderData;}这里就是封装的传入参数,warningData就是上面的对象
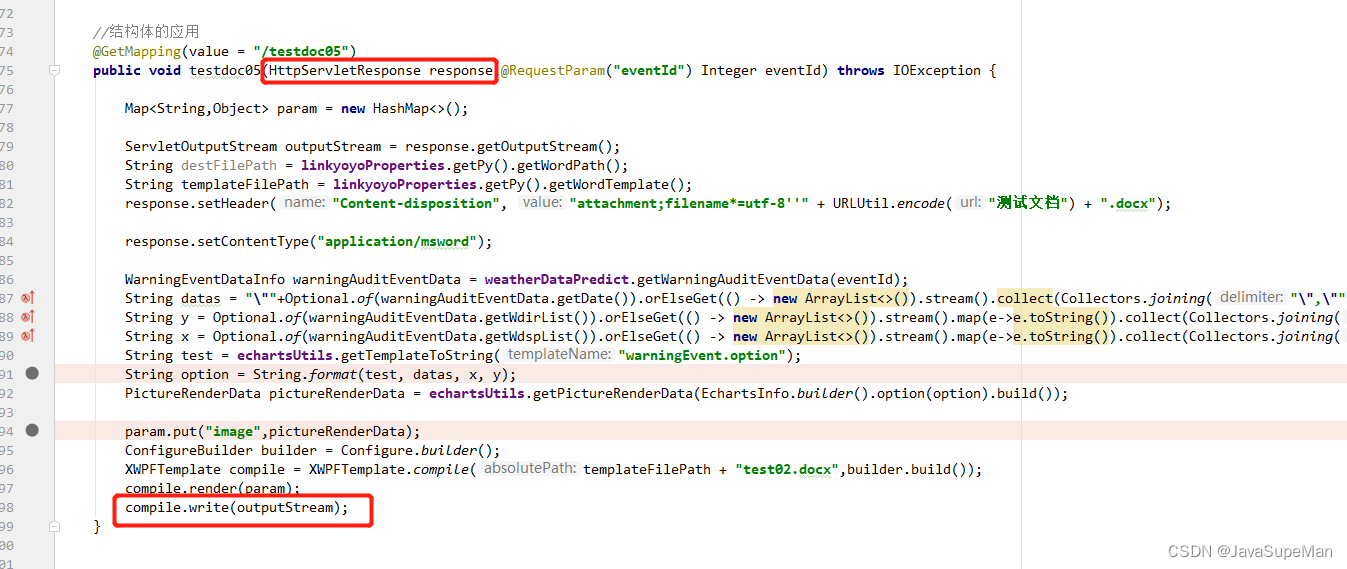
default void generateWordStream(ServletOutputStream outputStream, String templateFilePath, Object WarningData ) throws IOException { File file = new File(templateFilePath); if(!file.isFile()) throw new BizException(CodeMsg.FILE_NOT_EXIST_ERROR.fillArgs("模板文件不存在!"+file.isFile()+" "+templateFilePath)); ConfigureBuilder configureBuilder = Configure.builder(); XWPFTemplate.compile(templateFilePath,configureBuilder.build()) .render(WarningData) .write(outputStream); }来源地址:https://blog.csdn.net/JavaSupeMan/article/details/125654484
--结束END--
本文标题: poi-tl的使用(最全详解)
本文链接: https://www.lsjlt.com/news/396205.html(转载时请注明来源链接)
有问题或投稿请发送至: 邮箱/279061341@qq.com QQ/279061341
下载Word文档到电脑,方便收藏和打印~
2024-04-01
2024-04-03
2024-04-03
2024-01-21
2024-01-21
2024-01-21
2024-01-21
2023-12-23
回答
回答
回答
回答
回答
回答
回答
回答
回答
回答


官方手机版

微信公众号

商务合作


0