#软件下载#开源博客Wordpress 下载地址:https://cn.wordpress.org/wordpress-4.7.4-zh_CN.tar.gz#PHP 7
#软件下载
#开源博客Wordpress 下载地址:https://cn.wordpress.org/wordpress-4.7.4-zh_CN.tar.gz
#PHP 7 下载地址:Http://cn2.php.net/distributions/php-7.1.4.tar.gz
#apache 下载地址: http://mirror.bit.edu.cn/apache//httpd/httpd-2.4.25.tar.gz
#数据库 Mariadb 下载地址:系统镜像(本次采取yum 安装, 编译安装 参考:Mysql 5.7.17 编译安装)
#系统环境
[root@KVM_1 ~]# cat /etc/redhat-release
Centos linux release 7.2.1511 (Core)
[root@KVM_1 ~]# ip addr show eno33554960
3: eno33554960: <BROADCAST,MULTICAST,UP,LOWER_UP> mtu 1500 qdisc pfifo_fast state UP qlen 1000
    link/ether 00:0c:29:84:b7:60 brd ff:ff:ff:ff:ff:ff
    inet 192.168.174.134/24 brd 192.168.174.255 scope global dynamic eno33554960
       valid_lft 1779sec preferred_lft 1779sec
    inet6 fe80::20c:29ff:fe84:b760/64 scope link
       valid_lft forever preferred_lft forever
#关闭防火墙和selinux
[root@KVM_1 ~]# systemctl stop firewalld
[root@KVM_1 ~]# setenforce 0
#YUM设置
[root@KVM_1 ~]# cat /etc/yum.repos.d/local.repo
[local]
name=local
baseurl=file:///mnt/cdrom
gpGCheck=0
enabled=1
apache编译安装
#下载软件(自行操作)
[root@KVM_1 ~]# ls
httpd-2.4.25.tar.gz  php-7.1.4.tar.gz  wordpress-4.7.4-zh_CN.tar.gz
[root@KVM_1 ~]# tar -xf  httpd-2.4.25.tar.gz
[root@KVM_1 ~]# cd httpd-2.4.25/
#安装依赖包
[root@KVM_1 httpd-2.4.25]# yum install -y net-tools  pcre-devel zlib-devel apr apr-devel  apr-util  apr-util-devel gcc-c++
#编译
[root@KVM_1 httpd-2.4.25]# ./configure --prefix=/usr/local/apache  --with-mysql=/usr/share/mysql  --enable-module=so  --enable-shared=max --enable-rewrite

#出现以下结果表示编译检查成功

configure: summary of build options:
    Server Version: 2.4.25
    Install prefix: /usr/local/apache
    C compiler:     gcc -std=gnu99
    CFLAGS:           -pthread
    LDFLAGS:
    LIBS:
    CPPFLAGS:        -DLINUX -D_REENTRANT -D_GNU_SOURCE
    C preprocessor: gcc -E

#编译安装
[root@KVM_1 httpd-2.4.25]# make && make install#安装数据库
#本次采用yum安装 (编译安装可参考 Mysql 5.7.17 编译安装)
[root@KVM_1 ~]# yum install -y mariadb mariadb-server
[root@KVM_1 ~]# systemctl start mariadb
#初始化数据库
[root@KVM_1 ~]# mysql_secure_installation
/usr/bin/mysql_secure_installation: line 379: find_mysql_client: command not found

NOTE: RUNNING ALL PARTS OF THIS SCRIPT IS RECOMMENDED FOR ALL MariaDB
      SERVERS IN PRODUCTION USE!  PLEASE READ EACH STEP CAREFULLY!

In order to log into MariaDB to secure it, we'll need the current
password for the root user.  If you've just installed MariaDB, and
you haven't set the root password yet, the password will be blank,
so you should just press enter here.

Enter current password for root (enter for none):
OK, successfully used password, moving on...

Setting the root password ensures that nobody can log into the MariaDB
root user without the proper authorisation.

Set root password? [Y/n] y            #选择 y
New password:                         #设置密码 123456
Re-enter new password:                #设置密码 123456
Password updated successfully!
Reloading privilege tables..
 ... Success!


By default, a MariaDB installation has an anonymous user, allowing anyone
to log into MariaDB without having to have a user account created for
them.  This is intended only for testing, and to make the installation
Go a bit smoother.  You should remove them before moving into a
production environment.

Remove anonymous users? [Y/n] y      #选择 y
 ... Success!

NORMally, root should only be allowed to connect from 'localhost'.  This
ensures that someone cannot guess at the root password from the network.

Disallow root login remotely? [Y/n] n        #选择 n
 ... skipping.

By default, MariaDB comes with a database named 'test' that anyone can
access.  This is also intended only for testing, and should be removed
before moving into a production environment.

Remove test database and access to it? [Y/n] y     #选择 y
 - Dropping test database...
 ... Success!
 - Removing privileges on test database...
 ... Success!

Reloading the privilege tables will ensure that all changes made so far
will take effect immediately.

Reload privilege tables now? [Y/n] y      #选择 y
 ... Success!

Cleaning up...

All done!  If you've completed all of the above steps, your MariaDB
installation should now be secure.

Thanks for using MariaDB!
#创建Wordpress数据库
[root@KVM_1 ~]# mysql -uroot -p123456
Welcome to the MariaDB monitor.  Commands end with ; or \g.
Your MariaDB connection id is 9
Server version: 5.5.44-MariaDB MariaDB Server

Copyright (c) 2000, 2015, oracle, MariaDB Corporation Ab and others.

Type 'help;' or '\h' for help. Type '\c' to clear the current input statement.

MariaDB [(none)]> create database wordpressdb;
Query OK, 1 row affected (0.00 sec)

MariaDB [(none)]> create user 'wordpressuser'@'localhost' identified by '123456';
Query OK, 0 rows affected (0.00 sec)

MariaDB [(none)]> grant all on wordpressdb.* to 'wordpressuser'@'localhost';
Query OK, 0 rows affected (0.00 sec)

MariaDB [(none)]> grant all on wordpressdb.* to 'wordpressuser'@'%' ;
Query OK, 0 rows affected (0.00 sec)

MariaDB [(none)]> flush privileges;
Query OK, 0 rows affected (0.00 sec)

MariaDB [(none)]> exit
Bye
#PHP7编译安装
#安装PHP依赖 libmcrypt 下载地址ftp://mcrypt.hellug.gr/pub/crypto/mcrypt/libmcrypt/libmcrypt-2.5.6.tar.gz
#下载libmcrypt
[root@KVM_1 ~]# wget ftp://mcrypt.hellug.gr/pub/crypto/mcrypt/libmcrypt/libmcrypt-2.5.6.tar.gz
[root@KVM_1  ~]# tar -xf libmcrypt-2.5.6.tar.gz
[root@KVM_1 ~]# cd libmcrypt-2.5.6/
[root@KVM_1 libmcrypt-2.5.6]# ./configure
[root@KVM_1 libmcrypt-2.5.6]# make && make install
#软件下载(自行操作)
[root@KVM_1 ~]# ls
 httpd-2.4.25.tar.gz  php-7.1.4.tar.gz  wordpress-4.7.4-zh_CN.tar.gz   httpd-2.4.25
[root@KVM_1 ~]# tar -xf php-7.1.4.tar.gz
[root@KVM_1 ~]# cd php-7.1.4/
[root@KVM_1  php-7.1.4]# yum -y install libxml2 libxml2-devel openssl openssl-devel curl-devel libjpeg-devel libpng-devel freetype-devel libmcrypt-devel
[root@KVM_1  php-7.1.4]# ./configure --prefix=/usr/local/php7 --with-apxs2=/usr/local/apache/bin/apxs \
--with-mcrypt=/usr/include --enable-mysqlnd --with-mysqli --with-pdo-mysql \
--enable-fpm --with-gd --with-iconv --with-zlib --enable-xml \
--enable-shmop --enable-sysvsem --enable-inline-optimization --enable-mbregex \
--enable-exif --enable-mbstring --enable-ftp --enable-gd-native-ttf --with-openssl \
--enable-pcntl --enable-Sockets --with-xmlrpc --enable-zip --enable-soap --without-pear \
--with-gettext --enable-session --with-curl --with-jpeg-dir \
--with-freetype-dir --enable-opcache --enable-fileinfo


#出现以下情况表示编译检查成功
+--------------------------------------------------------------------+
| License:                                                           |
| This software is subject to the PHP License, available in this     |
| distribution in the file LICENSE.  By continuing this installation |
| process, you are bound by the terms of this license agreement.     |
| If you do not agree with the terms of this license, you must abort |
| the installation process at this point.                            |
+--------------------------------------------------------------------+

Thank you for using PHP.

config.status: creating php7.spec
config.status: creating main/build-defs.h
config.status: creating scripts/phpize
config.status: creating scripts/man1/phpize.1
config.status: creating scripts/php-config
config.status: creating scripts/man1/php-config.1
config.status: creating sapi/cli/php.1
config.status: creating sapi/fpm/php-fpm.conf
config.status: creating sapi/fpm/www.conf
config.status: creating sapi/fpm/init.d.php-fpm
config.status: creating sapi/fpm/php-fpm.service
config.status: creating sapi/fpm/php-fpm.8
config.status: creating sapi/fpm/status.html
config.status: creating sapi/cgi/php-cgi.1
config.status: creating ext/phar/phar.1
config.status: creating ext/phar/phar.phar.1
config.status: creating main/php_config.h
config.status: executing default commands

#编译安装
[root@KVM_1  php-7.1.4]# make && make install
#注:此处同时开启了 --enable-fpm 和 --with-apxs2
# --with-apxs2 是直接把php编译到apache的模块中去 ,apachectl -M 可以查看被加载的模块
# --enable-fpm 是开启php-fpm
#如果只想使用php-fpm 可以取消--with-apxs2选项
#参数详解 http://www.jianshu.com/p/0a79847c8151
#方便起见,本文没有采用php-fpm
#修改http配置文件以支持php
[root@KVM_1 ~]# vim /usr/local/apache/conf/httpd.conf
#将第254行修改为如下值
<IfModule dir_module>
     DirectoryIndex index.php index.html
</IfModule>
#第392行增加如下值
  AddType application/x-httpd-php .php
#开启服务
[root@KVM_1 ~]# /usr/local/apache/bin/apachectl -k start
AH00557: httpd: apr_sockaddr_info_get() failed for KVM_1
AH00558: httpd: Could not reliably determine the server's fully qualified domain name, using 127.0.0.1. Set the 'ServerName' directive globally to suppress this message
[root@KVM_1 ~]#

此处的两个警告产生的原因是 没有设置 ServerName 和 没有在 /etc/hosts 设置主机名与ip的对应关系

[root@KVM_1 ~]# vim /usr/local/apache/conf/httpd.conf
#修改第196行 改为如下值
ServerName localhost:80


[root@KVM_1 ~]# vim /etc/hosts
[root@KVM_1 ~]# cat /etc/hosts
127.0.0.1   localhost localhost.localdomain localhost4 localhost4.localdomain4
::1         localhost localhost.localdomain localhost6 localhost6.localdomain6
192.168.174.134 KVM_1
[root@KVM_1 ~]# /usr/local/apache/bin/apachectl -k restart
#添加php文件
[root@KVM_1 ~]# vim /usr/local/apache/htdocs/index.php
[root@KVM_1  ~]#  rm -f /usr/local/apache/htdocs/index.html
[root@KVM_1 ~]# cat /usr/local/apache/htdocs/index.php
<?php
phpinfo();
?>
[root@KVM_1 ~]# chown -R daemon:daemon /usr/local/apache#测试

#设置虚拟主机
[root@KVM_1 ~]# vim /usr/local/apache/conf/httpd.conf
#取消第479行的注释(或者在最后一行增加如下配置)
Include conf/extra/httpd-vhosts.conf
[root@KVM_1 ~]# vim /usr/local/apache/conf/extra/httpd-vhosts.conf
#添加如下配置(删除原有配置)
<VirtualHost 192.168.174.134>
DocumentRoot "/usr/local/apache/htdocs/blog"
ServerName "blog.chauncey.com"
<Directory "usr/local/apache/htdocs/blog">
AllowOverride None
Require all granted
</directory>
</VirtualHost>

[root@KVM_1 ~]# mkdir /usr/local/apache/htdocs/blog
#安装开源博客 Wordpress
#软件下载(自行操作)
[root@KVM_1 ~]# ls
anaconda-ks.cfg  httpd-2.4.25.tar.gz  libmcrypt-2.5.6.tar.gz  php-7.1.4.tar.gz  wordpress-4.7.4-zh_CN.tar.gz
httpd-2.4.25     libmcrypt-2.5.6      php-7.1.4
[root@KVM_1 ~]# tar -xf wordpress-4.7.4-zh_CN.tar.gz
[root@KVM_1 ~]# cp -rf wordpress/* /usr/local/apache/htdocs/blog/
[root@KVM_1 ~]# chown -R daemon:daemon /usr/local/apache/htdocs/blog

#语法检查
[root@KVM_1 ~]# /usr/local/apache/bin/apachectl -t
Syntax OK

#开启服务
[root@KVM_1 ~]# /usr/local/apache/bin/apachectl -k start
[root@KVM_1 ~]# netstat -lntup | grep 80
tcp        0      0 192.168.174.134:80      0.0.0.0:*               LISTEN      3068/httpd
[root@KVM_1 ~]#
#设置DNS解析
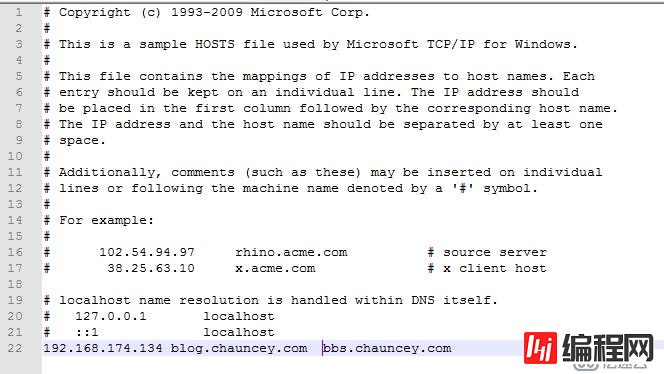
#window设置hosts文件(C:\windows\System32\drivers\etc\hosts)增加一行解析 #Linux设置hosts (/etc/hosts)
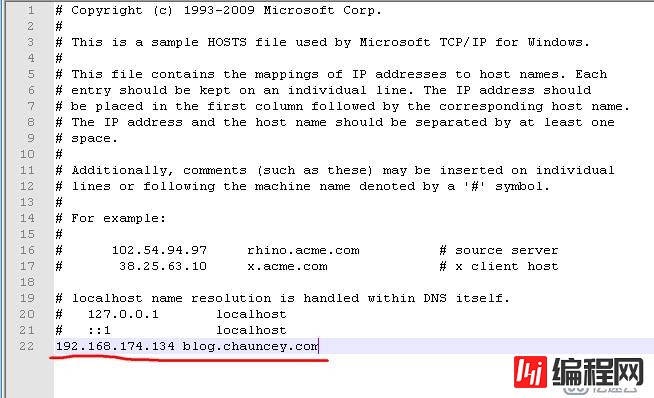
#输入blog.chauncey.com
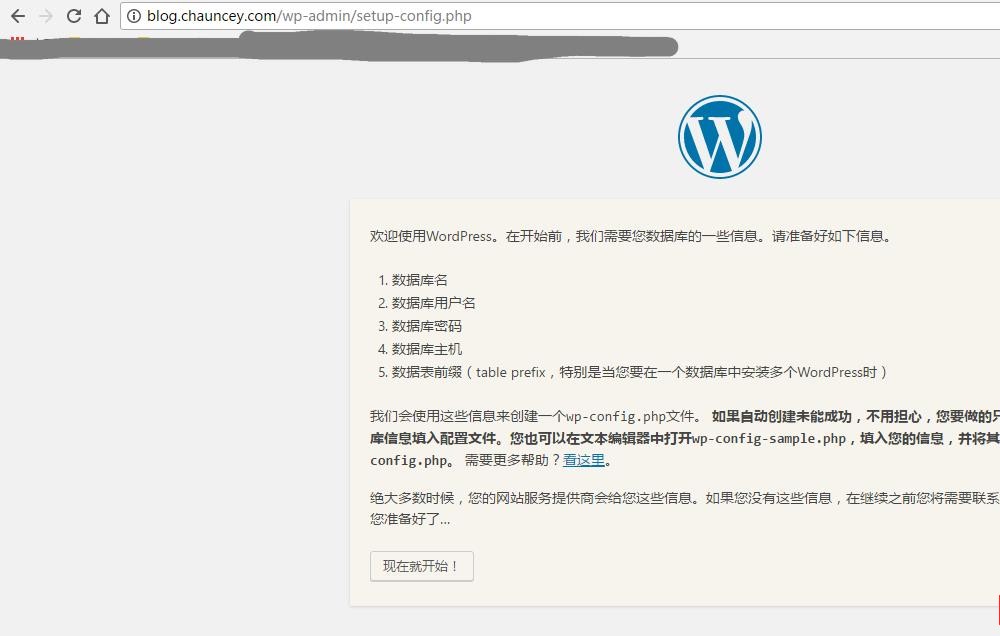
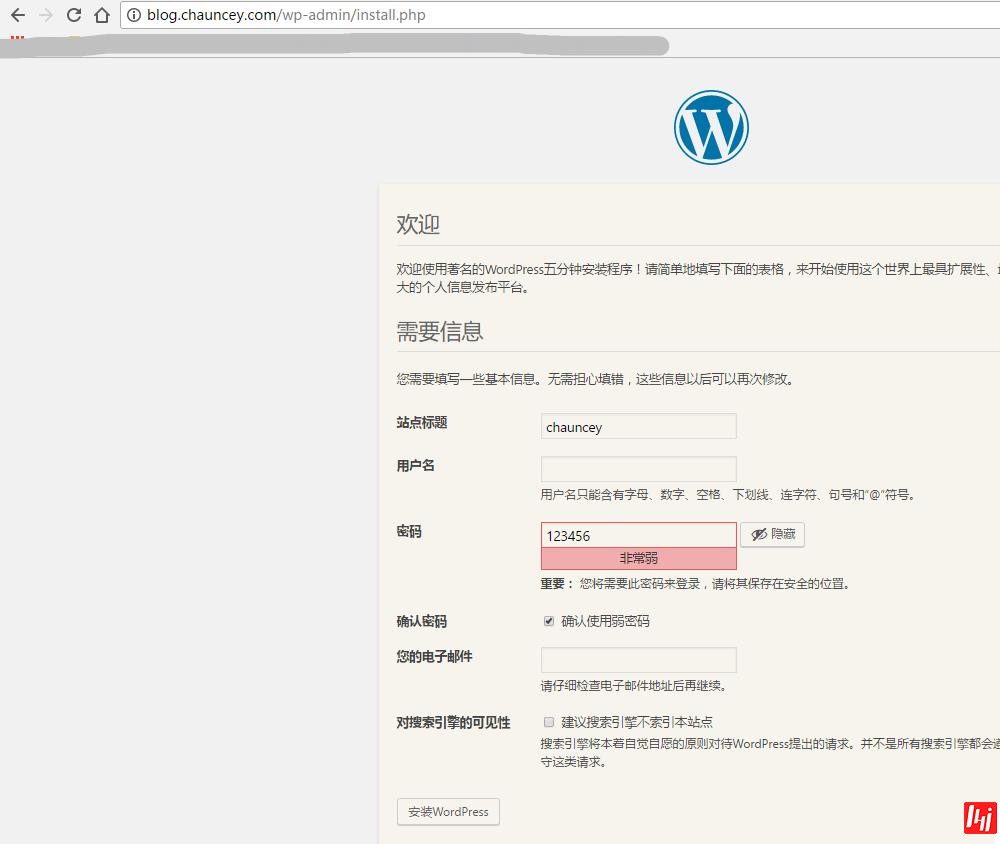
#填写相关数据

#填写相关数据
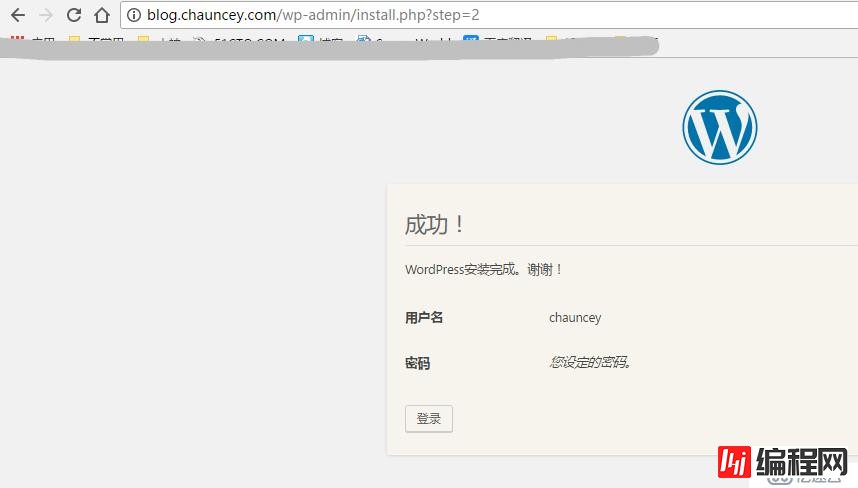
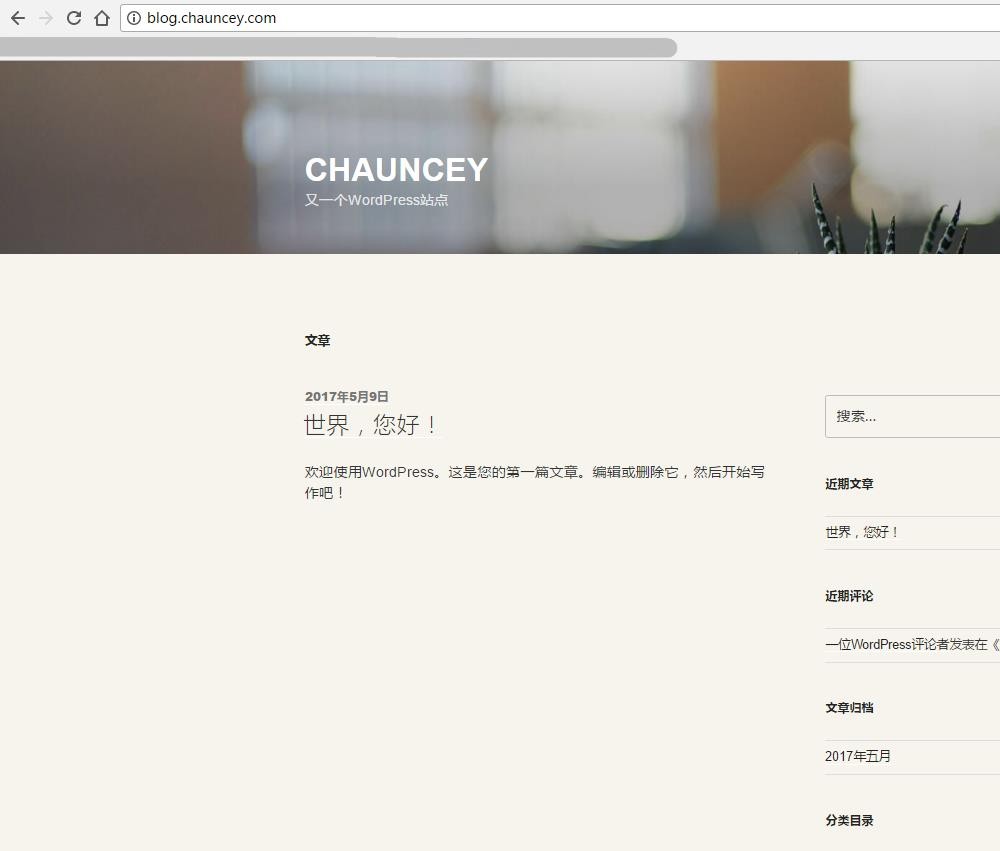
#安装完成,wordpress十分强大,插件丰富,可以去腾讯云或者阿里云买一台云主机,来搭建自己的个人博客。
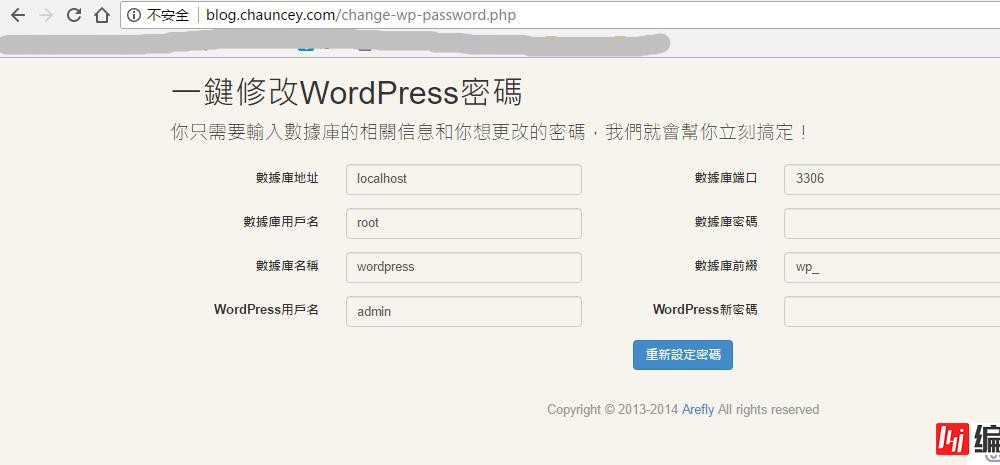
#登陆密码忘记 找回方法:
WordPress恢复密码PHP文件 下载地址:https://www.freehao123.com/dl-wordpress-password-php/
上传到 wordpress根目录下面 /usr/local/apache/htdocs/blog
访问
#Discuz!论坛安装
#软件下载 下载地址:http://www.discuz.net/forum-10-1.html
#创建Discuz!数据库
[root@KVM_1 ~]# mysql -uroot -p123456
Welcome to the MariaDB monitor.  Commands end with ; or \g.
Your MariaDB connection id is 80
Server version: 5.5.44-MariaDB MariaDB Server
Copyright (c) 2000, 2015, Oracle, MariaDB Corporation Ab and others.
Type 'help;' or '\h' for help. Type '\c' to clear the current input statement.
MariaDB [(none)]> create database discuz;
Query OK, 1 row affected (0.00 sec)
MariaDB [(none)]> create user 'discuzuser'@'localhost' identified by '123456';
Query OK, 0 rows affected (0.01 sec)
MariaDB [(none)]> grant all on discuz.* to 'discuzuser'@'localhost';
Query OK, 0 rows affected (0.01 sec)
MariaDB [(none)]> grant all on discuz.* to 'discuzuser'@'%';
Query OK, 0 rows affected (0.00 sec)
MariaDB [(none)]> flush privileges;
Query OK, 0 rows affected (0.00 sec)
MariaDB [(none)]> exit
Bye
#上传软件
[root@KVM_1 ~]# wget http://download.comsenz.com/DiscuzX/3.3/Discuz_X3.3_SC_GBK.zip
[root@KVM_1 ~]# yum install -y unzip
[root@KVM_1 ~]# unzip Discuz_X3.3_SC_GBK.zip
[root@KVM_1 ~]# mkdir /usr/local/apache/htdocs/bbs/
[root@KVM_1 ~]# cp -rf upload/* /usr/local/apache/htdocs/bbs/
[root@KVM_1 ~]# chown -R daemon:daemon /usr/local/apache/htdocs/bbs
#增加虚拟主机
[root@KVM_1 ~]# vim /usr/local/apache/conf/extra/httpd-vhosts.conf
[root@KVM_1 ~]# cat /usr/local/apache/conf/extra/httpd-vhosts.conf
#增加如下配置
<VirtualHost 192.168.174.134>
DocumentRoot "/usr/local/apache/htdocs/bbs"
ServerName "bbs.chauncey.com"
<Directory "usr/local/apache/htdocs/bbs">
AllowOverride None
Require all granted
</directory>
</VirtualHost>
#开启服务
#语法检查
[root@KVM_1 ~]# /usr/local/apache/bin/apachectl -t
Syntax OK
[root@KVM_1 ~]# /usr/local/apache/bin/apachectl -k restart
#设置DNS解析
#window设置hosts文件(C:\Windows\System32\drivers\etc\hosts)增加一行解析 #Linux设置hosts (/etc/hosts)
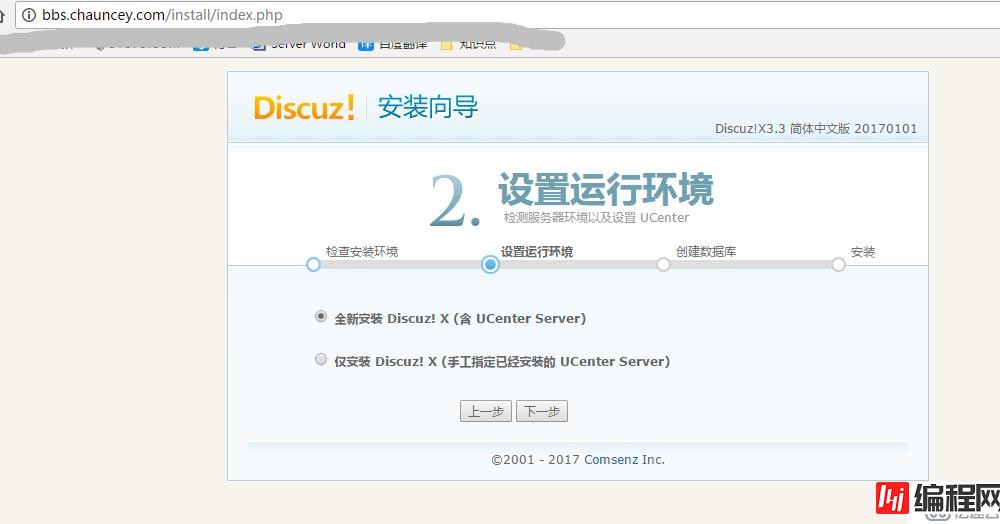
#开始安装
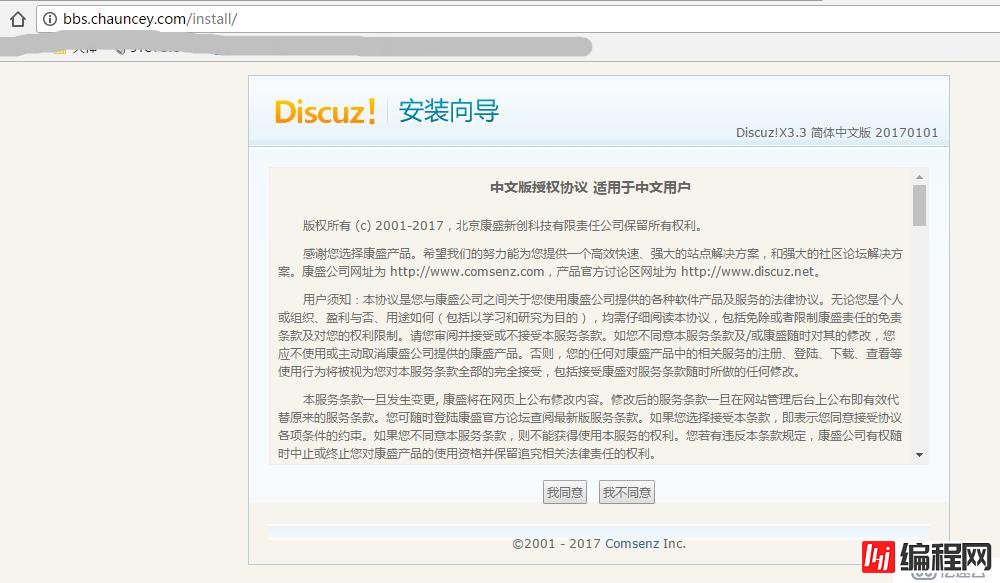
#开始安装
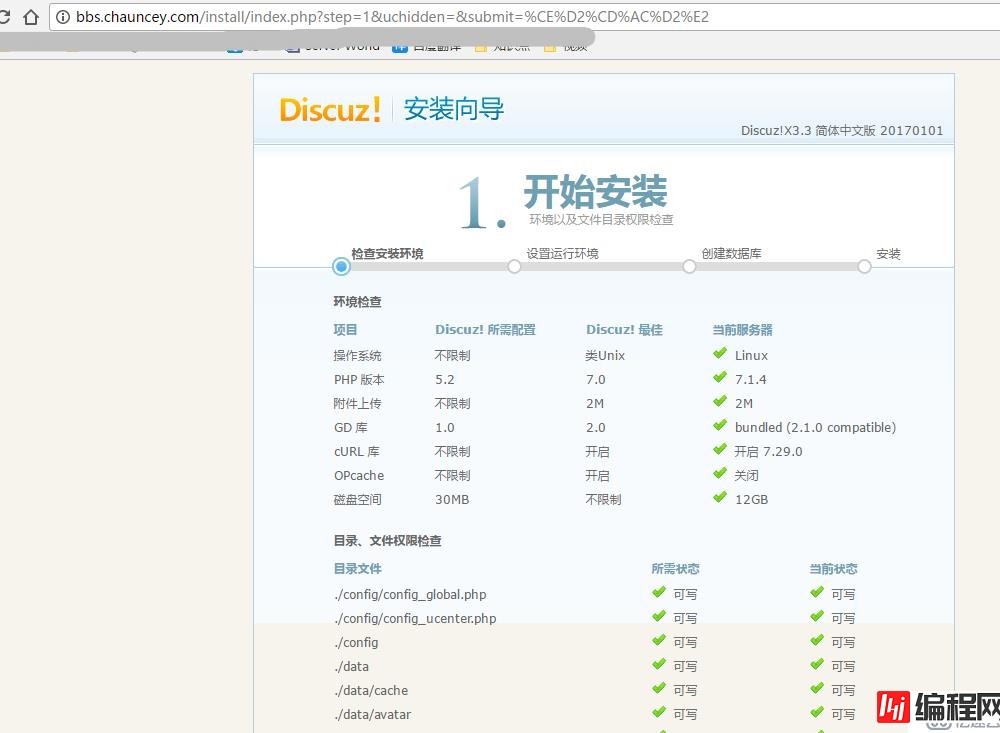
#检查环境
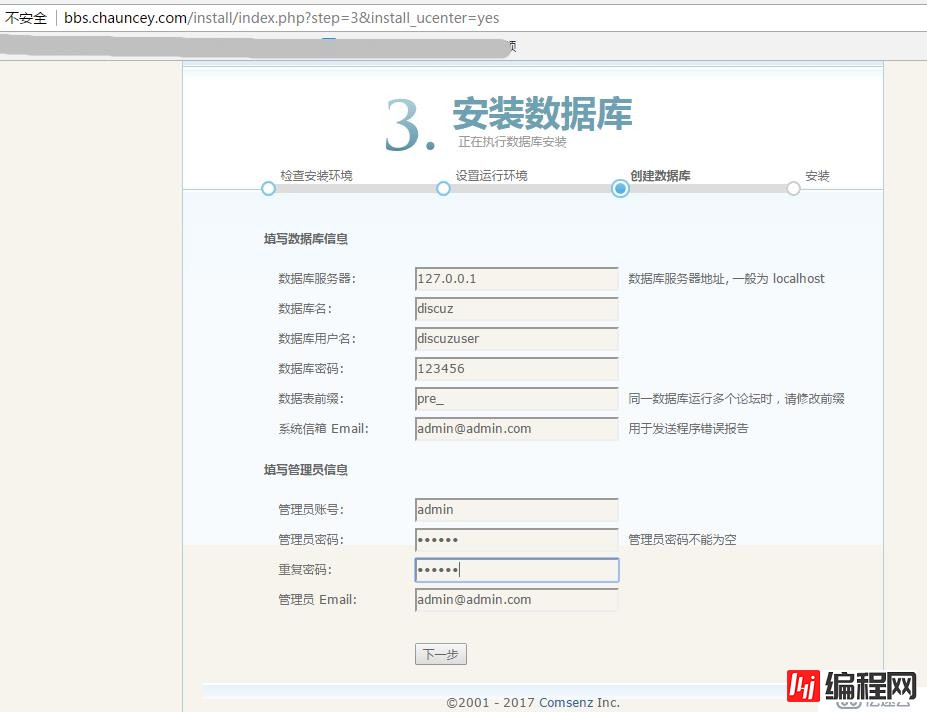
#设置数据库
#安装完成

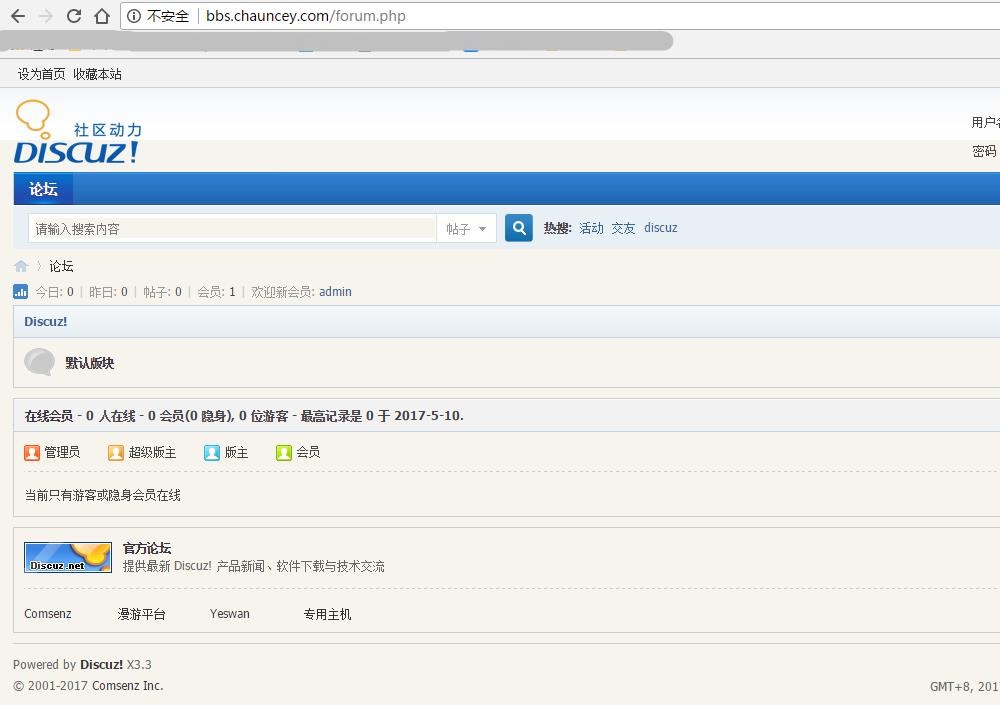
#测试访问
--结束END--
本文标题: LAMP 编译安装 +wordpress+discuz
本文链接: https://www.lsjlt.com/news/43535.html(转载时请注明来源链接)
有问题或投稿请发送至: 邮箱/279061341@qq.com QQ/279061341
下载Word文档到电脑,方便收藏和打印~
2024-02-29
2024-02-29
2024-02-27
2023-10-27
2023-10-26
2023-10-25
2023-10-21
2023-10-21
2023-10-18
2023-10-12
回答
回答
回答
回答
回答
回答
回答
回答
回答
回答


官方手机版

微信公众号

商务合作


0