目录一、虚拟列表二、实现思路难点与思考:其他注意事项:三、实现最终实现效果实现代码模拟数据的后端代码四、封装为组件props:event:虚拟列表组件代码使用代码最近项目中需要用到列
真实列表:每条数据都展示到html上,数据越多,DOM元素也就越多,性能也就越差。
虚拟列表:只展示部分数据(可见区域展示数据),当屏幕滚动时替换展示的数据,DOM元素的数量是固定的,相比较真实列表更高效。
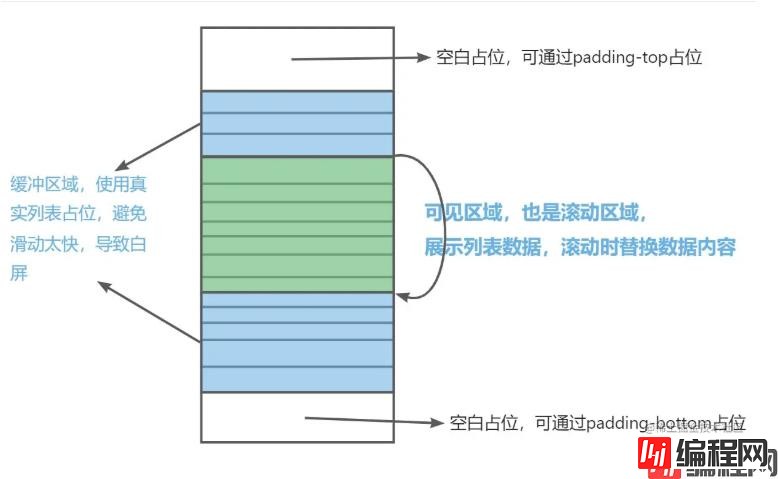
1. 如何计算需要渲染的数据
渲染的数据,需要渲染的数据包括了可见区域与缓冲区域的数据2. 何时替换数据
index大于缓冲区域的条数时),就开始替换数据了,每次往上滑动一个元素,就替换一次数据。3. 为何需要空白占位,如何计算空白占位的高度

index) * 单个元素的高度index与总数据条数的差值)* 单个元素的高度v-for遍历渲染数据时,key的值使用index,不用item的id,可以避免该dom元素被重新渲染,只替换数据。padding来占位,也可以使用DOM元素占位,使用DOM元素占位监听滚动事件时,应使用touchmove或mousemove监听,避免dom元素高度变化后,又触发了scroll滚动事件。passive修饰符,可以提前告知浏览器需要执行preventDefault,使滚动更流畅,具体功能可以参考Vue官网。overflow为auto,才能监听scroll滚动事件。
<template>
  <div id="app">
    <!-- 监听滚动事件使用passive修饰符 -->
    <div class="container" ref="container" @scroll.passive="handleScroll">
      <div :style="paddingStyle">
        <!-- key使用index,可避免多次渲染该dom -->
        <div class="box" v-for="(item, index) in showList" :key="index">
          <h2>{{ item.title }} - {{ item.id }}</h2>
          <h3>{{ item.from }}</h3>
        </div>
        <div>到低了~~~</div>
      </div>
    </div>
  </div>
</template>

<script>
import axiOS from "axios";
export default {
  name: "App",
  data() {
    return {
      allList: [], // 所有数据
      isRequest: false,// 是否正在请求数据
      oneHeight: 150,  // 单条数据的高度
      showNum: 0,    // 可见区域最多能展示多少条数据
      startIndex: 0,   // 渲染元素的第一个索引
      canScroll: true,  // 可以监听滚动,用于节流
      scrollTop: 0,// 当前滚动高度,再次返回页面时能定位到之前的滚动高度
      lower: 150,// 距离底部多远时触发触底事件
    };
  },
  created() {
    this.getData();// 请求数据
  },
  activited() {
    this.$nextTick(()=>{
      // 定位到之前的高度
      this.$refs.container.scrollTop = this.scrollTop
    })
  },
  mounted() {
    this.canShowNum();  // 获取可见区域能展示多少条数据
    window.onresize = this.canShowNum;  // 监听窗口变化,需要重新计算一屏能展示多少条数据
    window.onorientationchange = this.canShowNum;  // 监听窗口翻转
  },
  computed: {
    // 渲染元素最后的index
    endIndex() {
      let end = this.startIndex + this.showNum * 3; // 3倍是需要预留缓冲区域
      let len = this.allList.length
      return end >= len ? len : end;  // 结束元素大于所有元素的长度时,就取元素长度
    },
    // 需要渲染的数据
    showList() {
      return this.allList.slice(this.startIndex, this.endIndex)
    },
    // 空白占位的高度
    paddingStyle() {
      return {
        paddingTop: this.startIndex * this.oneHeight + 'px',
        paddingBottom: (this.allList.length - this.endIndex) * this.oneHeight + 'px'
      }
    }
  },
  methods: {
    // 请求数据
    getData() {
      this.isRequest = true  // 正在请求中
      axios.get("Http://localhost:4000/data?num=10").then((res) => {
        // 将结果追加到allList
        this.allList = [...this.allList, ...res.data.list];
        this.isRequest = false
      });
    },
    // 计算可见区域能展示的条数
    canShowNum() {
      // ~~ 按位两次取反,得到整数
      this.showNum = ~~(this.$refs.container.offsetHeight / this.oneHeight) + 2;
    },
    // 监听滚动
    handleScroll(e) {
      if (this.canScroll) {
        this.canScroll = false
        // 处理数据
        this.handleData(e)
        // 节流
        let timer = setTimeout(() => {
          this.canScroll = true
          clearTimeout(timer)
          timer = null
        }, 30)
      }
    },
    handleData(e) {
      // 记录当前元素滚动的高度
      this.scrollTop = e.target.scrollTop
      // 可见区域第一个元素的index
      const curIndex = ~~(e.target.scrollTop / this.oneHeight)
      // 渲染区域第一个元素的index,这里缓冲区域的列表条数使用的是this.showNum
      this.startIndex = curIndex < this.showNum ? 0 : curIndex - this.showNum
      // 滚动距离底部,还有this.lower距离时,触发触底事件,正在请求中不发送数据
      if (e.target.scrollTop + e.target.clientHeight >= e.target.scrollHeight - this.lower && !this.isRequest) {
        this.getData()
      }
    }
  },
};
</script>

<style>
#app {
  height: 100vh;
}
.container {
  height: 100%;

  overflow: auto;
}
.box {
  width: 96vw;
  height: 150px;
  background: #eee;
  border: 2px navajowhite solid;
  box-sizing: border-box;
}
</style>mock和express。const Mock = require('mockjs')
const express = require('express')
const app = express()
let sum = 1 // mock的ID
// 根据入参生成num条模拟数据
function generatorList(num) {
return Mock.mock({
[`list|${num}`]: [
{
'id|+1': sum,
title: "@ctitle(15,25)",
from: "@ctitle(3,10)",
}
]
})
}
// 允许跨域
app.all('*', function (req, res, next) {
res.setHeader("Access-Control-Allow-Origin", '*');
res.setHeader("Access-Control-Allow-Headers", '*');
res.setHeader("Access-Control-Allow-Method", '*');
next()
})
app.get('/data', function (req, res) {
const { num } = req.query
const data = generatorList(num)
sum += parseInt(num)
return res.send(data)
})
const server = app.listen(4000, function () {
console.log('4000端口正在监听~~')
})也可以封装为插件,此处为了方便就封装为组件
<template>
    <!-- 监听滚动事件使用passive修饰符 -->
    <div class="container" ref="container" @scroll.passive="handleScroll">
      <div :style="paddingStyle">
        <!-- key使用index,可避免多次渲染该dom -->
        <div v-for="(item, index) in showList" :key="index">
          <!-- 使用作用域插槽,将遍历后的数据item和index传递出去 -->
          <slot :item="item" :$index="index"></slot>
        </div>
        <div>到低了~~~</div>
      </div>
    </div>
</template>

<script>
export default {
  name: "App",
  props:{
    // 所有数据
    allList:{
      type:Array,
      default(){
        return []
      }
    },
    // 单条数据的高度
    oneHeight:{
      type:Number,
      default:0
    },
    // 距离底部多远时触发触底事件
    lower:{
      type:Number,
      default:50
    }
  },
  data() {
    return {
      showNum: 0,    // 可见区域最多能展示多少条数据
      startIndex: 0,   // 渲染元素的第一个索引
      canScroll: true,  // 可以监听滚动,用于节流
      scrollTop: 0,// 当前滚动高度,再次返回页面时能定位到之前的滚动高度
    };
  },
  activited() {
    this.$nextTick(()=>{
      // 定位到之前的高度
      this.$refs.container.scrollTop = this.scrollTop
    })
  },
  mounted() {
    this.canShowNum();  // 获取可见区域能展示多少条数据
    window.onresize = this.canShowNum;  // 监听窗口变化,需要重新计算一屏能展示多少条数据
    window.onorientationchange = this.canShowNum;  // 监听窗口翻转
  },
  computed: {
    // 渲染元素最后的index
    endIndex() {
      let end = this.startIndex + this.showNum * 3; // 3倍是需要预留缓冲区域
      let len = this.allList.length
      return end >= len ? len : end;  // 结束元素大于所有元素的长度时,就取元素长度
    },
    // 需要渲染的数据
    showList() {
      return this.allList.slice(this.startIndex, this.endIndex)
    },
    // 空白占位的高度
    paddingStyle() {
      return {
        paddingTop: this.startIndex * this.oneHeight + 'px',
        paddingBottom: (this.allList.length - this.endIndex) * this.oneHeight + 'px'
      }
    }
  },
  methods: {
    // 计算可见区域能展示的条数
    canShowNum() {
      // ~~ 按位两次取反,得到整数
      this.showNum = ~~(this.$refs.container.offsetHeight / this.oneHeight) + 2;
    },
    // 监听滚动
    handleScroll(e) {
      if (this.canScroll) {
        this.canScroll = false
        // 处理数据
        this.handleData(e)
        // 节流
        let timer = setTimeout(() => {
          this.canScroll = true
          clearTimeout(timer)
          timer = null
        }, 30)
      }
    },
    handleData(e) {
      // 记录当前元素滚动的高度
      this.scrollTop = e.target.scrollTop
      // 可见区域第一个元素的index
      const curIndex = ~~(e.target.scrollTop / this.oneHeight)
      // 渲染区域第一个元素的index,这里缓冲区域的列表条数使用的是this.showNum
      this.startIndex = curIndex < this.showNum ? 0 : curIndex - this.showNum
      // 滚动距离底部,还有this.lower距离时,触发触底事件,正在请求中不发送数据
      if (e.target.scrollTop + e.target.clientHeight >= e.target.scrollHeight - this.lower) {
        this.$emit('scrollLower') // 传递触底事件
      }
    }
  },
};
</script>

<style>
.container {
  height: 100%;

  overflow: auto;
}
</style><template>
<div id="app">
<VScroll :allList="allList" :oneHeight="150" :lower="150" @scrollLower="scrollLower">
<!-- 作用域插槽,使用slot-scope取出在组件中遍历的数据 -->
<template slot-scope="{item}">
<div class="box">
<h2>{{ item.title }} - {{ item.id }}</h2>
<h3>{{ item.from }}</h3>
</div>
</template>
</VScroll>
</div>
</template>
<script>
import axios from "axios";
import VScroll from "./components/VScroll.vue";
export default {
name: "App",
data() {
return {
allList: [], // 所有数据
isRequest: false // 是否正在请求数据
};
},
created() {
this.getData(); // 请求数据
},
methods: {
// 请求数据
getData() {
this.isRequest = true; // 正在请求中
axios.get("http://localhost:4000/data?num=10").then((res) => {
// 将结果追加到allList
this.allList = [...this.allList, ...res.data.list];
this.isRequest = false;
});
},
// 滚动到底部
scrollLower() {
if (!this.isRequest) this.getData()
}
},
components: { VScroll }
};
</script>
<style>
#app {
height: 100vh;
}
.box {
width: 96vw;
height: 150px;
background: #eee;
border: 2px navajowhite solid;
box-sizing: border-box;
}
</style>到此这篇关于在vue中实现虚拟列表组件,解决长列表性能问题的文章就介绍到这了,更多相关vue虚拟列表组件内容请搜索编程网以前的文章或继续浏览下面的相关文章希望大家以后多多支持编程网!
--结束END--
本文标题: vue实现虚拟列表组件解决长列表性能问题
本文链接: https://www.lsjlt.com/news/164612.html(转载时请注明来源链接)
有问题或投稿请发送至: 邮箱/279061341@qq.com QQ/279061341
下载Word文档到电脑,方便收藏和打印~
2024-01-12
2023-05-20
2023-05-20
2023-05-20
2023-05-20
2023-05-20
2023-05-20
2023-05-20
2023-05-20
2023-05-20
回答
回答
回答
回答
回答
回答
回答
回答
回答
回答


官方手机版

微信公众号

商务合作


0