目录前言一、如何实现?1、设置横向ListBox2、Item设为刻度样式3、绑定数据源二、完整代码三、效果预览总结前言 尺子在客户端开发中有一定的应用场景,比如厘米尺、白板的画线尺、
尺子在客户端开发中有一定的应用场景,比如厘米尺、白板的画线尺、视频剪辑的时间尺。一般可以采用用户控件通过自绘的方式实现,但今天我要讲一个不一样的方法,不使用自定义控件也不用用户控件,只需要ListBox即能实现一把尺子。
我们实现一把水平的尺子,所以需要让ListBox横向显示
<ListBox.ItemsPanel>
    <ItemsPanelTemplate>
        <VirtualizingStackPanel Orientation="Horizontal"></VirtualizingStackPanel>
    </ItemsPanelTemplate>
</ListBox.ItemsPanel>
一个Item就是一个刻度,我们通过ItemTemplate的方式设置样式。
<ListBox.ItemTemplate>
    <DataTemplate>
        <StackPanel Width="10" Height="46" Orientation="Vertical" Background="Transparent">
            <TextBlock x:Name="text" Margin="0,6,0,6" HorizontalAlignment="Center"  FontSize="16"  Text="{Binding Number}" Foreground="#ffffff"  Visibility="{Binding NumberVisibility}"></TextBlock>
            <Line x:Name="line"  HorizontalAlignment="Center" Height="20" Width="5" X1="2.5" Y1="0" X2="2.5" Y2="25" StrokeThickness="1" Stroke="#aaaaaa"></Line>
        </StackPanel>
</ListBox.ItemTemplate>
由于ListBox是基于数据集合来显示控件的,我们通过绑定数据源让其显示刻度。
<ListBox ItemsSource="{Binding Chips}">
public class RulerChip
{
    public double Number { get; set; }
    public Visibility NumberVisibility { get; set; }

}
public List<RulerChip> Chips { get; set; }=new List<RulerChip>();
MainWindow.xaml
<Window x:Class="WPFApp7.MainWindow"
        xmlns="Http://schemas.microsoft.com/winfx/2006/xaml/presentation"
        xmlns:x="http://schemas.microsoft.com/winfx/2006/xaml"
        xmlns:d="http://schemas.microsoft.com/expression/blend/2008"
        xmlns:mc="http://schemas.openxmlfORMats.org/markup-compatibility/2006"
        xmlns:local="clr-namespace:WpfApp7"
        mc:Ignorable="d"
        Title="MainWindow" Height="450" Width="800">
    <Grid>
        <ListBox  Background="#333333" Height="50" ItemsSource="{Binding Chips}" ScrollViewer.HorizontalScrollBarVisibility="Disabled" >
            <ListBox.ItemContainerStyle>
                <Style  TargetType="{x:Type ListBoxItem}">
                    <Setter Property="Template">
                        <Setter.Value>
                            <ControlTemplate TargetType="{x:Type ListBoxItem}">
                                <ContentPresenter
                                                  Content="{TemplateBinding Content}"
                                                   ContentStringFormat="{TemplateBinding ContentStringFormat}"
                                                   ContentTemplate="{TemplateBinding ContentTemplate}" />
                            </ControlTemplate>
                        </Setter.Value>
                    </Setter>
                </Style>
            </ListBox.ItemContainerStyle>
            <ListBox.ItemsPanel>
                <ItemsPanelTemplate>
                    <VirtualizingStackPanel Orientation="Horizontal"></VirtualizingStackPanel>
                </ItemsPanelTemplate>
            </ListBox.ItemsPanel>
            <ListBox.ItemTemplate>
                <DataTemplate>
                    <StackPanel Width="10" Height="46" Orientation="Vertical" Background="Transparent">
                        <TextBlock x:Name="text" Margin="0,6,0,6" HorizontalAlignment="Center"  FontSize="16"  Text="{Binding Number}" Foreground="#ffffff"  Visibility="{Binding NumberVisibility}"></TextBlock>
                        <Line x:Name="line"  HorizontalAlignment="Center" Height="20" Width="5" X1="2.5" Y1="0" X2="2.5" Y2="25" StrokeThickness="1" Stroke="#aaaaaa"></Line>
                    </StackPanel>
                    <DataTemplate.Triggers>
                        <DataTrigger Binding="{Binding NumberVisibility}" Value="Hidden">
                            <Setter TargetName="line" Property="Y1" Value="3" />
                        </DataTrigger>
                        <Trigger Property="IsMouseOver" Value="True">
                            <Setter TargetName="line" Property="Stroke" Value="RoyalBlue" />
                            <Setter TargetName="text" Property="Foreground" Value="RoyalBlue" />
                        </Trigger>
                    </DataTemplate.Triggers>
                </DataTemplate>
            </ListBox.ItemTemplate>
        </ListBox>
    </Grid>
</Window>
MainWindow.xaml.cs
using System.Collections.Generic;
using System.windows;
namespace WpfApp7
{
    public class RulerChip
    {
        public double Number { get; set; }
        public Visibility NumberVisibility { get; set; }

    }
    /// <summary>
    /// Interaction logic for MainWindow.xaml
    /// </summary>
    public partial class MainWindow : Window
    {

        public List<RulerChip> Chips { get; set; }=new List<RulerChip>();
        public MainWindow()
        {
            InitializeComponent();
            DataContext = this;
            for (int i = 0; i < 100; i++)
            {
                Chips.Add(new RulerChip() { Number=i/10.0, NumberVisibility = (i%10==0)?Visibility.Visible:Visibility.Hidden});
            }
        }
    }
}
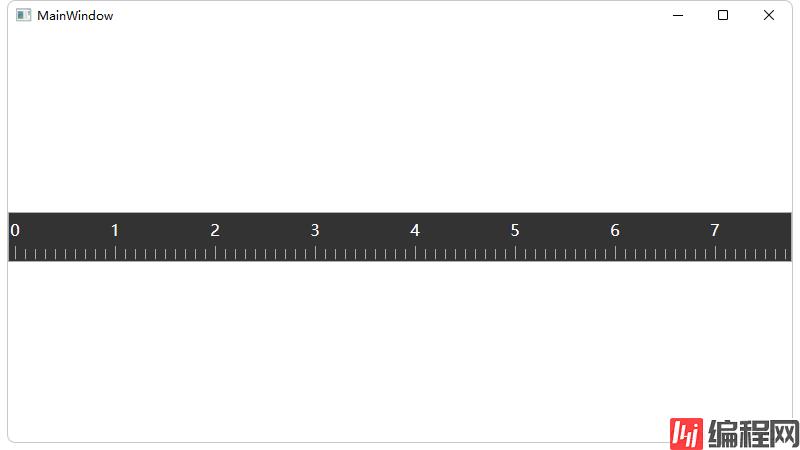
以上就是今天要讲的内容,本文仅仅简单介绍了ListBox实现尺子控件的方法,很容易实现。而且因为使用了虚拟化容器理论上性能很好,就算是几百万刻度绘制也估计不会卡顿。所以在此基础上可以进行一定的拓展,比如利用dpi实现物理尺子,以及实现时间尺的缩放功能等。总的来说,这是一个易于实现且拓展性也不错的尺子实现方案。更多相关C# wpf尺子内容请搜索编程网以前的文章或继续浏览下面的相关文章希望大家以后多多支持编程网!
--结束END--
本文标题: C#wpf使用ListBox实现尺子控件的示例代码
本文链接: https://www.lsjlt.com/news/164783.html(转载时请注明来源链接)
有问题或投稿请发送至: 邮箱/279061341@qq.com QQ/279061341
下载Word文档到电脑,方便收藏和打印~
2024-03-01
2024-03-01
2024-02-29
2024-02-29
2024-02-29
2024-02-29
2024-02-29
2024-02-29
2024-02-29
2024-02-29
回答
回答
回答
回答
回答
回答
回答
回答
回答
回答


官方手机版

微信公众号

商务合作


0