Python 官方文档:入门教程 => 点击学习
目录一、前言1.1、starter加载原理1.1.1、加载starter二、自定义starter2.1、代码2.1.1、新建SpringBoot项目。2.1.2、项目构建完成后,在r
想要自定义starter组件,首先要了解springboot是如何加载starter的,也就是springboot的自动装配机制原理。
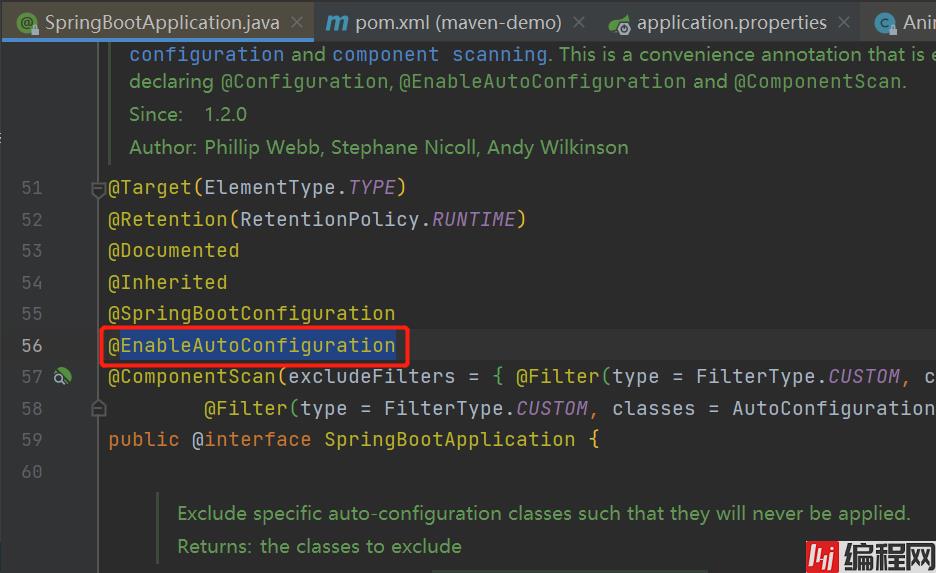
springboot通过一个@SpringBootApplication注解启动项目,springboot在项目启动的时候,会将项目中所有声明为Bean对象(注解、xml)的实例信息全部加载到ioc容器当中。 除此之外也会将所有依赖到的starter里的bean信息加载到ioc容器中,从而做到所谓的零配置,开箱即用。
首先通过通过注解@SpringBootApplication找到@EnableAutoConfiguration注解进行加载starter。

再通过注解@EnableAutoConfiguration下注解@import找到AutoConfigurationImportSelector类加载器实现。

这个AutoConfigurationImportSelector类会去其引用的依赖jar包下,找到一个”spring.factories”文件,一般spring.factories文件里都会声明该依赖所提供的核心功能bean配置信息。文件一般在依赖jar包的META-INF文件夹下面。
以spring-boot版本2.7.7为例,加载spring.factories的代码在:
AutoConfigurationImportSelector.java->selectImports(AnnotationMetadata annotationMetadata)->getAutoConfigurationEntry(annotationMetadata)->getCandidateConfigurations(annotationMetadata, attributes)->SpringFactoriesLoader.loadFactoryNames(getSpringFactoriesLoaderFactoryClass(), getBeanClassLoader())->loadSpringFactories(classLoaderToUse):
private static Map<String, List<String>> loadSpringFactories(ClassLoader classLoader) {
        Map<String, List<String>> result = (Map)cache.get(classLoader);
        if (result != null) {
            return result;
        } else {
            HashMap result = new HashMap();

            try {
                Enumeration urls = classLoader.getResources("META-INF/spring.factories");

                while(urls.hasMoreElements()) {
                    URL url = (URL)urls.nextElement();
                    UrlResource resource = new UrlResource(url);
                    Properties properties = PropertiesLoaderUtils.loadProperties(resource);
                    Iterator var6 = properties.entrySet().iterator();

                    while(var6.hasNext()) {
                        Entry<?, ?> entry = (Entry)var6.next();
                        String factoryTypeName = ((String)entry.geTKEy()).trim();
                        String[] factoryImplementationNames = StringUtils.commaDelimitedListToStringArray((String)entry.getValue());
                        String[] var10 = factoryImplementationNames;
                        int var11 = factoryImplementationNames.length;

                        for(int var12 = 0; var12 < var11; ++var12) {
                            String factoryImplementationName = var10[var12];
                            ((List)result.computeIfAbsent(factoryTypeName, (key) -> {
                                return new ArrayList();
                            })).add(factoryImplementationName.trim());
                        }
                    }
                }

                result.replaceAll((factoryType, implementations) -> {
                    return (List)implementations.stream().distinct().collect(Collectors.collectingAndThen(Collectors.toList(), Collections::unmodifiableList));
                });
                cache.put(classLoader, result);
                return result;
            } catch (IOException var14) {
                throw new IllegalArgumentException("Unable to load factories from location [META-INF/spring.factories]", var14);
            }
        }
    }
举例如:spring-boot-autoconfig的spring.factories.

上面了解了springboot加载starter原理,其实就是加载依赖jar包下的spring.factories文件。所以我们要自定义starter,就需要在项目中建立一个META-INF的文件夹,然后在该文件夹下面建一个spring.factories文件,文件里将你需要提供出去的bean实例信息配置好就行。
简单演示所以需求配置任务依赖。如springboot构建很慢,或者打包的时候下载依赖很慢,可在pom文件中添加如下仓库配置,可以加快构建速度。
 <repositories>
        <repository>
            <id>aliMaven</id>
            <url>https://maven.aliyun.com/repository/public</url>
        </repository>
    </repositories>

    <pluginRepositories>
        <pluginRepository>
            <id>alimaven</id>
            <url>Https://maven.aliyun.com/repository/public</url>
        </pluginRepository>
    </pluginRepositories>
注意:spring官方规定自定义组件的命名:
SpringBoot官方命名方式
格式:spring-boot-starter-{模块名}
举例:spring-boot-starter-WEB
自定义命名方式
格式:{模块名}-spring-boot-starter
举例:mystarter-spring-boot-starter

一个接口AnimalService:
package com.example.demospringbootstarter.service;


public interface AnimalService {

    String say();
}
两个接口实现类CatService和DogService:
package com.example.demospringbootstarter.service;

import lombok.AllArgsConstructor;
import lombok.Data;
import lombok.NoArgsConstructor;
import org.springframework.stereotype.Service;


@Service
public class CatService implements AnimalService{

    public static String name = "cat";

    @Override
    public String say() {
        return "喵喵";
    }
}
package com.example.demospringbootstarter.service;
import org.springframework.stereotype.Service;
@Service
public class DogService implements AnimalService{
public static String name = "dog";
@Override
public String say() {
return "汪汪";
}
}再建一个配置AnimalProperties类,方便注入属性值:
package com.example.demospringbootstarter.config;

import lombok.Data;
import org.springframework.boot.context.properties.ConfigurationProperties;


@Data
@ConfigurationProperties(prefix = "animal")
public class AnimalProperties {

    private String name;
}
最后新建一个核心自动装备配置类:
package com.example.demospringbootstarter.config;

import com.example.demospringbootstarter.service.AnimalService;
import com.example.demospringbootstarter.service.CatService;
import com.example.demospringbootstarter.service.DogService;
import org.springframework.beans.factory.annotation.Autowired;
import org.springframework.boot.context.properties.EnableConfigurationProperties;
import org.springframework.context.annotation.Bean;
import org.springframework.context.annotation.Configuration;


@Configuration
@EnableConfigurationProperties(AnimalProperties.class)
public class AnimalAutoConfig {

    @Autowired
    private AnimalProperties animalProperties;

    @Bean
    public AnimalService demoService(){
        switch (animalProperties.getName()){
            case "cat":
                return new CatService();
            case "dog":
                return new DogService();
            default:
                return null;
        }
    }
}
META-INF/spring.factories的内容为:
org.springframework.boot.autoconfigure.EnableAutoConfiguration=\
  com.example.demospringbootstarter.config.AnimalAutoConfig
以上步骤都好后,使用maven命令打包:
mvn clean install -Dmaven.test.skip=true或者使用idea的LIfecycle点击对应操作(注意不是plugin下的命令操作)。

pom.xml内容为:
<?xml version="1.0" encoding="UTF-8"?>
<project xmlns="http://maven.apache.org/POM/4.0.0" xmlns:xsi="http://www.w3.org/2001/XMLSchema-instance"
         xsi:schemaLocation="http://maven.apache.org/POM/4.0.0 https://maven.apache.org/xsd/maven-4.0.0.xsd">
    <modelVersion>4.0.0</modelVersion>
    <parent>
        <groupId>org.springframework.boot</groupId>
        <artifactId>spring-boot-starter-parent</artifactId>
        <version>2.3.4.RELEASE</version>
        <relativePath/> <!-- lookup parent from repository -->
    </parent>
    <groupId>com.example</groupId>
    <artifactId>demo-spring-boot-starter</artifactId>
    <version>0.0.4-SNAPSHOT</version>
    <name>demo-spring-boot-starter</name>
    <description>Demo project for Spring Boot</description>
    <properties>
        <java.version>8</java.version>
    </properties>
    <dependencies>
        <dependency>
            <groupId>org.springframework.boot</groupId>
            <artifactId>spring-boot-starter-web</artifactId>
        </dependency>

        <dependency>
            <groupId>org.projectlombok</groupId>
            <artifactId>lombok</artifactId>
            <optional>true</optional>
        </dependency>

    </dependencies>

    <repositories>
        <repository>
            <id>alimaven</id>
            <url>https://maven.aliyun.com/repository/public</url>
        </repository>
    </repositories>

    <pluginRepositories>
        <pluginRepository>
            <id>alimaven</id>
            <url>https://maven.aliyun.com/repository/public</url>
        </pluginRepository>
    </pluginRepositories>

</project>
        <dependency>
            <groupId>com.example</groupId>
            <artifactId>demo-spring-boot-starter</artifactId>
            <version>0.0.4-SNAPSHOT</version>
</dependency>package com.cjb.mavendemo.controllers;
import com.example.demospringbootstarter.service.AnimalService;
import com.example.inputoutputlogspringbootstarter.config.PrintResponseTime;
import org.springframework.beans.factory.annotation.Autowired;
import org.springframework.web.bind.annotation.GetMapping;
import org.springframework.web.bind.annotation.RequestMapping;
import org.springframework.web.bind.annotation.RestController;
@RestController
@RequestMapping(value = "/test")
public class TestController {
@Autowired
private AnimalService animalService;
@PrintResponseTime
@GetMapping("/call")
public String call(){
return animalService.say();
}
}
package com.cjb.mavendemo;

import org.springframework.boot.SpringApplication;
import org.springframework.boot.autoconfigure.SpringBootApplication;

@SpringBootApplication
public class MavenDemoApplication {

    public static void main(String[] args) {
        SpringApplication.run(MavenDemoApplication.class, args);
    }

}调用http接口测试:

修改"animal.name"值为"cat",再次调用http接口访问:

组件代码:https://download.csdn.net/download/u010132847/87426046
集成自定义组件代码:https://download.csdn.net/download/u010132847/87426048
到此这篇关于实现自定义SpringBoot的Starter组件的文章就介绍到这了,更多相关SpringBoot自定义Starter组件内容请搜索编程网以前的文章或继续浏览下面的相关文章希望大家以后多多支持编程网!
--结束END--
本文标题: 如何实现自定义SpringBoot的Starter组件
本文链接: https://www.lsjlt.com/news/195164.html(转载时请注明来源链接)
有问题或投稿请发送至: 邮箱/279061341@qq.com QQ/279061341
下载Word文档到电脑,方便收藏和打印~
2024-03-01
2024-03-01
2024-03-01
2024-02-29
2024-02-29
2024-02-29
2024-02-29
2024-02-29
2024-02-29
2024-02-29
回答
回答
回答
回答
回答
回答
回答
回答
回答
回答
0