Python 官方文档:入门教程 => 点击学习
目录阅读收获本章源码下载什么是Starter为什么使用StarterSpringBoot自动配置spring.factoriesStarter开发常用注解Full全模式和Lite轻量
学会自定义Spring-Boot-Starter
理解SpringBoot自动配置原理
开发starter
测试starter
Starter是Spring Boot中的一个非常重要的概念,Starter相当于模块,它能将模块所需的依赖整合起来并对模块内的Bean根据环境( 条件)进行自动配置。
使用者只需要依赖相应功能的Starter,无需做过多的配置和依赖,Spring Boot就能自动扫描并加载相应的模块并设置默认值,做到开箱即用
在我们的日常开发工作中,经常会有一些独立于业务之外的配置模块,我们经常将其放到一个特定的包下,然后如果另一个工程需要复用这块功能的时候,需要将代码硬拷贝到另一个工程,重新集成一遍,麻烦至极。
如果我们将这些可独立于业务代码之外的功配置模块封装成一个个starter,并在starter中设置好默认值,复用的时候只需要将其在pom中引用依赖即可,Spring Boot为我们完成自动装配,做到开箱即用。
SpringBoot中的starter是一种非常重要的机制,能够抛弃以前繁杂的配置,将其统一集成进starter,应用者只需要在Maven中引入starter依赖,Spring Boot就能自动扫描各个jar包下classpath路径的spring.factories文件,加载自动配置类信息,加载相应的bean信息并启动相应的默认配置。
Spring Boot提供了针对日常企业应用研发各种场景的spring-boot-starter依赖模块。所有这些依赖模块都遵循着约定成俗的默认配置,并允许我们调整这些配置,即遵循“约定大于配置”的理念。
大家可以看看我之前写的一篇文章,详细介绍了springboot自动配置的流程:一文搞懂SpringBoot自动配置原理
Spring Boot会默认扫描跟启动类平级的包,如果我们的Starter跟启动类不在同一个主包下,需要通过配置spring.factories文件来配置生效,SpringBoot默认加载各个jar包下classpath路径的spring.factories文件,配置的key为org.springframework.boot.autoconfigure.EnableAutoConfiguration
注解使用已经大大方便我们开发,再也不需要写xml配置文件了,SpringBoot经过查找spring.factories文件,加载自动配置类,而自动配置类中定义了各种运行时判断条件,如@ConditionalOnMissingBean(A.class)等,只要ioc容器中没有指定的A类型的bean信息,该配置文件才会生效。
@Conditional是Spring4新提供的注解,它的作用是按照一定的条件进行判断,满足条件给容器注册bean。
1.属性映射注解
2.配置bean注解
3.条件注解
@Conditional:是根据条件类创建特定的Bean,条件类需要实现Condition接口,并重写matches接口来构造判断条件。
@ConditionalOnBean :容器中存在指定bean,才会实例化一个Bean
@ConditionalOnMissingBean:容器中不存在指定bean,才会实例化一个Bean
@ConditionalOnClass:系统中有指定类,才会实例化一个Bean
@ConditionalOnMissinGClass:系统中没有指定类,才会实例化一个Bean
@ConditionalOnExpression:当SpEl表达式为true的时候,才会实例化一个Bean
@AutoConfigureAfter :在某个bean完成自动配置后实例化这个bean
@AutoConfigureBefore :在某个bean完成自动配置前实例化这个bean
@ConditionalOnJava :系统中版本是否符合要求
@ConditionalOnSingleCandidate:当指定的Bean在容器中只有一个,或者有多个但是指定了首选的Bean时触发实例化
@ConditionalOnResource:类路径下是否存在指定资源文件
@ConditionalOnWEBApplication:是web应用
@ConditionalOnNotWebApplication:不是web应用
@ConditionalOnJndi:JNDI指定存在项
@ConditionalOnProperty: 配置Configuration的加载规则
@Configuration参数proxyBeanMethods:
Full 全模式(默认):@Configuration(proxyBeanMethods = true)
同一配置类下,当直接调用@Bean修饰的方法注入的对象,则调用该方法会被代理,从ioc容器中取bean实列,所以实列是一样的。即单实例对象,在该模式下SpringBoot每次启动都会判断检查容器中是否存在该组件
Lite 轻量级模式:@Configuration(proxyBeanMethods = false)
同一配置类下,当直接调用@Bean修饰的方法注入的对象,则调用该方法不会被代理,相当于直接调用一个普通方法,会有构造方法,但是没有bean的生命周期,返回的是不同的实例。
注:proxyBeanMethods 是为了让使用@Bean注解的方法被代理。而不是@Bean的单例多例的设置参数。
测试例子这里不展示,可以下载我的代码查看
@Configuration(proxyBeanMethods = false)
public class AppConfig {

    //放一份myBean到ioc容器
    @Bean
    public Mybean myBean() {
        return new Mybean();
    }
    //放一份yourBean到ioc容器
    @Bean
    public YourBean yourBean() {
        System.out.println("==========");
        //注意:@Configuration(proxyBeanMethods = false):myBean()方法不代理,直接调用
        //注意:@Configuration(proxyBeanMethods = true):myBean()方法代理,从ioc容器拿
        return new YourBean(myBean());
    }
}
什么时候用Full全模式,什么时候用Lite轻量级模式?
Spring官方Starter通常命名为spring-boot-starter-{name}如:spring-boot-starter-web
Spring官方建议非官方Starter命名应遵循{name}-spring-boot-starter的格式:如mybatis-spring-boot-starter。

新建项目后,要删除main启动类
<?xml version="1.0" encoding="UTF-8"?>
<project xmlns="Http://maven.apache.org/POM/4.0.0"
         xmlns:xsi="http://www.w3.org/2001/XMLSchema-instance"
         xsi:schemaLocation="http://maven.apache.org/POM/4.0.0 http://maven.apache.org/xsd/maven-4.0.0.xsd">
    <parent>
        <groupId>org.springframework.boot</groupId>
        <artifactId>spring-boot-starter-parent</artifactId>
        <version>2.6.1</version>
        <relativePath/> <!-- lookup parent from repository -->
    </parent>

    <modelVersion>4.0.0</modelVersion>
    <groupId>com.ljw</groupId>
    <artifactId>ljw-spring-boot-starter</artifactId>
    <version>1.0</version>

   <properties>
        <java.version>1.8</java.version>
        <maven.compiler.source>8</maven.compiler.source>
        <maven.compiler.target>8</maven.compiler.target>
    </properties>


    <dependencies>

        <dependency>
            <groupId>org.springframework.boot</groupId>
            <artifactId>spring-boot-starter</artifactId>
        </dependency>

        <!--        包含自动配置的代码-->
        <dependency>
            <groupId>org.springframework.boot</groupId>
            <artifactId>spring-boot-autoconfigure</artifactId>
        </dependency>

        <!--        配置文件点击可以跳转实体-->
        <dependency>
            <groupId>org.springframework.boot</groupId>
            <artifactId>spring-boot-configuration-processor</artifactId>
            <optional>true</optional>
        </dependency>

    </dependencies>

</project>
我们没有main入口,需要去除pom文件中maven打包插件spring-boot-maven-plugin
spring-boot-configuration-processor作用:
@ConfigurationProperties可以定义一个配置信息类,和配置文件进行映射
@ConfigurationProperties(prefix = "ljw.config")
public class HelloProperties {

    private String name = "hello 默认值!";

    private int age = 8;

    public int getAge() {
        return age;
    }

    public void setAge(int age) {
        this.age = age;
    }

    public String getName() {
        return name;
    }

    public void setName(String name) {
        this.name = name;
    }
}
这里可以模拟一些获取了配置文件信息的进行业务操作的业务类
public class HelloService {

    private String name;

    private int age;

    public String getName() {
        return name;
    }

    public void setName(String name) {
        this.name = name;
    }

    public int getAge() {
        return age;
    }

    public void setAge(int age) {
        this.age = age;
    }

    public String hello() {
        return "HelloService{" +
                "name='" + name + ''' +
                ", age=" + age +
                '}';
    }
}
命名规范:XxxAutoConfiguration
@Configuration(proxyBeanMethods = false)
// 当存在某个类时,此自动配置类才会生效
@ConditionalOnClass(value = {HelloService.class})
// 导入我们自定义的配置类,供当前类使用
@EnableConfigurationProperties(value = HelloProperties.class)
// 只有非web应用程序时此自动配置类才会生效
@ConditionalOnWebApplication
//判断ljw.config.flag的值是否为“true”, matchIfMissing = true:没有该配置属性时也会正常加载
@ConditionalOnProperty(prefix = "ljw.config", name = "flag", havingValue = "true", matchIfMissing = true)
public class HelloAutoConfiguration {


    @Bean
    @ConditionalOnMissingBean(HelloService.class)
    //@ConditionalOnProperty(prefix = "ljw.config", name = "flag", havingValue = "true", matchIfMissing = true)
    public HelloService helloService(HelloProperties helloProperties) {
        HelloService helloService = new HelloService();
        //把获取的信息注入
        helloService.setName(helloProperties.getName());
        helloService.setAge(helloProperties.getAge());
        return helloService;
    }

}
注:这里配置一个web应用才能注入,并且ljw.config.flag的值是否为“true”或者不配置该key才能注入HelloService服务
把自动配置类HelloAutoConfiguration配置到org.springframework.boot.autoconfigure.EnableAutoConfiguration的key下,springboot会自动加载该文件并根据条件装配
org.springframework.boot.autoconfigure.EnableAutoConfiguration=\
com.ljw.starter.config.HelloAutoConfiguration
additional-spring-configuration-metadata.json
配置additional-spring-configuration-metadata.json文件后,在开发人员的IDE工具使用个人编写的配置读取很有效的在application.properties或application.yml文件下完成提示。
配置详细格式参数可查看文档
我的配置:
{"properties": [
    {
      "name": "ljw.config.name",
      "type": "java.lang.String",
      "defaultValue": "hello 默认值!这里配置的是提示,真正默认值在Properties里面",
      "description": "这是字符串名称啊."
    },
    {
      "name": "ljw.config.age",
      "defaultValue": 8,
      "description": "这是int类型的年龄啊.",
      "deprecation": {
              "reason": "过时原因.",
              "replacement": "替代key是:ljw.config.age22",
              "level": "warning"
            }
    }
]}
大家参考下面properties表格进行配置上的理解。
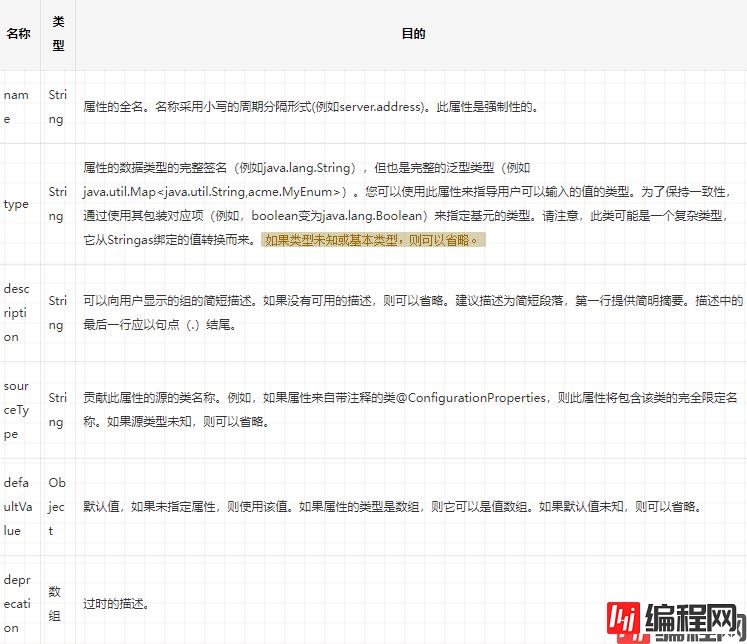
deprecation每个properties元素的属性中包含的JSON对象可以包含以下属性:

spring-configuration-metadata.json
spring-configuration-metadata.json代码量挺大的,为了方便我们可以通过IDE来生成,这里使用的是idea。
在idea设置中搜索Annotation Processors,接下来勾住Enable annonation processing就完成了。在编译打包后的文件中看到自动生成的spring-configuration-metadata.json。这个文件不用我们编写

下面是自动生成的:
{
  "groups": [
    {
      "name": "ljw.config",
      "type": "com.ljw.starter.properties.HelloProperties",
      "sourceType": "com.ljw.starter.properties.HelloProperties"
    }
  ],
  "properties": [
    {
      "name": "ljw.config.name",
      "type": "java.lang.String",
      "description": "这是字符串名称啊.",
      "sourceType": "com.ljw.starter.properties.HelloProperties",
      "defaultValue": "hello 默认值!这里配置的是提示,真正默认值在Properties里面"
    },
    {
      "name": "ljw.config.age",
      "type": "java.lang.Integer",
      "description": "这是int类型的年龄啊.",
      "sourceType": "com.ljw.starter.properties.HelloProperties",
      "defaultValue": 8,
      "deprecated": true,
      "deprecation": {
        "level": "warning",
        "reason": "过时原因.",
        "replacement": "替代key是:ljw.config.age22"
      }
    }
  ],
  "hints": []
}
install打包自定义starter项目:ljw-spring-boot-starter
新建项目:ljw-test-spring-boot-starter
引入打好包的自定义starter
<dependencies>

    <dependency>
        <groupId>org.springframework.boot</groupId>
        <artifactId>spring-boot-starter</artifactId>
    </dependency>
    <!--        测试web应用-->
    <dependency>
        <groupId>org.springframework.boot</groupId>
        <artifactId>spring-boot-starter-web</artifactId>
    </dependency>
    <!--自定义satrter-->
    <dependency>
        <groupId>com.ljw</groupId>
        <artifactId>ljw-spring-boot-starter</artifactId>
        <version>1.0</version>
    </dependency>
</dependencies>
@Service
public class TestController implements CommandLineRunner {


    @Resource
    private HelloService helloService;

    @Override
    public void run(String... args) throws Exception {
        System.out.println(helloService.hello());
    }
}
输入前缀可以看出已经有提示了

ljw.config.name=ljw hello!
ljw.config.age=99
ljw.config.flag=true
#不会注入
#ljw.config.flag=true1
# 可以看到哪些自动配置了
debug=true
HelloService{name='ljw hello!', age=99}
条件注入
通过启用 debug=true 属性,让控制台打印自动配置报告,这样就可以很方便地知道哪些自动配置类生效。
   HelloAutoConfiguration matched:
      - @ConditionalOnClass found required class 'com.ljw.starter.service.HelloService' (OnClassCondition)
      - @ConditionalOnWebApplication (required) found 'session' scope (OnWebApplicationCondition)
      - @ConditionalOnProperty (ljw.config.flag=true) matched (OnPropertyCondition)

   HelloAutoConfiguration#helloService matched:
      - @ConditionalOnMissingBean (types: com.ljw.starter.service.HelloService; SearchStrategy: all) did not find any beans (OnBeanCondition)
以上就是详解SpringBoot如何自定义Starter的详细内容,更多关于SpringBoot自定义Starter的资料请关注编程网其它相关文章!
--结束END--
本文标题: 详解SpringBoot如何自定义Starter
本文链接: https://www.lsjlt.com/news/161389.html(转载时请注明来源链接)
有问题或投稿请发送至: 邮箱/279061341@qq.com QQ/279061341
下载Word文档到电脑,方便收藏和打印~
2024-03-01
2024-03-01
2024-03-01
2024-02-29
2024-02-29
2024-02-29
2024-02-29
2024-02-29
2024-02-29
2024-02-29
回答
回答
回答
回答
回答
回答
回答
回答
回答
回答


官方手机版

微信公众号

商务合作


0