Python 官方文档:入门教程 => 点击学习
小编给大家分享一下python如何实现我的世界小游戏,相信大部分人都还不怎么了解,因此分享这篇文章给大家参考一下,希望大家阅读完这篇文章后大有收获,下面让我们一起去了解一下吧!我的世界小游戏使用方法:移动前进:W,后退:S,向左:A,向右:
小编给大家分享一下python如何实现我的世界小游戏,相信大部分人都还不怎么了解,因此分享这篇文章给大家参考一下,希望大家阅读完这篇文章后大有收获,下面让我们一起去了解一下吧!
我的世界小游戏使用方法:
移动
前进:W,后退:S,向左:A,向右:D,环顾四周:鼠标,跳起:空格键,切换飞行模式:Tab;
选择建筑材料
砖:1,草:2,沙子:3,删除建筑:鼠标左键单击,创建建筑块:鼠标右键单击
ESC退出程序。
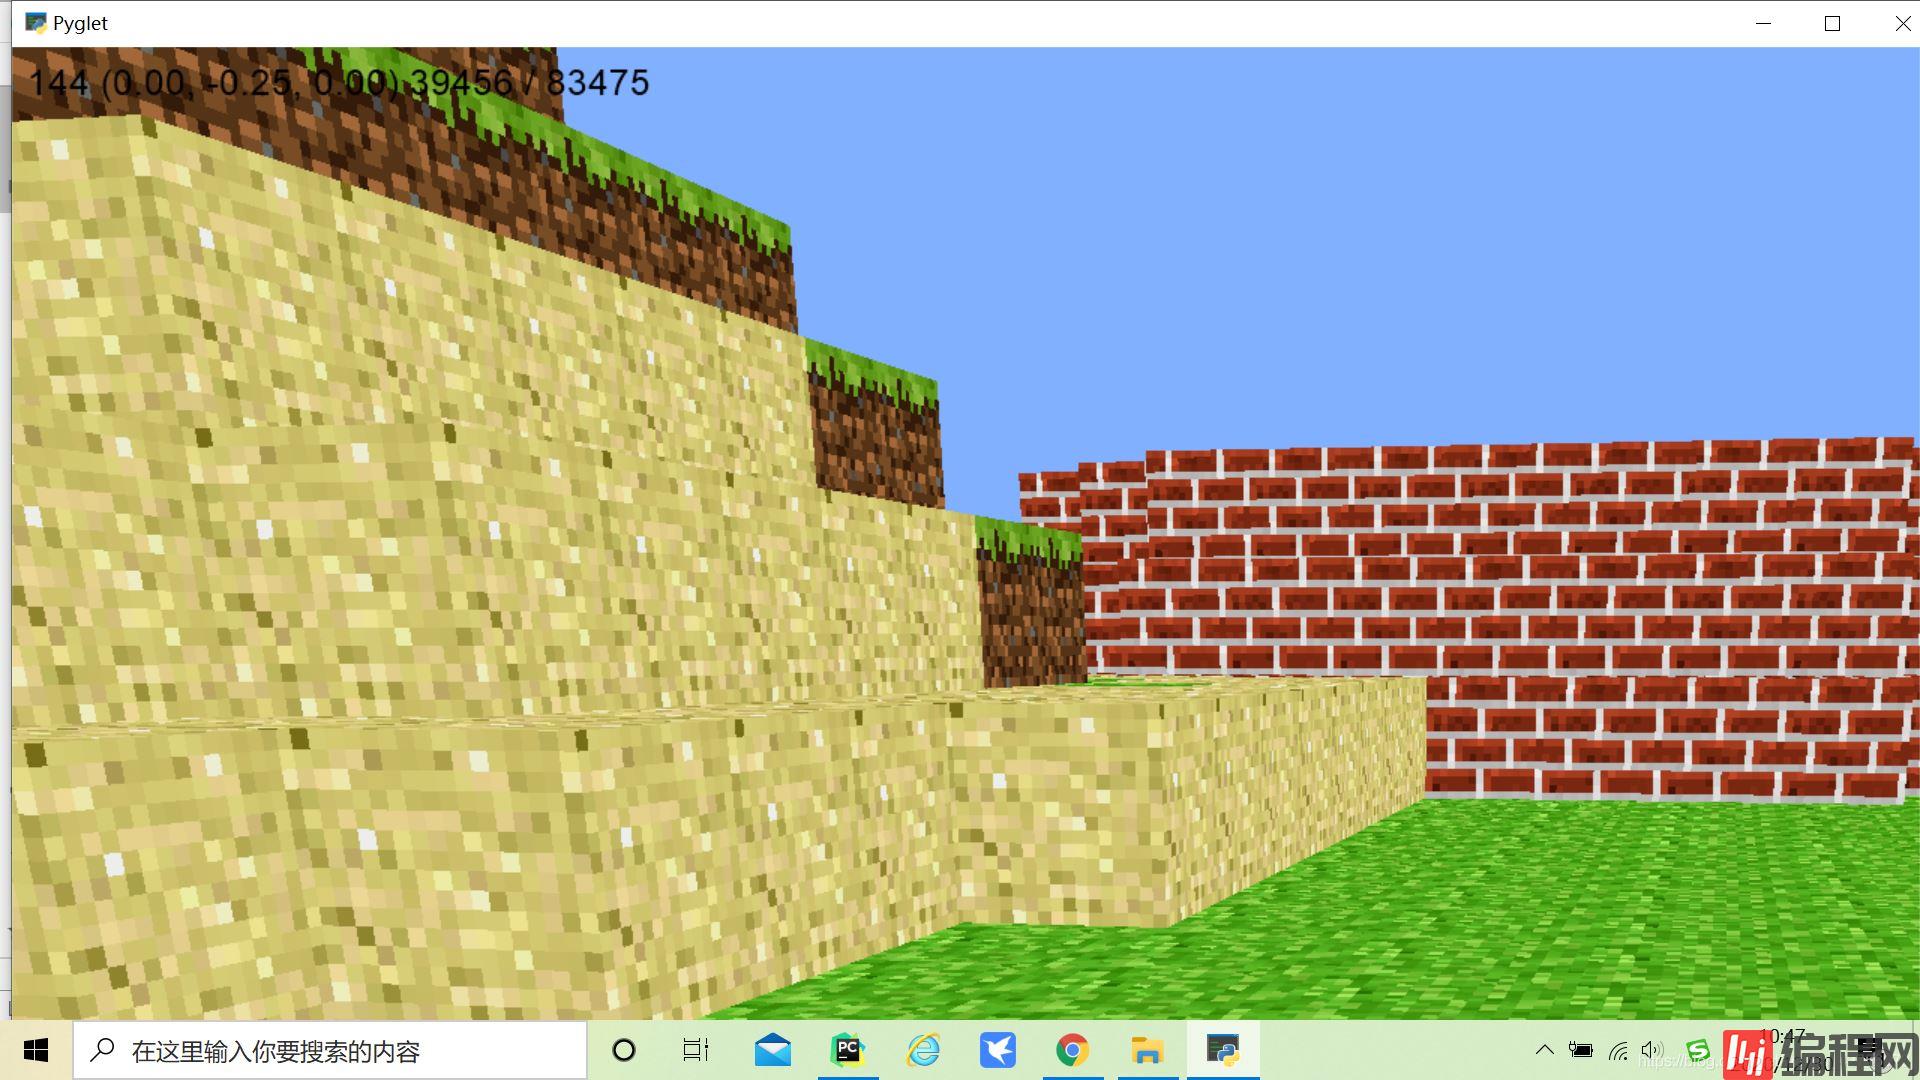
完整程序包请通过文末地址下载,程序运行截图如下:
from __future__ import divisionimport sysimport mathimport randomimport timefrom collections import dequefrom pyglet import imagefrom pyglet.gl import *from pyglet.graphics import TextureGroupfrom pyglet.window import key, mouseTICKS_PER_SEC = 60# Size of sectors used to ease block loading.SECTOR_SIZE = 16WALKING_SPEED = 5FLYING_SPEED = 15GRAVITY = 20.0MAX_JUMP_HEIGHT = 1.0 # About the height of a block.# To derive the fORMula for calculating jump speed, first solve# v_t = v_0 + a * t# for the time at which you achieve maximum height, where a is the acceleration# due to gravity and v_t = 0. This gives:# t = - v_0 / a# Use t and the desired MAX_JUMP_HEIGHT to solve for v_0 (jump speed) in# s = s_0 + v_0 * t + (a * t^2) / 2JUMP_SPEED = math.sqrt(2 * GRAVITY * MAX_JUMP_HEIGHT)TERMINAL_VELOCITY = 50PLAYER_HEIGHT = 2if sys.version_info[0] >= 3: xrange = rangedef cube_vertices(x, y, z, n): """ Return the vertices of the cube at position x, y, z with size 2*n. """ return [ x-n,y+n,z-n, x-n,y+n,z+n, x+n,y+n,z+n, x+n,y+n,z-n, # top x-n,y-n,z-n, x+n,y-n,z-n, x+n,y-n,z+n, x-n,y-n,z+n, # bottom x-n,y-n,z-n, x-n,y-n,z+n, x-n,y+n,z+n, x-n,y+n,z-n, # left x+n,y-n,z+n, x+n,y-n,z-n, x+n,y+n,z-n, x+n,y+n,z+n, # right x-n,y-n,z+n, x+n,y-n,z+n, x+n,y+n,z+n, x-n,y+n,z+n, # front x+n,y-n,z-n, x-n,y-n,z-n, x-n,y+n,z-n, x+n,y+n,z-n, # back ]def tex_coord(x, y, n=4): """ Return the bounding vertices of the texture square. """ m = 1.0 / n dx = x * m dy = y * m return dx, dy, dx + m, dy, dx + m, dy + m, dx, dy + mdef tex_coords(top, bottom, side): """ Return a list of the texture squares for the top, bottom and side. """ top = tex_coord(*top) bottom = tex_coord(*bottom) side = tex_coord(*side) result = [] result.extend(top) result.extend(bottom) result.extend(side * 4) return resultTEXTURE_PATH = 'texture.png'GRASS = tex_coords((1, 0), (0, 1), (0, 0))SAND = tex_coords((1, 1), (1, 1), (1, 1))BRICK = tex_coords((2, 0), (2, 0), (2, 0))STONE = tex_coords((2, 1), (2, 1), (2, 1))FACES = [ ( 0, 1, 0), ( 0,-1, 0), (-1, 0, 0), ( 1, 0, 0), ( 0, 0, 1), ( 0, 0,-1),]def normalize(position): """ Accepts `position` of arbitrary precision and returns the block containing that position. Parameters ---------- position : tuple of len 3 Returns ------- block_position : tuple of ints of len 3 """ x, y, z = position x, y, z = (int(round(x)), int(round(y)), int(round(z))) return (x, y, z)def sectorize(position): """ Returns a tuple representing the sector for the given `position`. Parameters ---------- position : tuple of len 3 Returns ------- sector : tuple of len 3 """ x, y, z = normalize(position) x, y, z = x // SECTOR_SIZE, y // SECTOR_SIZE, z // SECTOR_SIZE return (x, 0, z)class Model(object): def __init__(self): # A Batch is a collection of vertex lists for batched rendering. self.batch = pyglet.graphics.Batch() # A TextureGroup manages an OpenGL texture. self.group = TextureGroup(image.load(TEXTURE_PATH).get_texture()) # A mapping from position to the texture of the block at that position. # This defines all the blocks that are currently in the world. self.world = {} # Same mapping as `world` but only contains blocks that are shown. self.shown = {} # Mapping from position to a pyglet `VertextList` for all shown blocks. self._shown = {} # Mapping from sector to a list of positions inside that sector. self.sectors = {} # Simple function queue implementation. The queue is populated with # _show_block() and _hide_block() calls self.queue = deque() self._initialize() def _initialize(self): """ Initialize the world by placing all the blocks. """ n = 80 # 1/2 width and height of world s = 1 # step size y = 0 # initial y height for x in xrange(-n, n + 1, s): for z in xrange(-n, n + 1, s): # create a layer stone an grass everywhere. self.add_block((x, y - 2, z), GRASS, immediate=False) self.add_block((x, y - 3, z), STONE, immediate=False) if x in (-n, n) or z in (-n, n): # create outer walls. for dy in xrange(-2, 3): self.add_block((x, y + dy, z), STONE, immediate=False) # generate the hills randomly o = n - 10 for _ in xrange(120): a = random.randint(-o, o) # x position of the hill b = random.randint(-o, o) # z position of the hill c = -1 # base of the hill h = random.randint(1, 6) # height of the hill s = random.randint(4, 8) # 2 * s is the side length of the hill d = 1 # how quickly to taper off the hills t = random.choice([GRASS, SAND, BRICK]) for y in xrange(c, c + h): for x in xrange(a - s, a + s + 1): for z in xrange(b - s, b + s + 1): if (x - a) ** 2 + (z - b) ** 2 > (s + 1) ** 2: continue if (x - 0) ** 2 + (z - 0) ** 2 < 5 ** 2: continue self.add_block((x, y, z), t, immediate=False) s -= d # decrement side lenth so hills taper off def hit_test(self, position, vector, max_distance=8): """ Line of sight search from current position. If a block is intersected it is returned, along with the block previously in the line of sight. If no block is found, return None, None. Parameters ---------- position : tuple of len 3 The (x, y, z) position to check visibility from. vector : tuple of len 3 The line of sight vector. max_distance : int How many blocks away to search for a hit. """ m = 8 x, y, z = position dx, dy, dz = vector previous = None for _ in xrange(max_distance * m): key = normalize((x, y, z)) if key != previous and key in self.world: return key, previous previous = key x, y, z = x + dx / m, y + dy / m, z + dz / m return None, None def exposed(self, position): """ Returns False is given `position` is surrounded on all 6 sides by blocks, True otherwise. """ x, y, z = position for dx, dy, dz in FACES: if (x + dx, y + dy, z + dz) not in self.world: return True return False def add_block(self, position, texture, immediate=True): """ Add a block with the given `texture` and `position` to the world. Parameters ---------- position : tuple of len 3 The (x, y, z) position of the block to add. texture : list of len 3 The coordinates of the texture squares. Use `tex_coords()` to generate. immediate : bool Whether or not to draw the block immediately. """ if position in self.world: self.remove_block(position, immediate) self.world[position] = texture self.sectors.setdefault(sectorize(position), []).append(position) if immediate: if self.exposed(position): self.show_block(position) self.check_neighbors(position) def remove_block(self, position, immediate=True): """ Remove the block at the given `position`. Parameters ---------- position : tuple of len 3 The (x, y, z) position of the block to remove. immediate : bool Whether or not to immediately remove block from canvas. """ del self.world[position] self.sectors[sectorize(position)].remove(position) if immediate: if position in self.shown: self.hide_block(position) self.check_neighbors(position) def check_neighbors(self, position): """ Check all blocks surrounding `position` and ensure their visual state is current. This means hiding blocks that are not exposed and ensuring that all exposed blocks are shown. Usually used after a block is added or removed. """ x, y, z = position for dx, dy, dz in FACES: key = (x + dx, y + dy, z + dz) if key not in self.world: continue if self.exposed(key): if key not in self.shown: self.show_block(key) else: if key in self.shown: self.hide_block(key) def show_block(self, position, immediate=True): """ Show the block at the given `position`. This method assumes the block has already been added with add_block() Parameters ---------- position : tuple of len 3 The (x, y, z) position of the block to show. immediate : bool Whether or not to show the block immediately. """ texture = self.world[position] self.shown[position] = texture if immediate: self._show_block(position, texture) else: self._enqueue(self._show_block, position, texture) def _show_block(self, position, texture): """ Private implementation of the `show_block()` method. Parameters ---------- position : tuple of len 3 The (x, y, z) position of the block to show. texture : list of len 3 The coordinates of the texture squares. Use `tex_coords()` to generate. """ x, y, z = position vertex_data = cube_vertices(x, y, z, 0.5) texture_data = list(texture) # create vertex list # FIXME Maybe `add_indexed()` should be used instead self._shown[position] = self.batch.add(24, GL_QUADS, self.group, ('v3f/static', vertex_data), ('t2f/static', texture_data)) def hide_block(self, position, immediate=True): """ Hide the block at the given `position`. Hiding does not remove the block from the world. Parameters ---------- position : tuple of len 3 The (x, y, z) position of the block to hide. immediate : bool Whether or not to immediately remove the block from the canvas. """ self.shown.pop(position) if immediate: self._hide_block(position) else: self._enqueue(self._hide_block, position) def _hide_block(self, position): """ Private implementation of the 'hide_block()` method. """ self._shown.pop(position).delete() def show_sector(self, sector): """ Ensure all blocks in the given sector that should be shown are drawn to the canvas. """ for position in self.sectors.get(sector, []): if position not in self.shown and self.exposed(position): self.show_block(position, False) def hide_sector(self, sector): """ Ensure all blocks in the given sector that should be hidden are removed from the canvas. """ for position in self.sectors.get(sector, []): if position in self.shown: self.hide_block(position, False) def change_sectors(self, before, after): """ Move from sector `before` to sector `after`. A sector is a contiguous x, y sub-region of world. Sectors are used to speed up world rendering. """ before_set = set() after_set = set() pad = 4 for dx in xrange(-pad, pad + 1): for dy in [0]: # xrange(-pad, pad + 1): for dz in xrange(-pad, pad + 1): if dx ** 2 + dy ** 2 + dz ** 2 > (pad + 1) ** 2: continue if before: x, y, z = before before_set.add((x + dx, y + dy, z + dz)) if after: x, y, z = after after_set.add((x + dx, y + dy, z + dz)) show = after_set - before_set hide = before_set - after_set for sector in show: self.show_sector(sector) for sector in hide: self.hide_sector(sector) def _enqueue(self, func, *args): """ Add `func` to the internal queue. """ self.queue.append((func, args)) def _dequeue(self): """ Pop the top function from the internal queue and call it. """ func, args = self.queue.popleft() func(*args) def process_queue(self): """ Process the entire queue while taking periodic breaks. This allows the game loop to run smoothly. The queue contains calls to _show_block() and _hide_block() so this method should be called if add_block() or remove_block() was called with immediate=False """ start = time.perf_counter() while self.queue and time.time()- start < 1.0 / TICKS_PER_SEC: self._dequeue() def process_entire_queue(self): """ Process the entire queue with no breaks. """ while self.queue: self._dequeue()class Window(pyglet.window.Window): def __init__(self, *args, **kwargs): super(Window, self).__init__(*args, **kwargs) # Whether or not the window exclusively captures the mouse. self.exclusive = False # When flying gravity has no effect and speed is increased. self.flying = False # Strafing is moving lateral to the direction you are facing, # e.g. moving to the left or right while continuing to face forward. # # First element is -1 when moving forward, 1 when moving back, and 0 # otherwise. The second element is -1 when moving left, 1 when moving # right, and 0 otherwise. self.strafe = [0, 0] # Current (x, y, z) position in the world, specified with floats. Note # that, perhaps unlike in math class, the y-axis is the vertical axis. self.position = (0, 0, 0) # First element is rotation of the player in the x-z plane (ground # plane) measured from the z-axis down. The second is the rotation # angle from the ground plane up. Rotation is in degrees. # # The vertical plane rotation ranges from -90 (looking straight down) to # 90 (looking straight up). The horizontal rotation range is unbounded. self.rotation = (0, 0) # Which sector the player is currently in. self.sector = None # The crosshairs at the center of the screen. self.reticle = None # Velocity in the y (upward) direction. self.dy = 0 # A list of blocks the player can place. Hit num keys to cycle. self.inventory = [BRICK, GRASS, SAND] # The current block the user can place. Hit num keys to cycle. self.block = self.inventory[0] # Convenience list of num keys. self.num_keys = [ key._1, key._2, key._3, key._4, key._5, key._6, key._7, key._8, key._9, key._0] # Instance of the model that handles the world. self.model = Model() # The label that is displayed in the top left of the canvas. self.label = pyglet.text.Label('', font_name='Arial', font_size=18, x=10, y=self.height - 10, anchor_x='left', anchor_y='top', color=(0, 0, 0, 255)) # This call schedules the `update()` method to be called # TICKS_PER_SEC. This is the main game event loop. pyglet.clock.schedule_interval(self.update, 1.0 / TICKS_PER_SEC) def set_exclusive_mouse(self, exclusive): """ If `exclusive` is True, the game will capture the mouse, if False the game will ignore the mouse. """ super(Window, self).set_exclusive_mouse(exclusive) self.exclusive = exclusive def get_sight_vector(self): """ Returns the current line of sight vector indicating the direction the player is looking. """ x, y = self.rotation # y ranges from -90 to 90, or -pi/2 to pi/2, so m ranges from 0 to 1 and # is 1 when looking ahead parallel to the ground and 0 when looking # straight up or down. m = math.cos(math.radians(y)) # dy ranges from -1 to 1 and is -1 when looking straight down and 1 when # looking straight up. dy = math.sin(math.radians(y)) dx = math.cos(math.radians(x - 90)) * m dz = math.sin(math.radians(x - 90)) * m return (dx, dy, dz) def get_motion_vector(self): """ Returns the current motion vector indicating the velocity of the player. Returns ------- vector : tuple of len 3 Tuple containing the velocity in x, y, and z respectively. """ if any(self.strafe): x, y = self.rotation strafe = math.degrees(math.atan2(*self.strafe)) y_angle = math.radians(y) x_angle = math.radians(x + strafe) if self.flying: m = math.cos(y_angle) dy = math.sin(y_angle) if self.strafe[1]: # Moving left or right. dy = 0.0 m = 1 if self.strafe[0] > 0: # Moving backwards. dy *= -1 # When you are flying up or down, you have less left and right # motion. dx = math.cos(x_angle) * m dz = math.sin(x_angle) * m else: dy = 0.0 dx = math.cos(x_angle) dz = math.sin(x_angle) else: dy = 0.0 dx = 0.0 dz = 0.0 return (dx, dy, dz) def update(self, dt): """ This method is scheduled to be called repeatedly by the pyglet clock. Parameters ---------- dt : float The change in time since the last call. """ self.model.process_queue() sector = sectorize(self.position) if sector != self.sector: self.model.change_sectors(self.sector, sector) if self.sector is None: self.model.process_entire_queue() self.sector = sector m = 8 dt = min(dt, 0.2) for _ in xrange(m): self._update(dt / m) def _update(self, dt): """ Private implementation of the `update()` method. This is where most of the motion logic lives, along with gravity and collision detection. Parameters ---------- dt : float The change in time since the last call. """ # walking speed = FLYING_SPEED if self.flying else WALKING_SPEED d = dt * speed # distance covered this tick. dx, dy, dz = self.get_motion_vector() # New position in space, before accounting for gravity. dx, dy, dz = dx * d, dy * d, dz * d # gravity if not self.flying: # Update your vertical speed: if you are falling, speed up until you # hit terminal velocity; if you are jumping, slow down until you # start falling. self.dy -= dt * GRAVITY self.dy = max(self.dy, -TERMINAL_VELOCITY) dy += self.dy * dt # collisions x, y, z = self.position x, y, z = self.collide((x + dx, y + dy, z + dz), PLAYER_HEIGHT) self.position = (x, y, z) def collide(self, position, height): """ Checks to see if the player at the given `position` and `height` is colliding with any blocks in the world. Parameters ---------- position : tuple of len 3 The (x, y, z) position to check for collisions at. height : int or float The height of the player. Returns ------- position : tuple of len 3 The new position of the player taking into account collisions. """ # How much overlap with a dimension of a surrounding block you need to # have to count as a collision. If 0, touching terrain at all counts as # a collision. If .49, you sink into the ground, as if walking through # tall grass. If >= .5, you'll fall through the ground. pad = 0.25 p = list(position) np = normalize(position) for face in FACES: # check all surrounding blocks for i in xrange(3): # check each dimension independently if not face[i]: continue # How much overlap you have with this dimension. d = (p[i] - np[i]) * face[i] if d < pad: continue for dy in xrange(height): # check each height op = list(np) op[1] -= dy op[i] += face[i] if tuple(op) not in self.model.world: continue p[i] -= (d - pad) * face[i] if face == (0, -1, 0) or face == (0, 1, 0): # You are colliding with the ground or ceiling, so stop # falling / rising. self.dy = 0 break return tuple(p) def on_mouse_press(self, x, y, button, modifiers): """ Called when a mouse button is pressed. See pyglet docs for button amd modifier mappings. Parameters ---------- x, y : int The coordinates of the mouse click. Always center of the screen if the mouse is captured. button : int Number representing mouse button that was clicked. 1 = left button, 4 = right button. modifiers : int Number representing any modifying keys that were pressed when the mouse button was clicked. """ if self.exclusive: vector = self.get_sight_vector() block, previous = self.model.hit_test(self.position, vector) if (button == mouse.RIGHT) or \ ((button == mouse.LEFT) and (modifiers & key.MOD_CTRL)): # ON OSX, control + left click = right click. if previous: self.model.add_block(previous, self.block) elif button == pyglet.window.mouse.LEFT and block: texture = self.model.world[block] if texture != STONE: self.model.remove_block(block) else: self.set_exclusive_mouse(True) def on_mouse_motion(self, x, y, dx, dy): """ Called when the player moves the mouse. Parameters ---------- x, y : int The coordinates of the mouse click. Always center of the screen if the mouse is captured. dx, dy : float The movement of the mouse. """ if self.exclusive: m = 0.15 x, y = self.rotation x, y = x + dx * m, y + dy * m y = max(-90, min(90, y)) self.rotation = (x, y) def on_key_press(self, symbol, modifiers): """ Called when the player presses a key. See pyglet docs for key mappings. Parameters ---------- symbol : int Number representing the key that was pressed. modifiers : int Number representing any modifying keys that were pressed. """ if symbol == key.W: self.strafe[0] -= 1 elif symbol == key.S: self.strafe[0] += 1 elif symbol == key.A: self.strafe[1] -= 1 elif symbol == key.D: self.strafe[1] += 1 elif symbol == key.SPACE: if self.dy == 0: self.dy = JUMP_SPEED elif symbol == key.ESCAPE: self.set_exclusive_mouse(False) elif symbol == key.TAB: self.flying = not self.flying elif symbol in self.num_keys: index = (symbol - self.num_keys[0]) % len(self.inventory) self.block = self.inventory[index] def on_key_release(self, symbol, modifiers): """ Called when the player releases a key. See pyglet docs for key mappings. Parameters ---------- symbol : int Number representing the key that was pressed. modifiers : int Number representing any modifying keys that were pressed. """ if symbol == key.W: self.strafe[0] += 1 elif symbol == key.S: self.strafe[0] -= 1 elif symbol == key.A: self.strafe[1] += 1 elif symbol == key.D: self.strafe[1] -= 1 def on_resize(self, width, height): """ Called when the window is resized to a new `width` and `height`. """ # label self.label.y = height - 10 # reticle if self.reticle: self.reticle.delete() x, y = self.width // 2, self.height // 2 n = 10 self.reticle = pyglet.graphics.vertex_list(4, ('v2i', (x - n, y, x + n, y, x, y - n, x, y + n)) ) def set_2d(self): """ Configure OpenGL to draw in 2d. """ width, height = self.get_size() glDisable(GL_DEPTH_TEST) viewport = self.get_viewport_size() glViewport(0, 0, max(1, viewport[0]), max(1, viewport[1])) glMatrixMode(GL_PROJECTION) glLoadIdentity() glOrtho(0, max(1, width), 0, max(1, height), -1, 1) glMatrixMode(GL_MODELVIEW) glLoadIdentity() def set_3D(self): """ Configure OpenGL to draw in 3d. """ width, height = self.get_size() glEnable(GL_DEPTH_TEST) viewport = self.get_viewport_size() glViewport(0, 0, max(1, viewport[0]), max(1, viewport[1])) glMatrixMode(GL_PROJECTION) glLoadIdentity() gluPerspective(65.0, width / float(height), 0.1, 60.0) glMatrixMode(GL_MODELVIEW) glLoadIdentity() x, y = self.rotation glRotatef(x, 0, 1, 0) glRotatef(-y, math.cos(math.radians(x)), 0, math.sin(math.radians(x))) x, y, z = self.position glTranslatef(-x, -y, -z) def on_draw(self): """ Called by pyglet to draw the canvas. """ self.clear() self.set_3d() glColor3d(1, 1, 1) self.model.batch.draw() self.draw_focused_block() self.set_2d() self.draw_label() self.draw_reticle() def draw_focused_block(self): """ Draw black edges around the block that is currently under the crosshairs. """ vector = self.get_sight_vector() block = self.model.hit_test(self.position, vector)[0] if block: x, y, z = block vertex_data = cube_vertices(x, y, z, 0.51) glColor3d(0, 0, 0) glPolyGonMode(GL_FRONT_AND_BACK, GL_LINE) pyglet.graphics.draw(24, GL_QUADS, ('v3f/static', vertex_data)) glPolygonMode(GL_FRONT_AND_BACK, GL_FILL) def draw_label(self): """ Draw the label in the top left of the screen. """ x, y, z = self.position self.label.text = '%02d (%.2f, %.2f, %.2f) %d / %d' % ( pyglet.clock.get_fps(), x, y, z, len(self.model._shown), len(self.model.world)) self.label.draw() def draw_reticle(self): """ Draw the crosshairs in the center of the screen. """ glColor3d(0, 0, 0) self.reticle.draw(GL_LINES)def setup_fog(): """ Configure the OpenGL fog properties. """ # Enable fog. Fog "blends a fog color with each rasterized pixel fragment's # post-texturing color." glEnable(GL_FOG) # Set the fog color. glFogfv(GL_FOG_COLOR, (GLfloat * 4)(0.5, 0.69, 1.0, 1)) # Say we have no preference between rendering speed and quality. glHint(GL_FOG_HINT, GL_DONT_CARE) # Specify the equation used to compute the blending factor. glFogi(GL_FOG_MODE, GL_LINEAR) # How close and far away fog starts and ends. The closer the start and end, # the denser the fog in the fog range. glFogf(GL_FOG_START, 20.0) glFogf(GL_FOG_END, 60.0)def setup(): """ Basic OpenGL configuration. """ # Set the color of "clear", i.e. the sky, in rgba. glClearColor(0.5, 0.69, 1.0, 1) # Enable culling (not rendering) of back-facing facets -- facets that aren't # visible to you. glEnable(GL_CULL_FACE) # Set the texture minification/magnification function to GL_NEAREST (nearest # in Manhattan distance) to the specified texture coordinates. GL_NEAREST # "is generally faster than GL_LINEAR, but it can produce textured 图片 # with sharper edges because the transition between texture elements is not # as smooth." glTexParameteri(GL_TEXTURE_2D, GL_TEXTURE_MIN_FILTER, GL_NEAREST) glTexParameteri(GL_TEXTURE_2D, GL_TEXTURE_MAG_FILTER, GL_NEAREST) setup_fog()def main(): window = Window(width=1800, height=1600, caption='Pyglet', resizable=True) # Hide the mouse cursor and prevent the mouse from leaving the window. window.set_exclusive_mouse(True) setup() pyglet.app.run()if __name__ == '__main__': main()以上是“Python如何实现我的世界小游戏”这篇文章的所有内容,感谢各位的阅读!相信大家都有了一定的了解,希望分享的内容对大家有所帮助,如果还想学习更多知识,欢迎关注编程网Python频道!
--结束END--
本文标题: Python如何实现我的世界小游戏
本文链接: https://www.lsjlt.com/news/247818.html(转载时请注明来源链接)
有问题或投稿请发送至: 邮箱/279061341@qq.com QQ/279061341
下载Word文档到电脑,方便收藏和打印~
2024-03-01
2024-03-01
2024-03-01
2024-02-29
2024-02-29
2024-02-29
2024-02-29
2024-02-29
2024-02-29
2024-02-29
回答
回答
回答
回答
回答
回答
回答
回答
回答
回答


官方手机版

微信公众号

商务合作


0