Python 官方文档:入门教程 => 点击学习
步骤 1、安装Jupyter pip install jupyter 2、 新建一个Ipython文件 3、在Terminal里启动Jupyter Notebook 4、
pip install jupyter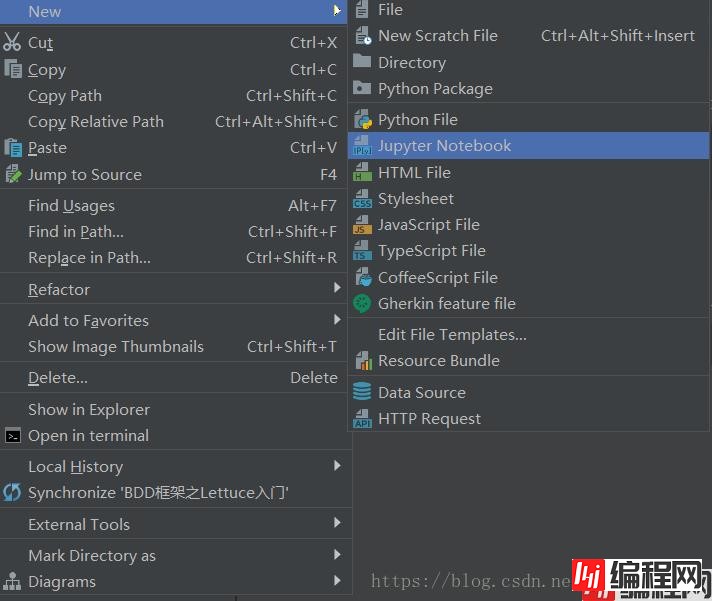
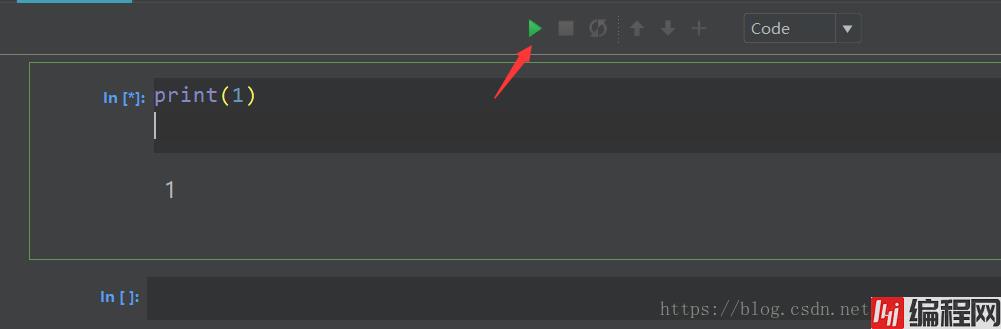
随便写点什么测试一下,应该得到的结果是这样的:
print(1) 点击运行!
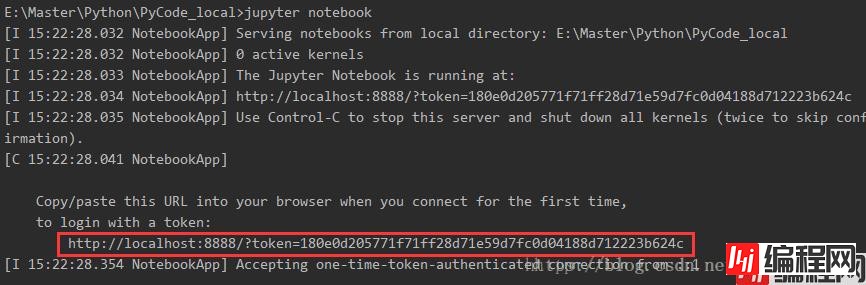
填入上面的地址即可
补充:Linux下安装Pycharm和jupyter

默认情况下 CentOS7 系统中自带的 Python 版本是2.7版本。我们当前工作的Python版本几乎全为 Python3 版本,所以可以通过 yum 软件包管理工具安装python3版本, 不过由
于 CentOS7 的 Base 软件包仓库默认没有 Python3版本 ,因此查找失败,
[root@localhost ~]# yum list "*python3*"
Loaded plugins: fastestmirror, langpacks
Loading mirror speeds from cached hostfile
 * base: centos.ustc.edu.cn
 * extras: mirrors.163.com
 * updates: mirrors.163.com
Error: No matching Packages to list
除了 Base 仓库,还可以使用 epel 仓库,要想使用 epel 仓库,需要先安装一下 epel 仓库,安装过程如下
[root@localhost ~]# yum install epel-release -y
Loaded plugins: fastestmirror, langpacks
Loading mirror speeds from cached hostfile
 * base: mirrors.njupt.edu.cn
 * extras: mirrors.163.com
 * updates: mirrors.163.com
Resolving Dependencies
--> Running transaction check
---> Package epel-release.noarch 0:7-11 will be installed
--> Finished Dependency Resolution

Dependencies Resolved

================================================================================
 Package                Arch             Version         Repository        Size
================================================================================
Installing:
 epel-release           noarch           7-11            extras            15 k

Transaction Summary
================================================================================
Install  1 Package

Total download size: 15 k
Installed size: 24 k
Downloading packages:
warning: /var/cache/yum/x86_64/7/extras/packages/epel-release-7-11.noarch.rpm: Header V3 RSA/SHA256 Signature, key ID f4a80eb5: NOKEY
Public key for epel-release-7-11.noarch.rpm is not installed
epel-release-7-11.noarch.rpm                               |  15 kB   00:00
Retrieving key from file:///etc/pki/rpm-gpg/RPM-GPG-KEY-CentOS-7
Importing GPG key 0xF4A80EB5:
 Userid     : "CentOS-7 Key (CentOS 7 Official Signing Key) <security@centos.org>"
 Fingerprint: 6341 ab27 53D7 8a78 a7c2 7bb1 24c6 a8a7 f4a8 0eb5
 Package    : centos-release-7-5.1804.el7.centos.x86_64 (@anaconda)
 From       : /etc/pki/rpm-gpg/RPM-GPG-KEY-CentOS-7
Running transaction check
Running transaction test
Transaction test succeeded
Running transaction
  Installing : epel-release-7-11.noarch                                     1/1
  Verifying  : epel-release-7-11.noarch                                     1/1

Installed:
  epel-release.noarch 0:7-11

Complete!
epel 仓库安装完毕后,使用 yum 命令再次查询 python3 ,发现有多个不同版本的 python3软件包。
root@localhost ~]# yum list "*python3*"
Loaded plugins: fastestmirror, langpacks
Loading mirror speeds from cached hostfile
epel/x86_64/metalink                                     | 7.1 kB     00:00
 * base: centos.ustc.edu.cn
 * epel: mirrors.yun-idc.com
 * extras: mirrors.163.com
 * updates: centos.ustc.edu.cn
epel                                                     | 4.7 kB     00:00
(1/3): epel/x86_64/group_gz                                |  88 kB   00:00
(2/3): epel/x86_64/updateinfo                              | 1.0 MB   00:03
(3/3): epel/x86_64/primary_db                              | 6.6 MB   00:05
Available Packages
abrt-addon-python3.noarch                2.1.11-49.el7                      epel
boost-python34.x86_64                    1.53.0-28.el7                      epel
boost-python34-devel.x86_64              1.53.0-28.el7                      epel
python3-urjtag.x86_64                    2017.10-2.el7                      epel
python3-virtualenv-doc.noarch            15.1.0-2.el7                       epel
python34.x86_64                          3.4.9-2.el7                        epel
python34-Cython.x86_64                   0.23.5-1.el7                       epel
python34-PyMysql.noarch                  0.9.2-1.el7                        epel
python34-PyYAML.x86_64                   3.11-3.el7                         epel
·
·省略部分软件包信息.......
·
python34-aiOSmtpd.noarch                 1.0-2.el7                          epel
python34-zope-interface.x86_64           4.3.3-1.el7                        epel
python34-zope-schema.noarch              4.4.1-2.el7                        epel
python34-zope-testing.noarch             4.1.2-2.el7                        epel
python36.x86_64                          3.6.6-2.el7                        epel
python36-PyYAML.x86_64                   3.11-3.el7                         epel
python36-asn1crypto.noarch               0.24.0-6.el7                       epel
python36-blosc.x86_64                    1.2.8-4.el7                        epel
python36-bsddb3.x86_64                   6.2.6-3.el7                        epel
python36-chardet.noarch                  2.3.0-4.el7                        epel
uwsgi-plugin-python34-gevent.x86_64      2.0.17.1-1.el7                     epel
uwsgi-plugin-python34-tornado.x86_64     2.0.17.1-1.el7                     epel
uwsgi-plugin-python36.x86_64             2.0.17.1-1.el7                     epel
uwsgi-plugin-python36-gevent.x86_64      2.0.17.1-1.el7                     epel
[root@localhost ~]# yum install python36 -y
Loaded plugins: fastestmirror, langpacks
Loading mirror speeds from cached hostfile
 * base: mirrors.njupt.edu.cn
 * epel: mirrors.yun-idc.com
 * extras: mirrors.163.com
 * updates: mirrors.163.com
Resolving Dependencies
--> Running transaction check
---> Package python36.x86_64 0:3.6.6-2.el7 will be installed
--> Processing Dependency: python36-libs(x86-64) = 3.6.6-2.el7 for package: python36-3.6.6-2.el7.x86_64
--> Processing Dependency: libpython3.6m.so.1.0()(64bit) for package: python36-3.6.6-2.el7.x86_64
--> Running transaction check
---> Package python36-libs.x86_64 0:3.6.6-2.el7 will be installed
--> Finished Dependency Resolution

Dependencies Resolved

================================================================================
 Package               Arch           Version                Repository    Size
================================================================================
Installing:
 python36              x86_64         3.6.6-2.el7            epel          66 k
Installing for dependencies:
 python36-libs         x86_64         3.6.6-2.el7            epel         8.6 M

Transaction Summary
================================================================================
Install  1 Package (+1 Dependent package)

Total download size: 8.6 M
Installed size: 36 M
Downloading packages:
warning: /var/cache/yum/x86_64/7/epel/packages/python36-3.6.6-2.el7.x86_64.rpm: Header V3 RSA/SHA256 Signature, key ID 352c64e5: NOKEY
Public key for python36-3.6.6-2.el7.x86_64.rpm is not installed
(1/2): python36-3.6.6-2.el7.x86_64.rpm                     |  66 kB   00:01
(2/2): python36-libs-3.6.6-2.el7.x86_64.rpm                | 8.6 MB   00:29
--------------------------------------------------------------------------------
Total                                              297 kB/s | 8.6 MB  00:29
Retrieving key from file:///etc/pki/rpm-gpg/RPM-GPG-KEY-EPEL-7
Importing GPG key 0x352C64E5:
 Userid     : "Fedora EPEL (7) <epel@fedoraproject.org>"
 Fingerprint: 91e9 7d7c 4a5e 96f1 7f3e 888f 6a2f aea2 352c 64e5
 Package    : epel-release-7-11.noarch (@extras)
 From       : /etc/pki/rpm-gpg/RPM-GPG-KEY-EPEL-7
Running transaction check
Running transaction test
Transaction test succeeded
Running transaction
  Installing : python36-libs-3.6.6-2.el7.x86_64                             1/2
  Installing : python36-3.6.6-2.el7.x86_64                                  2/2
  Verifying  : python36-3.6.6-2.el7.x86_64                                  1/2
  Verifying  : python36-libs-3.6.6-2.el7.x86_64                             2/2

Installed:
  python36.x86_64 0:3.6.6-2.el7

Dependency Installed:
  python36-libs.x86_64 0:3.6.6-2.el7

Complete!
python36 安装成功后,可以使用 rpm 命令查看一python36 具体包含哪些命令和文件
root@localhost ~]# rpm -ql python36
/usr/bin/pydoc3.6
/usr/bin/python3.6
/usr/bin/python3.6m
/usr/bin/python36
/usr/bin/pyvenv-3.6
/usr/share/doc/python36-3.6.6
/usr/share/doc/python36-3.6.6/README.rst
/usr/share/licenses/python36-3.6.6
/usr/share/licenses/python36-3.6.6/LICENSE
/usr/share/man/man1/python3.6.1.gz
[python@localhost ~]$ wget https://download.jetbrains.com/python/pycharm-commUnity-2018.3.5.tar.gz
--2019-03-25 17:27:00--  Https://download.jetbrains.com/python/pycharm-community-2018.3.5.tar.gz
Resolving download.jetbrains.com (download.jetbrains.com)... 54.72.98.183, 52.18.241.155, 2a05:d018:93b:d103:524e:e6ed:6592:1823, ...
Connecting to download.jetbrains.com (download.jetbrains.com)|54.72.98.183|:443... connected.
HTTP request sent, awaiting response... 302 Moved Temporarily
Location: https://download.jetbrains.8686c.com/python/pycharm-community-2018.3.5.tar.gz [following]
--2019-03-25 17:27:02--  https://download.jetbrains.8686c.com/python/pycharm-community-2018.3.5.tar.gz
Resolving download.jetbrains.8686c.com (download.jetbrains.8686c.com)... 60.221.21.254, 2408:876c:0:100::25
Connecting to download.jetbrains.8686c.com (download.jetbrains.8686c.com)|60.221.21.254|:443... connected.
HTTP request sent, awaiting response... 200 OK
Length: 311914955 (297M) [application/octet-stream]
Saving to: ‘pycharm-community-2018.3.5.tar.gz'

100%[=================================================================================================>] 311,914,955 1.22MB/s   in 7m 53s

2019-03-25 17:34:55 (644 KB/s) - ‘pycharm-community-2018.3.5.tar.gz' saved [311914955/311914955]

[python@localhost ~]$
[python@localhost ~]$ ll
total 304644
drwxr-xr-x. 2 python python      4096 Mar 25 17:02 Desktop
drwxr-xr-x. 2 python python      4096 Mar 25 17:02 Documents
drwxr-xr-x. 2 python python      4096 Mar 25 17:02 Downloads
drwxr-xr-x. 2 python python      4096 Mar 25 17:02 Music
drwxr-xr-x. 2 python python      4096 Mar 25 17:02 Pictures
drwxr-xr-x. 2 python python      4096 Mar 25 17:02 Public
-rw-rw-r--. 1 python python 311914955 Feb 27 19:15 pycharm-community-2018.3.5.tar.gz
drwxr-xr-x. 2 python python      4096 Mar 25 17:02 Templates
drwxr-xr-x. 2 python python      4096 Mar 25 17:02 Videos
上图中,下载软件包过程比较慢,建议提前下载好对应的软件包,方便后续安装操作。安装过程比较简单,直接解压开就可以使用
[python@localhost ~]$ mkdir software
[python@localhost ~]$ tar xf pycharm-community-2018.3.5.tar.gz -C software/
[python@localhost ~]$ cd software
[python@localhost software]$ mv pycharm-community-2018.3.5 pycharm180305
[python@localhost software]$ cd pycharm180305/
[python@localhost pycharm180305]$ cd bin
[python@localhost bin]$ ls
fORMat.sh     fsnotifier-arm   libdbm64.so  pycharm64.vmoptions  pycharm.svg
fsnotifier    idea.properties  log.xml      pycharm.png          pycharm.vmoptions
fsnotifier64  inspect.sh       printenv.py  pycharm.sh           restart.py
[python@localhost bin]$ ./pycharm.sh
Mar 25, 2019 5:45:20 PM java.util.prefs.FileSystemPreferences$1 run
INFO: Created user preferences directory.
Mar 25, 2019 5:45:20 PM java.util.prefs.FileSystemPreferences$6 run
WARNING: Prefs file removed in background /home/python/.java/.userPrefs/prefs.xml
这个属于版本问题


通过 CentOS7 系统桌面中创建的 pycharm 快捷方程式打开 pycharm ,然后点击 pycharm中的控制台,进行 pip 的跟新 和 jupyter 的安装
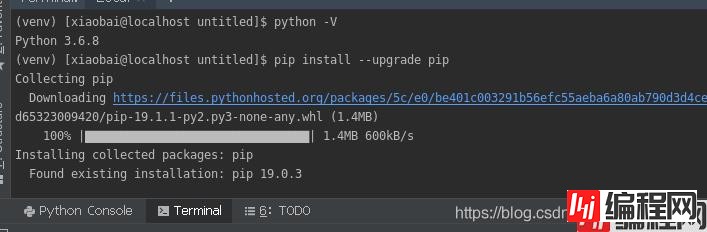
(venv) [python@localhost test]$ pip install --upgrade pip
(venv) [python@localhost test]$ pip install jupyter
(venv) [python@localhost test]$ jupyter notebook --ip=0.0.0.0 --port=8000
[I 18:25:00.814 NotebookApp] Serving notebooks from local directory: /home/python/PycharmProjects/test
[I 18:25:00.815 NotebookApp] The Jupyter Notebook is running at:
[I 18:25:00.815 NotebookApp] http://(localhost.localdomain or 127.0.0.1):8000/?token=f7d20e19f9abf2cd8323034c6a60e6bf0a3c30a98f866fbc
[I 18:25:00.815 NotebookApp] Use Control-C to stop this server and shut down all kernels (twice to skip confirmation).
[C 18:25:00.833 NotebookApp]

    To access the notebook, open this file in a browser:
        file:///run/user/1001/jupyter/nbserver-8326-open.html
    Or copy and paste one of these URLs:
        http://(localhost.localdomain or 127.0.0.1):8000/?token=f7d20e19f9abf2cd8323034c6a60e6bf0a3c30a98f866fbc
^C[I 18:25:14.249 NotebookApp] interrupted
Serving notebooks from local directory: /home/python/PycharmProjects/test
0 active kernels
The Jupyter Notebook is running at:
http://(localhost.localdomain or 127.0.0.1):8000/?token=f7d20e19f9abf2cd8323034c6a60e6bf0a3c30a98f866fbc
Shutdown this notebook server (y/[n])? y
[C 18:25:16.200 NotebookApp] Shutdown confirmed
[I 18:25:16.210 NotebookApp] Shutting down 0 kernels
(venv) [python@localhost test]$
以上为个人经验,希望能给大家一个参考,也希望大家多多支持编程网。
--结束END--
本文标题: pycharm中jupyter的使用图文教程
本文链接: https://www.lsjlt.com/news/126798.html(转载时请注明来源链接)
有问题或投稿请发送至: 邮箱/279061341@qq.com QQ/279061341
下载Word文档到电脑,方便收藏和打印~
2024-03-01
2024-03-01
2024-03-01
2024-02-29
2024-02-29
2024-02-29
2024-02-29
2024-02-29
2024-02-29
2024-02-29
回答
回答
回答
回答
回答
回答
回答
回答
回答
回答


官方手机版

微信公众号

商务合作


0