Python 官方文档:入门教程 => 点击学习
目录 Thymeleaf基本介绍基本语法th:text文本替换th:if和th:unless文本替换th:each foreach循环th:id、th:value、th:c
Spring Boot 官方推荐使用 Thymeleaf 作为其模板引擎。SpringBoot 为 Thymeleaf 提供了一系列默认配置,并且为Thymeleaf提供了视图解析器。项目中一但导入了 Thymeleaf 的依赖,相对应的自动配置 (ThymeleafAutoConfiguration) 就会自动生效,因此 Thymeleaf 可以与 spring Boot 完美整合 。Thymeleaf模板引擎可以和html标签完美结合,便于后端渲染数据。Thymeleaf支持静态效果和动态效果,在没有动态数据的时候,会展示静态效果模板引擎是为了使用户界面与业务数据(内容)分离而产生的,它可以生成特定格式的文档,用于网站的模板引擎就会生成一个标准的HTML文档就是将模板文件和数据通过模板引擎生成一个HTML代码**常见的模板引擎有:jsp、freemarker、velocity、thymeleafThymeleaf默认写的位置是在templates这个目录下面Thymeleaf官网:https://www.thymeleaf.org/
<dependency>
  <groupId>org.springframework.boot</groupId>
  <artifactId>spring-boot-starter-thymeleaf</artifactId>
</dependency>
Thymeleaf默认的视图路径是:/ resources/templates,在这个目录下面创建html并引入thymeleaf
<html lang="en" xmlns:th="Http://www.thymleaf.org">xmlns:th=“http://www.thymleaf.org”>
${域属性名}:获得request域中的域属性值并显示
${session.域属性名}: 获得session域中的域属性值并显示
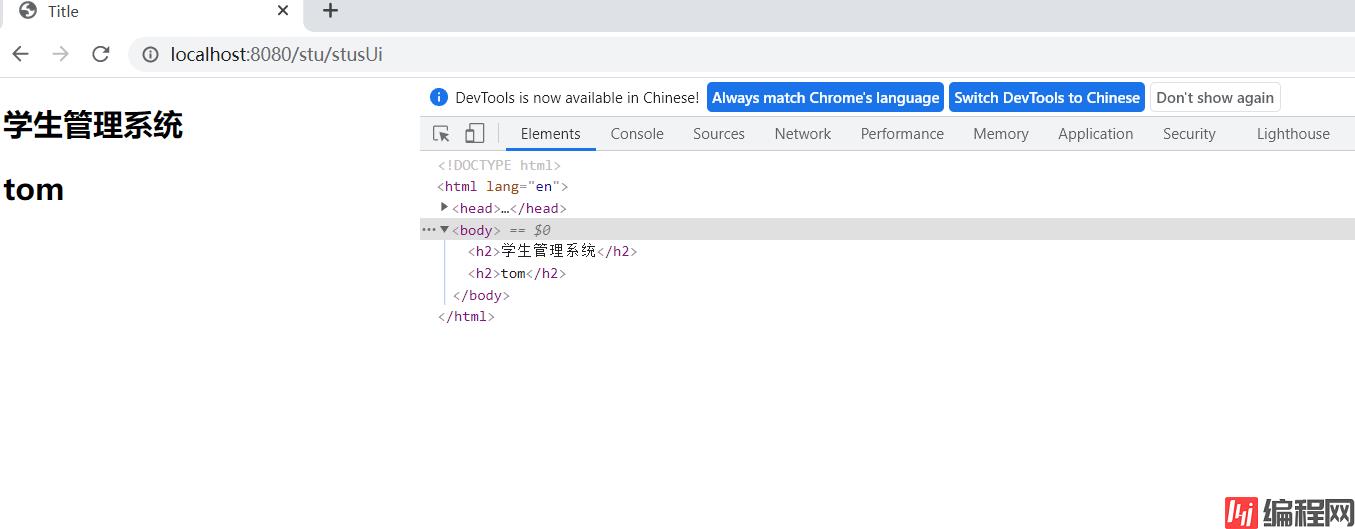
< p th:text="${name}">aaa</p>如果取得到数据的话,就会渲染成动态画面,否则就渲染成静态画面(只显示学生管理系统只显示学生管理系统这几个字)
<span th:text="${user.name}">Tom</span>使用th:if和th:unless属性进行条件判断,th:unlessth:unless刚好相反,只有表达式条件不成立才会显示内容
<h2 th:if="${age>=18}">成年</h2>
<h2 th:unless="${age>=18}">未成年</h2><!DOCTYPE html>
<html lang="en" xmlns:th="http://www.thymleaf.org">
<head>
<meta charset="UTF-8">
<title>Title</title>
<style>
.tb-stus{
width: 900px;
margin: 0 auto;
border: black 1px solid;
border-collapse: collapse;
}
.tb-stus th,td{
padding: 10px;
text-align: center;
border:1px solid black;
}
</style>
</head>
<body>
<h2 align="center">学生管理系统</h2>
<table class="tb-stus">
<thead>
<tr>
<th>序号</th>
<th>姓名</th>
<th>年龄</th>
<th>性别</th>
<th>班级</th>
<th>生日</th>
<th>操作</th>
</tr>
</thead>
<tbody>
<tr th:each="stu:${stuList}">
<td>1</td>
<td th:text="${stu.name}">aa</td>
<td>22</td>
<td>男</td>
<td>计科1班</td>
<td>2022-2-3</td>
<td>
<a href="#" rel="external nofollow" >删除</a>
</td>
</tr>
</tbody>
</table>
</body>
</html>
th:href和@{}链接表达式
<!--http://localhost:8080/stu/10 -->
<a th:href="${'/stus/'+ stu.id}" rel="external nofollow" >编辑学生1</a>

<!--http://localhost:8080/stu?id=10 -->
<a th:href="@{/stus(id=${stu.id})}" rel="external nofollow" >编辑学生2</a>

<!--http://localhost:8080/stu?id=10&name=abc -->
<a th:href="@{/stus(id=${stu.id},name=${stu.name})}" rel="external nofollow" >编辑学生3</a>
th:switch和th:case
<div th:switch="${stu.role}">
  <h2 th:case="banzhang">班长</h2>
  <h2 th:case="tuanzhishu">团支书</h2>
  <h2 th:case="${data}">学委</h2>
  <h2 th:case="*">其他</h2>

</div>
thymeleaf默认给变量名+Stat的状态
如果没有显示设置状态变量,thymeleaf会默认给一个变量名+Stat的状态
<tr th:each="stu: ${stus}">
  <td th:text="${stuStat.index}"></td>
  <td th:text="${ stu.name}"></td>
  <td th:text="${ stu.age}"></td>
</tr>th:object可以定义对象属性
#dates.format()可以用来格式化日期格式
*{}可以和th:object配合使用,可以取出对象中的属性
 <form th:object="${stu}">
        编号:<input type="text" name="id" th:value="*{id}"><br>
        姓名:<input type="text" name="name" th:value="*{name}"><br>
        年龄:<input type="text" name="age" th:value="*{age}"><br>
        性别:<input type="radio" name="gender" value="true" th:checked="*{gender}">男<br>
        性别:<input type="radio" name="gender" value="true" th:checked="*{not gender}">女<br>
        生日:<input type="text" name="birth" th:value="*{#dates.format(birth,'yyyy-MM-dd')}"><br>
        <input type="submit" value="编辑">
</form>创建项目的时候,记得在模板引擎中勾选Thymeleaf
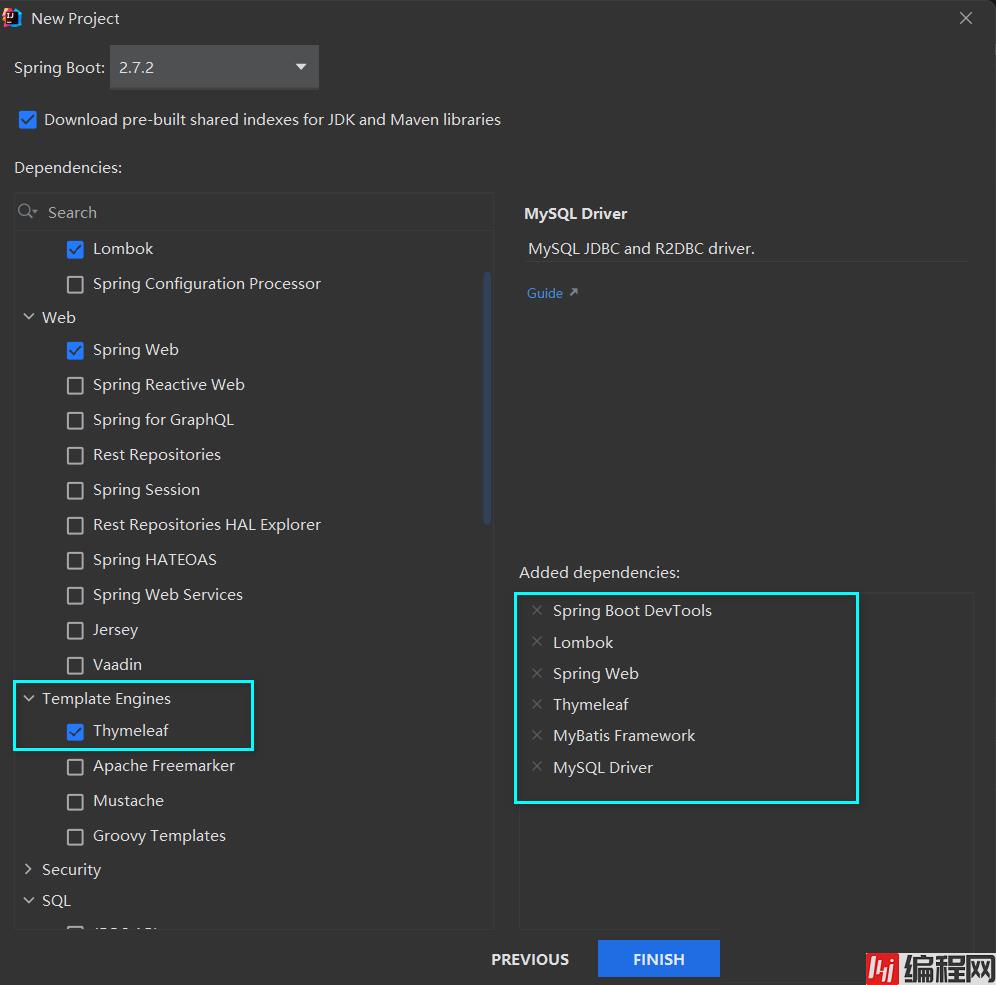
在pom.xml中把Mysql驱动的作用域删除
然后我们这里使用druid连接池,所以需要在pom文件导入相关依赖
 <dependency>
            <groupId>com.alibaba</groupId>
            <artifactId>druid-spring-boot-starter</artifactId>
            <version>1.2.11</version>
        </dependency>
然后我们需要在全局配置文件application.properties中进行相关配置
# 指定mybatis的Mapper接口的xml映射文件的路径
mybatis.mapper-locations=classpath:mapper
    @Select("select * from stu")
     List<Stu> queryAllStu() throws Exception;
}
Service
public interface StuService  {

    List<Stu> queryAllStu() throws Exception;
}
Service的实现类
@Service
public class StuServiceImpl implements StuService {
    @Autowired
    private StuMapper stuMapper;
    @Override
    public List<Stu> queryAllStu() throws Exception {
         return stuMapper.queryAllStu();
    }
}
thymeleaf
<!DOCTYPE html>
<html lang="en" xmlns:th="http://www.thymleaf.org">
  <head>
    <meta charset="UTF-8">
    <title>Title</title>
  </head>
  <body>
    <h2>学生管理系统</h2>
    <h2 th:text="${name}">aaaa</h2>
  </body>
</html>
Controller
@Controller
@RequestMapping("/stu")
public class StuController {
@Autowired
private StuService stuService;
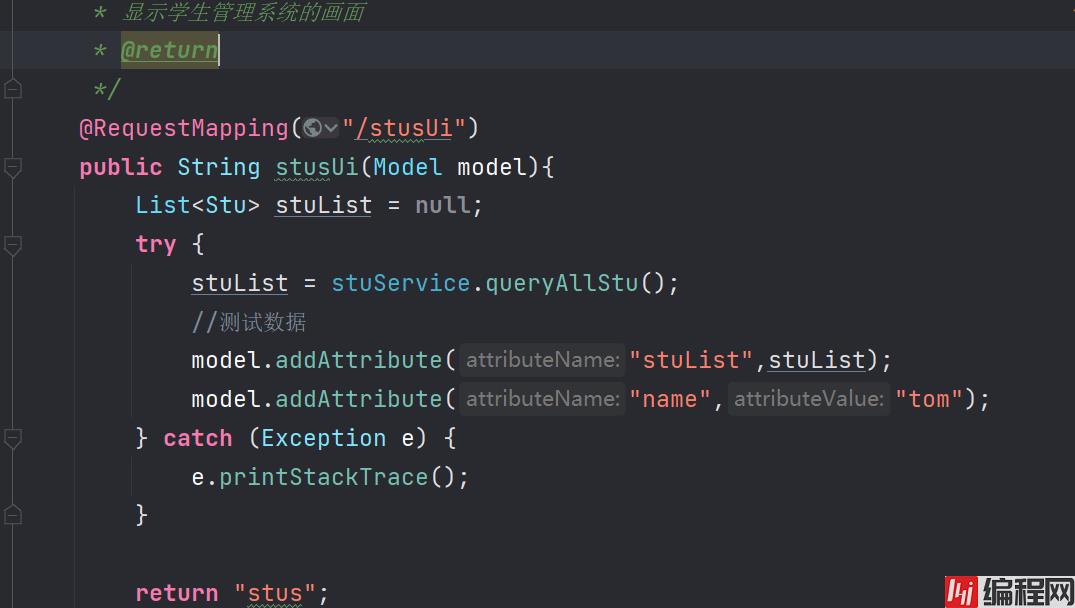
@RequestMapping("/stusUi")
public String stusUi(){
return "stus";
}
}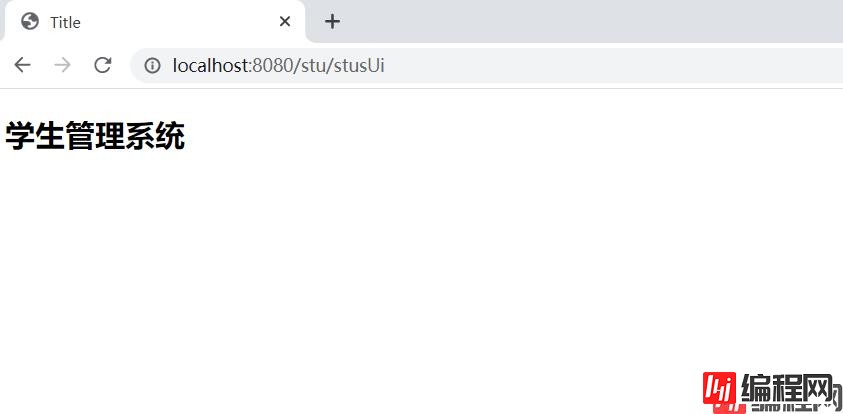
然后我们先准备好页面
<!DOCTYPE html>
<html lang="en" xmlns:th="http://www.thymeleaf.org">
<head>
<meta charset="UTF-8">
<title>Title</title>
<style>
.tb-stus{
width: 900px;
margin: 0 auto;
border: black 1px solid;
border-collapse: collapse;
}
.tb-stus th,td{
padding: 10px;
text-align: center;
border:1px solid black;
}
</style>
</head>
<body>
<h2 align="center">学生管理系统</h2>
<table class="tb-stus">
<thead>
<tr>
<th>序号</th>
<th>姓名</th>
<th>年龄</th>
<th>性别</th>
<th>班级</th>
<th>生日</th>
<th>操作</th>
</tr>
</thead>
<tbody>
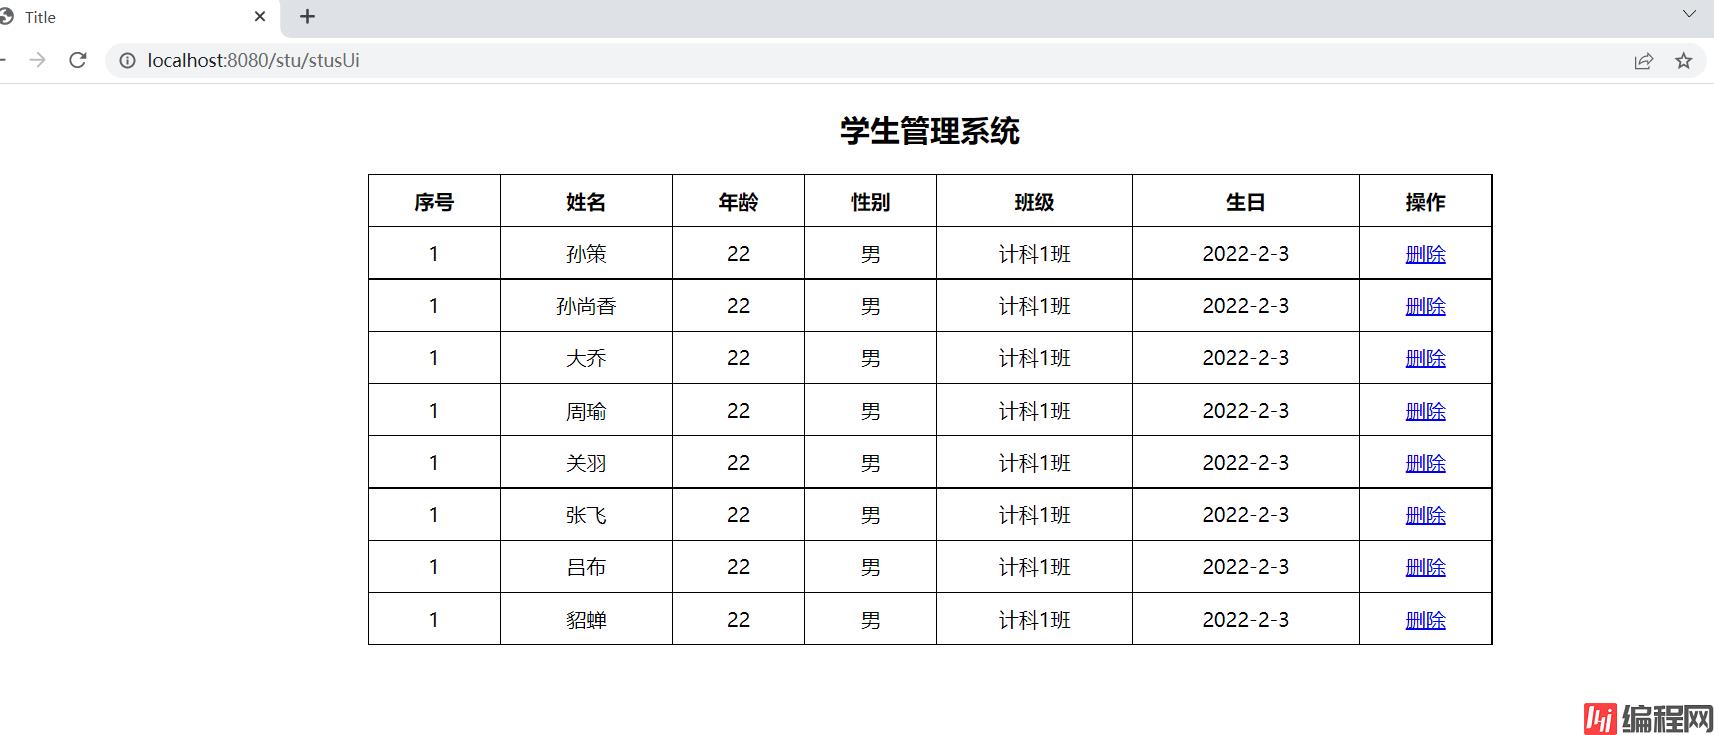
<tr th:each="stu,status: ${stuList}">
<td th:text="${status.index+1}">1</td>
<td th:text="${stu.name}">aa</td>
<td th:text="${stu.age}">22</td>
<!-- gender的属性值为1表示性别为男-->
<td th:if="${stu.gender}">男</td>
<td th:unless="${stu.gender}">女</td>
<td th:text="${stu.cid}">计科1班</td>
<td th:text="${#dates.format(stu.birth,'yyyy-MM-dd')}">2022-2-3</td>
<td>
<!--http://localhost:8080/stu/delete?id=10-->
<a th:href="@{/stu/delete(id=${stu.id})}" rel="external nofollow" rel="external nofollow" rel="external nofollow" >删除</a>
</td>
</tr>
</tbody>
</table>
</body>
</html>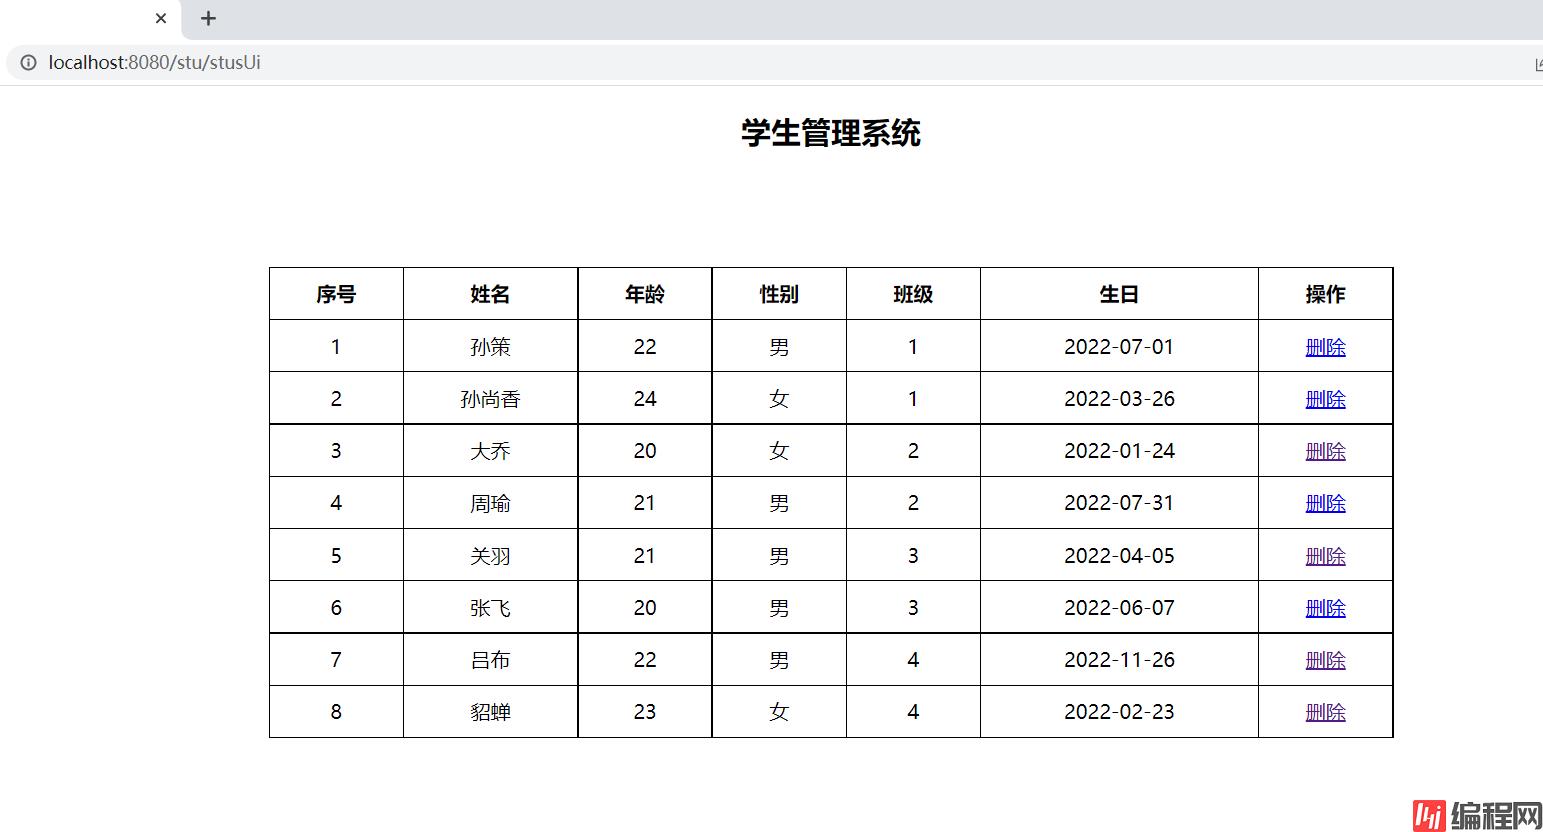
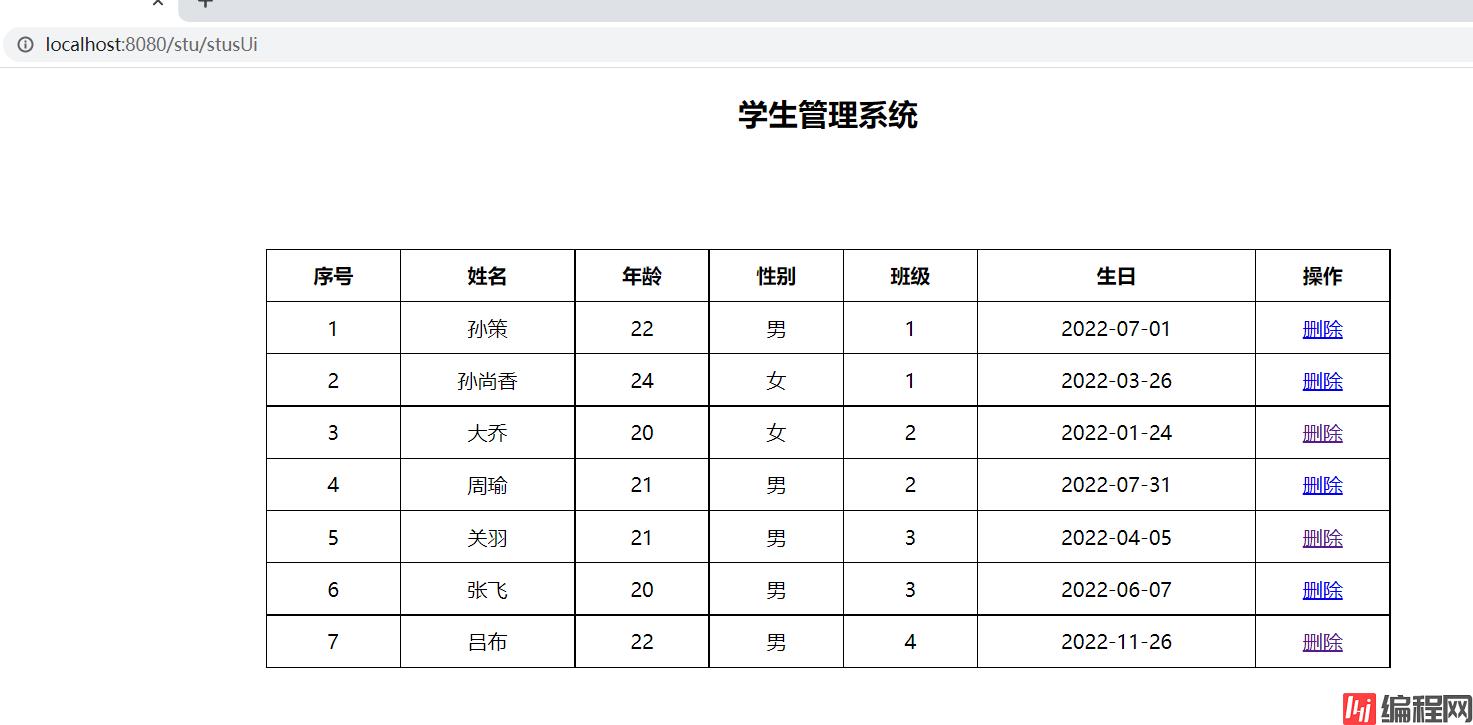
当我们点击删除的时候,后端要根据前端传过来的id来从数据库中删除对应的数据。这里我们先按照我们之前学的时候,熟悉的方法来完成,到后面的时候,会详细讲前后端分离开发
Controller(之前的方法这里没有粘贴出来,不然代码太多了)
@Controller
@RequestMapping("/stu")
public class StuController {
    @Autowired
    private StuService stuService;


    @RequestMapping("/delete")
    public String deleteById(@RequestParam("id") Integer id){
        try {
            stuService.deleteByid(id);
        } catch (Exception e) {
            e.printStackTrace();
        }
        System.out.println(id);
        return "redirect:/stu/stusUi";
    }


  }
Service
public interface StuService  {

    List<Stu> queryAllStu() throws Exception;

    void deleteByid(Integer id);
}
Service实现类
@Service
public class StuServiceImpl implements StuService {
    @Autowired
    private StuMapper stuMapper;
    @Override
    public List<Stu> queryAllStu() throws Exception {
         return stuMapper.queryAllStu();
    }


    @Override
    public void deleteByid(Integer id) throws Exception {
        stuMapper.deleteById(id);
    }
}
Mapper
@Mapper
public interface StuMapper {

    @Select("select * from stu")
     List<Stu> queryAllStu() throws Exception;
    @Delete("delete from stu where id=#{id}")
    void deleteById( Integer id);
}
把编号为8的数据删除
页面stus.html
<!DOCTYPE html>
<html lang="en"  xmlns:th="http://www.thymeleaf.org">
<head>
    <meta charset="UTF-8">
    <title>Title</title>
    <style>
        .tb-stus{
            width: 900px;
            margin: 0 auto;
            border: black 1px solid;
            border-collapse: collapse;
        }
        .tb-stus th,td{
            padding: 10px;
            text-align: center;
            border:1px solid black;
        }
    </style>
</head>
<body>
<h2 align="center">学生管理系统</h2>
<table class="tb-stus">
    <thead>
    <tr>
        <th>序号</th>
        <th>姓名</th>
        <th>年龄</th>
        <th>性别</th>
        <th>班级</th>
        <th>生日</th>
        <th>操作</th>
    </tr>
    </thead>
    <tbody>
    <tr th:each="stu,status: ${stuList}">
        <td th:text="${stu.id}">1</td>
        <td th:text="${stu.name}">aa</td>
        <td th:text="${stu.age}">22</td>
<!--        gender的属性值为1表示性别为男-->
        <td th:if="${stu.gender}">男</td>
        <td th:unless="${stu.gender}">女</td>
        <td th:text="${stu.cid}">计科1班</td>
         <td th:text="${#dates.format(stu.birth,'yyyy-MM-dd')}">2022-2-3</td>
        <td>
<!--            localhost:8080/stu/delete/8-->
<!--            <a th:href="${'/stu/delete/'+stu.id}" rel="external nofollow"  rel="external nofollow" >删除</a>-->
            <!--http://localhost:8080/stu/delete?id=10-->
            <a th:href="@{/stu/delete(id=${stu.id})}" rel="external nofollow"  rel="external nofollow"  rel="external nofollow" >删除</a>
            <a th:href="@{/stu/edit(id=${stu.id})}" rel="external nofollow"  rel="external nofollow" >编辑</a>
        </td>
    </tr>
    </tbody>
</table>

</body>
</html>
页面 stu-edit.html
<!DOCTYPE html>
<html lang="en" xmlns:th="http://www.thymeleaf.org">
  <head>
    <meta charset="UTF-8">
    <title>编辑画面</title>
  </head>
  <body>
    <h2 >编辑学生信息</h2>
    <form action="" method="post" th:object="${stu}">
      学号:<input type="text" name="id" th:value="*{id}"  ><br><br>
      姓名:<input type="text" name="name"  th:value="*{name}"><br><br>
      年龄:<input type="text" name="age"  th:value="*{age}"><br><br>
      性别:<input type="radio" name="gender"    th:checked="*{gender}"  >男
      <input type="radio" name="gender"   th:checked="*{!gender}" >女<br><br>
      班级:<input type="text" name="cid" th:value="*{cid}"><br><br>
      生日:<input type="text" name="birth" th:value="*{#dates.format(birth,'yyyy-MM-dd')}"><br><br>
      <input type="submit" value="编辑">
    </form>
  </body>
</html>
Controller
    @RequestMapping("/edit")
    public String edit(@RequestParam("id") Integer id,Model model){
        System.out.println("id"+id);
        try {
            Stu stu=stuService.queryById(id);
            model.addAttribute("stu",stu);
        } catch (Exception e) {
            e.printStackTrace();
        }

        return "stu-edit";
    }
Service
public interface StuService  {

    List<Stu> queryAllStu() throws Exception;


    void deleteByid(Integer id) throws Exception;


    Stu queryById(Integer id) throws Exception;
}
Service实现类
@Service
public class StuServiceImpl implements StuService {
    @Autowired
    private StuMapper stuMapper;
    @Override
    public List<Stu> queryAllStu() throws Exception {
         return stuMapper.queryAllStu();
    }


    @Override
    public void deleteByid(Integer id) throws Exception {
        stuMapper.deleteById(id);
    }

    @Override
    public Stu queryById(Integer id) throws Exception {
        return stuMapper.queryById(id);
    }
}
Mapper
@Mapper
public interface StuMapper {

    @Select("select * from stu")
    List<Stu> queryAllStu() throws Exception;
    @Delete("delete from stu where id=#{id}")
    void deleteById( Integer id);
    @Select("select * from stu where id=#{id}")
    Stu queryById(Integer id) throws Exception;
}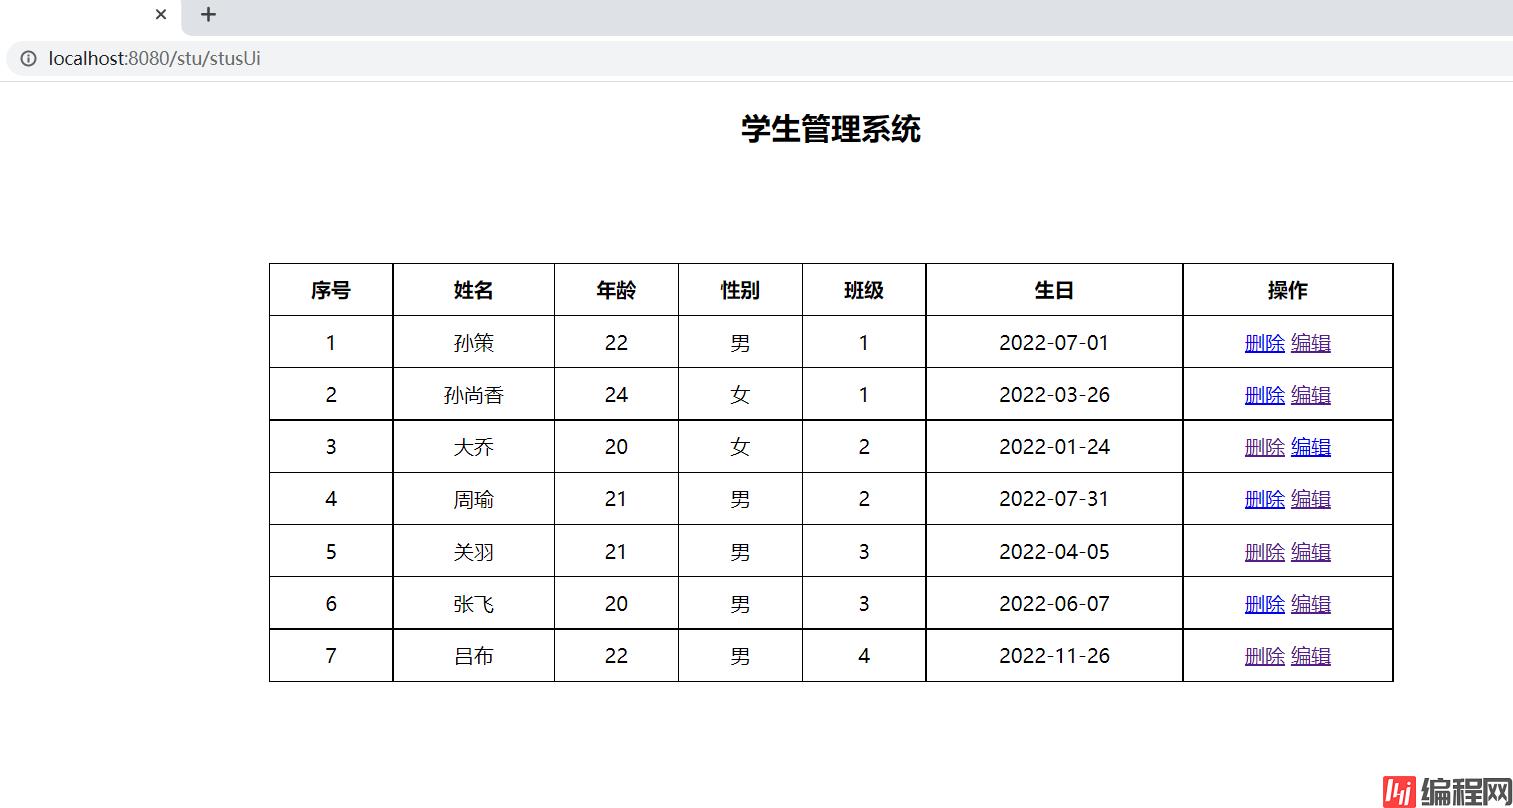
比如在序号为4中,点击编辑

登录页面:
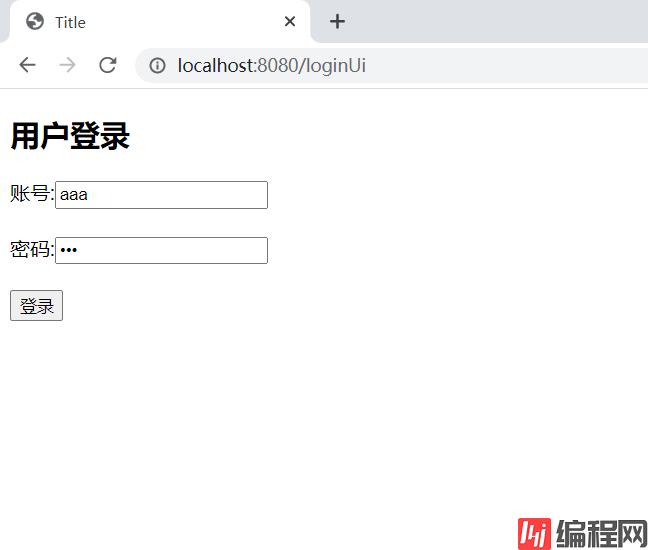
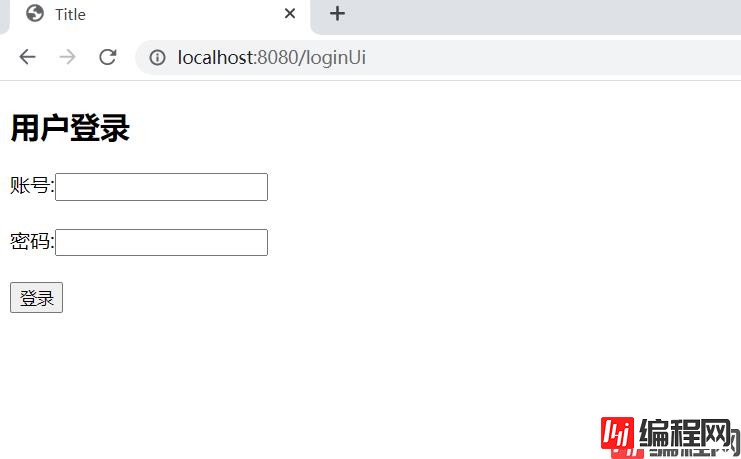
<!DOCTYPE html>
<html lang="en">
<head>
    <meta charset="UTF-8">
    <title>Title</title>
</head>
<body>
    <h2>用户登录</h2>
    <form action="/login" method="post">
        账号:<input type="text" name="username"><br><br>
        密码:<input type="passWord" name="password"><br><br>
        <input type="submit" value="登录">
    </form>


</body>
</html>因为需要判断用户是否存在,这是从数据库进行查询的,所以要准备对应的管理员表
# 创建管理员表
CREATE TABLE admin(
	id INT PRIMARY KEY AUTO_INCREMENT,
	username VARCHAR(20),
	`password` VARCHAR(20)
);

INSERT INTO admin VALUES
	(DEFAULT,'aaa',111),
	(DEFAULT,'bbb',222),
	(DEFAULT,'ccc',333);
# 查询测试
SELECT * FROM admin;
准备对应的实体类
@Data
public class Admin {
    private String username;
    private String password;
}
Controller
@Controller
@SessionAttributes(names = {"admin"})
public class AdminController {
    @Autowired
    private AdminService adminService;


    @RequestMapping(value = "/loginUi")
    public String loginUi(){
        return "login";
    }
    @RequestMapping(value = "/login",method = RequestMethod.POST)
    public String login(String username, String password, Model model){
        try {
            Admin admin = adminService.login(username, password);
            //用户名存在说明登录成功
            if (admin!=null){
                //存放到session域中
                model.addAttribute("admin",admin);
                return "redirect:/stu/stusUi";
            }
        } catch (Exception e) {
            e.printStackTrace();
        }
        return "redirect:/loginUi";
    }

}
Service
public interface AdminService {
    Admin login(String username,String password) throws Exception;
}
Service对应的实现类
@Service
public class AdminServiceImpl implements AdminService {
    @Autowired
    private AdminMapper adminMapper;
    @Override
    public Admin login(String username, String password) throws Exception {
        return adminMapper.queryByUsernameAndPassword(username,password);
    }
}
Mapper
@Mapper
public interface AdminMapper {
    @Select("select * from admin where username=#{username} and password=#{password}")
    Admin queryByUsernameAndPassword(@Param("username") String username, @Param("password") String password);
}
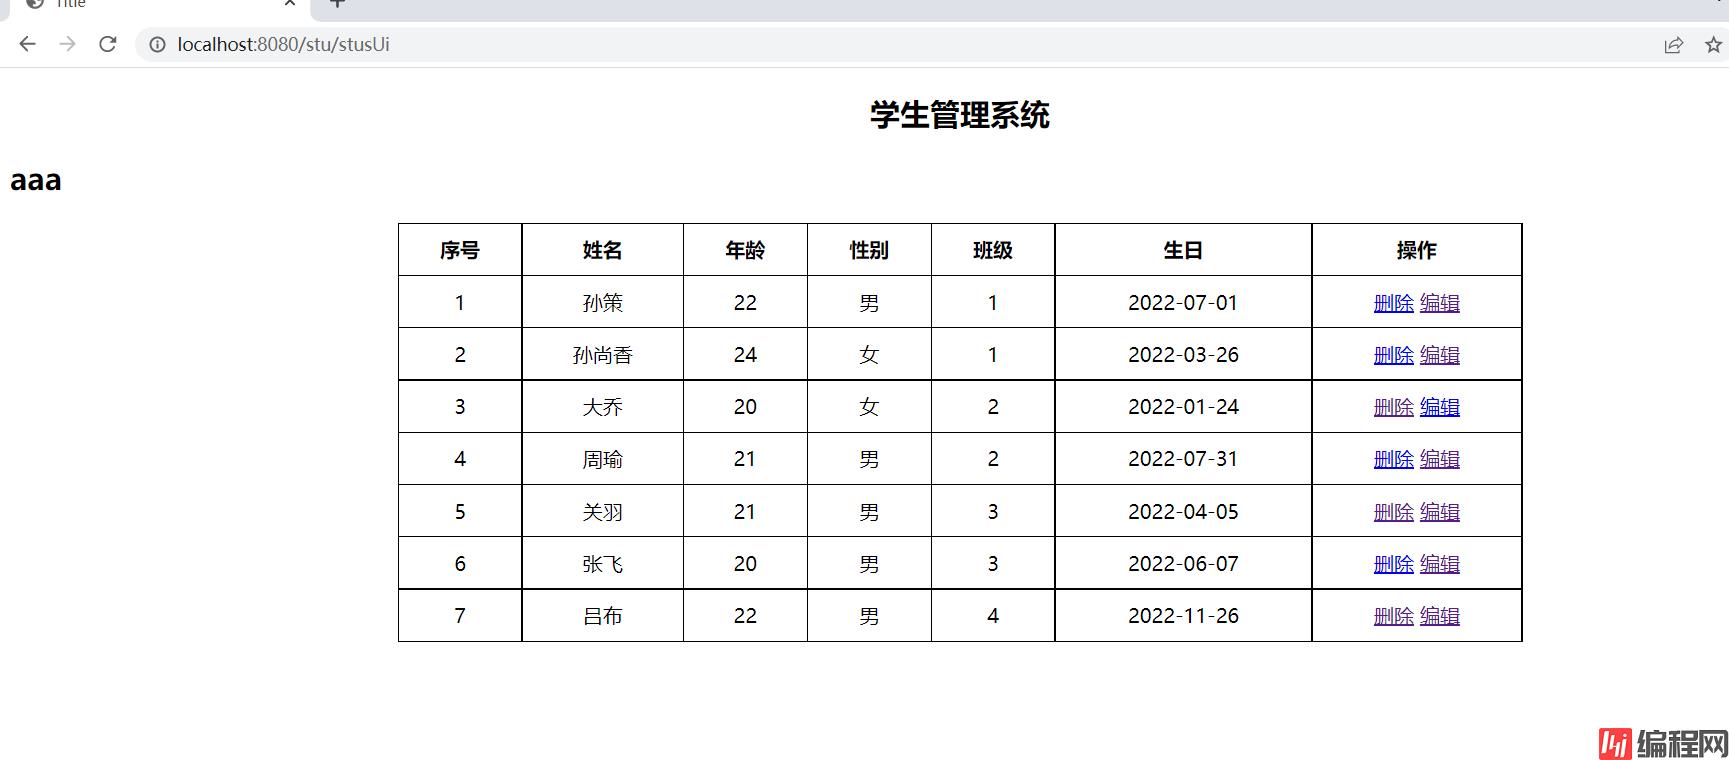
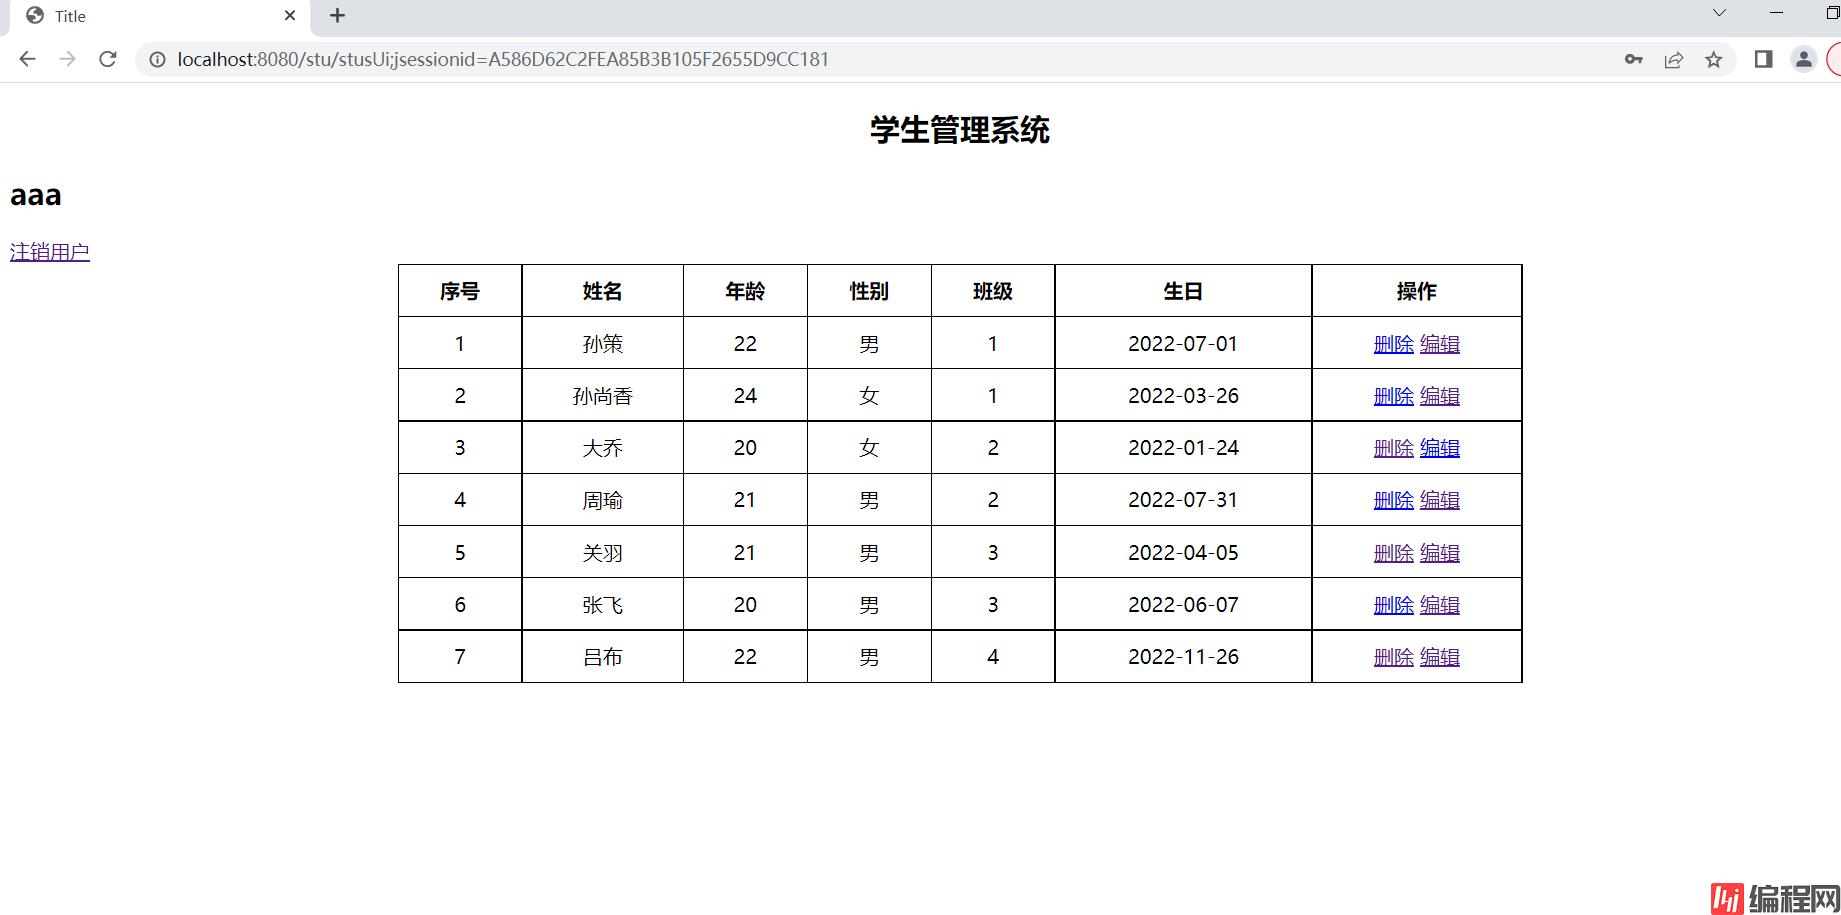
<!DOCTYPE html>
<html lang="en"  xmlns:th="http://www.thymeleaf.org">
<head>
    <meta charset="UTF-8">
    <title>Title</title>
    <style>
        .tb-stus{
            width: 900px;
            margin: 0 auto;
            border: black 1px solid;
            border-collapse: collapse;
        }
        .tb-stus th,td{
            padding: 10px;
            text-align: center;
            border:1px solid black;
        }
    </style>
</head>
<body>
    <h2 align="center">学生管理系统</h2>
    <h2 th:if="${session.admin!=null}" th:text="${session.admin.username}">用户名</h2>
    <a th:unless="${session.admin!=null}" href="/loginUi" rel="external nofollow" >登录</a>
    <a th:if="${session.admin!=null}" href="/loGout" rel="external nofollow" >注销用户</a>
<table class="tb-stus">
    <thead>
    <tr>
        <th>序号</th>
        <th>姓名</th>
        <th>年龄</th>
        <th>性别</th>
        <th>班级</th>
        <th>生日</th>
        <th>操作</th>
    </tr>
    </thead>
    <tbody>
    <tr th:each="stu,status: ${stuList}">
        <td th:text="${stu.id}">1</td>
        <td th:text="${stu.name}">aa</td>
        <td th:text="${stu.age}">22</td>
<!--        gender的属性值为1表示性别为男-->
        <td th:if="${stu.gender}">男</td>
        <td th:unless="${stu.gender}">女</td>
        <td th:text="${stu.cid}">计科1班</td>
        <td th:text="${#dates.format(stu.birth,'yyyy-MM-dd')}">2022-2-3</td>
        <td>
<!--            localhost:8080/stu/delete/8-->
<!--            <a th:href="${'/stu/delete/'+stu.id}" rel="external nofollow"  rel="external nofollow" >删除</a>-->
            <!--http://localhost:8080/stu/delete?id=10-->
            <a th:href="@{/stu/delete(id=${stu.id})}" rel="external nofollow"  rel="external nofollow"  rel="external nofollow" >删除</a>
            <a th:href="@{/stu/edit(id=${stu.id})}" rel="external nofollow"  rel="external nofollow" >编辑</a>
        </td>
    </tr>
    </tbody>
</table>

</body>
</html>

注销的话,我们把session域中的用户对象取消,然后这个时候就得重新登录,应该要跳转到登录画面
@RequestMapping("/logout")
    public String logout(HttpSession session){
        session.removeAttribute("admin");
        return "redirect:/loginUi";
    }

到此这篇关于Spring Boot整合Thymeleaf详解的文章就介绍到这了,更多相关Spring Boot整合Thymeleaf内容请搜索编程网以前的文章或继续浏览下面的相关文章希望大家以后多多支持编程网!
--结束END--
本文标题: SpringBoot整合Thymeleaf详解
本文链接: https://www.lsjlt.com/news/165787.html(转载时请注明来源链接)
有问题或投稿请发送至: 邮箱/279061341@qq.com QQ/279061341
下载Word文档到电脑,方便收藏和打印~
2024-03-01
2024-03-01
2024-03-01
2024-02-29
2024-02-29
2024-02-29
2024-02-29
2024-02-29
2024-02-29
2024-02-29
回答
回答
回答
回答
回答
回答
回答
回答
回答
回答


官方手机版

微信公众号

商务合作


0