Python 官方文档:入门教程 => 点击学习
目录依赖application.yml配置swagger配置类controller测试swagger常用注解说明@api@ApiOperation@ApiImplicitParams
 <dependency>
            <groupId>io.springfox</groupId>
            <artifactId>springfox-boot-starter</artifactId>
            <version>3.0.0</version>
        </dependency>
        <dependency>
            <groupId>com.GitHub.xiaoymin</groupId>
            <artifactId>knife4j-spring-boot-starter</artifactId>
            <version>3.0.3</version>
</dependency>
  mvc:
    pathmatch:
      matching-strategy: ant_path_matcher ## 解决Failed to start bean ‘documentationPluginsBootstrapper‘ 问题
knife4j:
  enable: true
package com.example.SpringBooth2.config;

import io.swagger.annotations.ApiOperation;
import org.springframework.beans.factory.annotation.Value;
import org.springframework.context.annotation.Bean;
import org.springframework.context.annotation.Configuration;
import springfox.documentation.builders.ApiInfoBuilder;
import springfox.documentation.builders.PathSelectors;
import springfox.documentation.builders.RequestHandlerSelectors;
import springfox.documentation.oas.annotations.EnableOpenApi;
import springfox.documentation.service.ApiInfo;
import springfox.documentation.service.Contact;
import springfox.documentation.spi.DocumentationType;
import springfox.documentation.spring.WEB.plugins.Docket;

@Configuration
@EnableOpenApi//Swagger 开启生成接口文档功能
public class SwaggerConfig {


    @Value("${knife4j.enable}")
    private Boolean enable;

    @Bean
    Docket docket() {
        return new Docket(DocumentationType.OAS_30)
                //配置网站的基本信息
                .apiInfo(apiInfo())
                .enable(enable)
                .select()
                //指定接口的位置
                // RequestHandlerSelectors.basePackage("com.example.springbooth2.controller") 接口的包所在路径
                .apis(RequestHandlerSelectors.withMethodAnnotation(ApiOperation.class))
                // 指定路径处理PathSelectors.any()代表所有的路径
                .paths(PathSelectors.any())
                .build();
    }

    private ApiInfo apiInfo() {
        return new ApiInfoBuilder()
                .title("swagger3") //接口文档标题
                .description("接口文档") //接口文档描述
                //作者信息
                // new Contact("作者","作者URL","作者Email")
                .contact(new Contact("jane", "Http://www.baidu.com", "123@qq.com"))
                .version("1.0")//版本
                .build();
    }
}package com.example.springbooth2.controller;
import com.example.springbooth2.config.ResponseResult;
import com.example.springbooth2.entity.User;
import com.example.springbooth2.service.UserService;
import io.swagger.annotations.Api;
import io.swagger.annotations.ApiImplicitParam;
import io.swagger.annotations.ApiImplicitParams;
import io.swagger.annotations.ApiOperation;
import org.springframework.web.bind.annotation.GetMapping;
import org.springframework.web.bind.annotation.PostMapping;
import org.springframework.web.bind.annotation.RequestMapping;
import org.springframework.web.bind.annotation.RestController;
import javax.annotation.Resource;
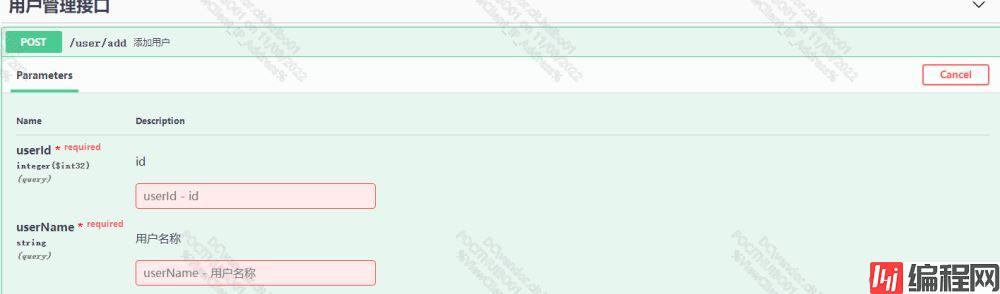
@Api(tags = "用户管理接口")
@RestController
@RequestMapping("/user")
public class UserController {
@Resource
private UserService userService;
@ApiOperation("添加用户")
@ApiImplicitParams({ // 参数名称
@ApiImplicitParam(name = "userId", value = "用户id"),
@ApiImplicitParam(name = "userName", value = "用户名", required = true)
})
@PostMapping("add")
public User add(User user) {
userService.addUser(user);
return user;
}
@ApiOperation("查询所有用户")
@GetMapping("list")
public ResponseResult<User> list() {
return ResponseResult.success(userService.list());
}
@GetMapping("/findOne")
public ResponseResult<User> findOne() {
return ResponseResult.success(userService.findById(1));
}
}knife4j访问地址 http://localhost:9090/doc.html

swagger访问地址 http://localhost:9090/swagger-ui/index.html

用在请求的类上
@Api(tags = “该类的作用进行说明”)
@ApiOperation(value=“改方法的作用”,note=“备注”)
@ApiImplicitParams:用在请求的方法上,表示一组参数说明
@ApiImplicitParam:用在@ApiImplicitParams注解中,指定一个请求参数的各个方面
多个 @ApiImplicitParam 注解需要放在一个 @ApiImplicitParams 注解中
@ApiImplicitParam 注解中虽然可以指定参数是必填的,但是却不能代替 @RequestParam(required = true) ,
前者的必填只是在 Swagger 框架内必填,抛弃了 Swagger ,这个限制就没用了,所以假如开发者需要指定一个参数必填, @RequestParam(required = true) 注解还是不能省略。
如果参数是一个对象(例如上文的更新接口),对于参数的描述也可以放在实体类中。例如下面一段代码
@ApiModelProperty:用在属性上,描述类的属性
@ApiModel(value = "用户对象",description = "用户表")
public class User {
    @Id
    @ApiModelProperty(value = "id",required = true)
    private int userId;
    @ApiModelProperty(value = "用户名称",required = true)
    private String userName;
}
到此这篇关于springboot整合swagger3和knife4j的文章就介绍到这了,更多相关springboot整合swagger3和knife4j内容请搜索编程网以前的文章或继续浏览下面的相关文章希望大家以后多多支持编程网!
--结束END--
本文标题: springboot整合swagger3和knife4j的详细过程
本文链接: https://www.lsjlt.com/news/173080.html(转载时请注明来源链接)
有问题或投稿请发送至: 邮箱/279061341@qq.com QQ/279061341
下载Word文档到电脑,方便收藏和打印~
2024-03-01
2024-03-01
2024-03-01
2024-02-29
2024-02-29
2024-02-29
2024-02-29
2024-02-29
2024-02-29
2024-02-29
回答
回答
回答
回答
回答
回答
回答
回答
回答
回答


官方手机版

微信公众号

商务合作


0